Getting Started
Welcome to Etrend - Multipurpose Responsive Magento 2 Theme!
We would like to thank you for purchasing Etrend Magento 2 Theme! We are very pleased you have chosen Etrend Magento 2 Theme for your website, you will be never disappointed! Before you get started, please be sure to always check out this documentation.
Compatible with Magento:
Etrend is fully compatible Magento Open Source 2.1.x, 2.2.x, 2.3.x, 2.4.x
Magento 2 Help:
Introduction
Etrend is fully responsive Magento 2 Theme dedicated for all stores selling clothes, furniture, watches, Jewelry, food ,etc. It has many attractive animations, modern and attractive design.
This Magento 2 theme has advanced features which will make your website becomes more professional with clean and classy layouts. It is fully responsive and looks stunning on all types of screens and devices. The Etrend Magento 2 Theme is come with many conversion boosting features. Classic design home page slider help to promote your products. Create a memorable first impression with Product Navigation. Grab your customer attention with New and Sale product labels. Make every moment shoppable with Quick Add to Cart. Responsive design helps your customer can order from any devices. Sticky Add to Cart provide hassle free shopping experience. With Etrend Magento 2 Theme convert your visitors into customers & drive more sales!
Highlighted Features
- Mobile-first Optimized
- WhatsApp Chat Bonus
- Sales Countdown Timer Hot
- Ultra-powerful Mega Menu
- Product Custom Tabs
- Product Remaining Stock Bonus
- Multi Language Support New
- Category Slider
- Banner Slider
- Sticky Add to Cart Hot
- Instagram Slider Bonus
- Newsletter Popup
- Scroll to Top
- Shipping Time Estimator Bonus
- Product Image Flip effect Hot
- Multi-Store Support
- Super High Performance
- Facebook Chat Bonus
- New & Sale Product Label Hot
- Ready Made CMS Pages
- Search Engine Optimized
- Unlimited Color Hot
- Login/Create Account Page DesignNew
- Promotion Message on Product Page
- Category Page Product Column Option
- One Click Installation Hot
- Well Documented
- Optimized for Speed
- Powerful Backend Configuration
- Dedicated Customer Support
Theme Installation
To install the theme follow the instructions below:
Prepare Installation
We recommend you to duplicate your live store on a development store and try installation on it in advance.
Backup Magento files and the store database.
Disable all cache related section that you have in your Magento.
Theme Installation
1. Download theme package from your HiddenTechies Account.
2. Copy(upload) files and folders from theme archive to your Magento 2 root directory.
3. In command line, using "cd", navigate to your Magento 2 root directory.
4. Run below commands.
- php bin/magento setup:upgrade
- php bin/magento setup:static-content:deploy -f
5. Clear/Flush the cache.
6. Now navigate to "Etrend Theme > Configuration > Theme" and expand "Installation" tab.
7. Your theme is now installed and ready for work.
Theme Enable/Activate
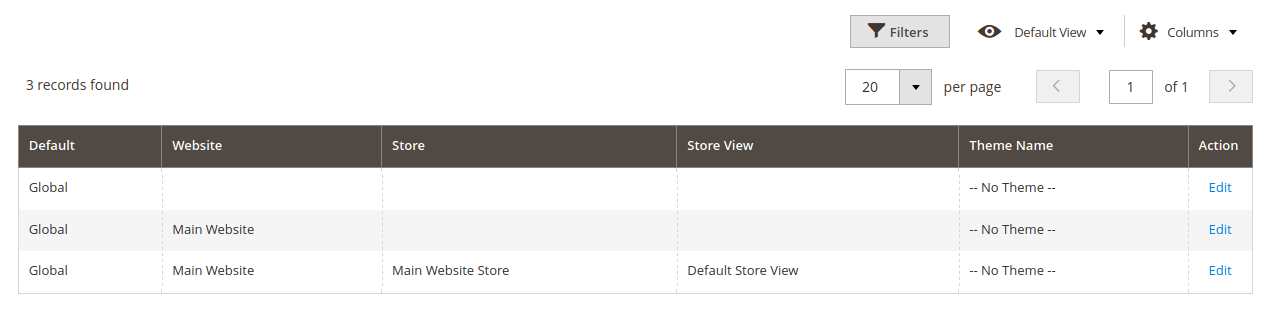
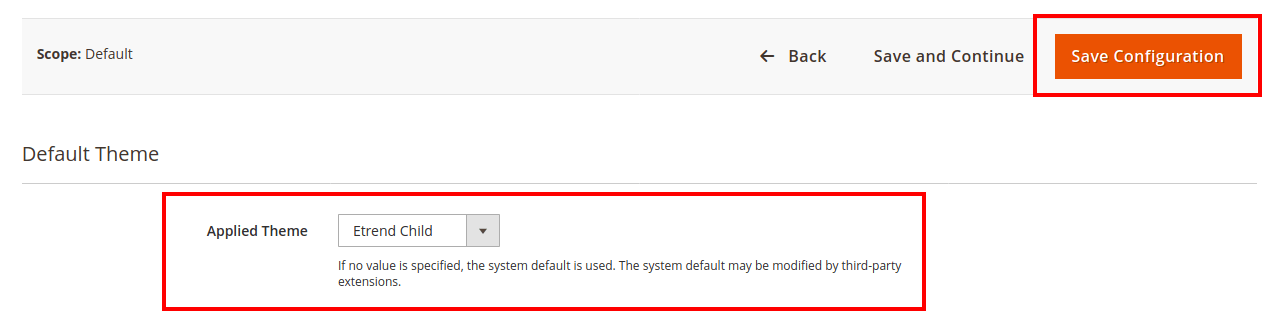
Navigate to "Content > Design > Configuration".
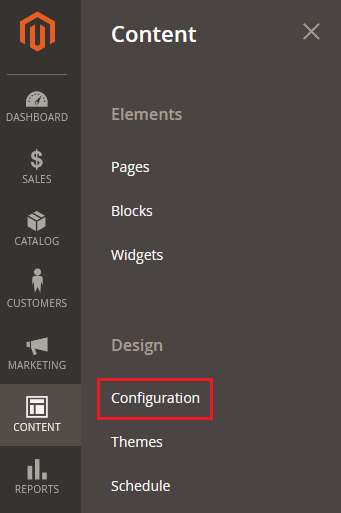
Step 1. Edit the store in which you want to set the theme.
Step 2. Select "Etrend" theme in "Applied Theme" drop-down and click on Save Configuration button.

Step 3. Clear/Flush the cache.
Demo Installation
Etrend theme provides very easy one click demo installation.
In order to do demo installation, first you should import CMS Pages, CMS Static Blocks and Demo Slider data.
To Import CMS Page, Static Blocks and Demo Slider data follow the steps.
Step 1: Now go to "Etrend Theme > Configuration > Theme" and expand "Installation" tab.
Step 2: If you want to import page and blocks for specific demo then select the "Demo Version" or select "All" to install all page and blocks.

After selecting Demo Version, click on Save Config button.
Step 3: If you want to override existing CMS Pages and Static Blocks, then select "Yes" for "Overwrite Existing Blocks" and "Overwrite Existing Pages".
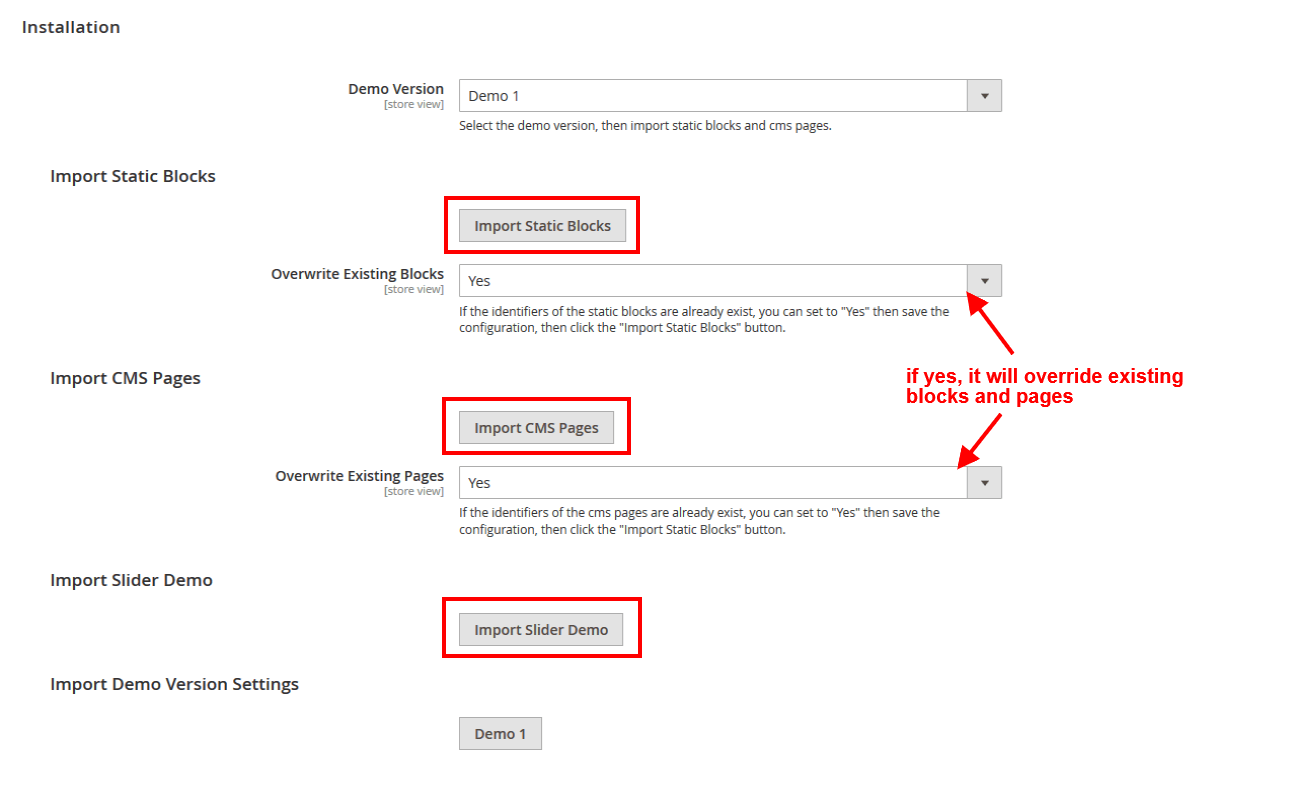
Now click on Save Config button.
Step 4:
Click Import Static Blocks to import all Static Blocks.
Click Import CMS Pages to import all CMS Pages.
Click Import Slider Demo to import Demo Slider data.
Step 5: Click Demo X button to install demo version that you prefer to install.

Clear/Flush the cache.
Please Note:
After demo import do not save the config. First flush the cache.
Create Child Theme
If you need to customize the theme, we recommend you to create the child theme.
How To Create A Child Theme?

Below steps define how to create a Magento 2 child theme.
For Etrend Theme
Vendor name: ET
Parent Theme name: base
Step 1: Create child theme folder named as {parent-theme-name}_child in the below folder path.
"app/design/frontend/{theme-vendor-name}/{parent-theme-name}_child"
Ex: Magento root folder/app/design/frontend/ET/base_child
Step 2: Create file theme.xml inside the child theme.
    <theme xmlns:xsi="https://www.w3.org/2001/XMLSchema-instance" xsi:noNamespaceSchemaLocation="urn:magento:framework:Config/etc/theme.xsd">
        <title>Etrend Child</title>
        <parent>ET/base</parent>
        <media>
            <preview_image>media/preview.jpg</preview_image>
        </media>
    </theme>
Step 3: Create a registration.php file for registering your child theme.
    <?php

    \Magento\Framework\Component\ComponentRegistrar::register(
        \Magento\Framework\Component\ComponentRegistrar::THEME,
        'frontend/ET/base_child',
        __DIR__
    );
Step 4: Create composer.json.
    {
        "name": "et/theme-frontend-base-child",
        "description": "N/A",
        "config": {
            "sort-packages": true
        },
        "require": {
            "php": "~7.1.3||~7.2.0||~7.3.0",
            "magento/framework": "102.0.*",
            "magento/theme-frontend-blank": "100.3.*"
        },
        "type": "magento2-theme",
        "license": [
            "OSL-3.0",
            "AFL-3.0"
        ],
        "autoload": {
            "files": [
                "registration.php"
            ]
        },
        "version": "100.3.5"
    }
Step 5:
Add preview.jpg in "app/design/frontend/ET/base_child/media" folder.
Add view.xml in "app/design/frontend/ET/base_child/etc" folder.
You can copy both file and image from parent theme.
How To Use A Child Theme?
Navigate to "Content > Design > Configuration".
Step 1. Edit the store in which you want to set the theme.
Step 2. Select "Etrend Child" theme in "Applied Theme" drop-down and click on Save Configuration button.
Step 3. Clear/Flush the cache.
Theme Update
Follow the steps.
Step 1: Take the existing files and database backup. (Recommended)
Step 2: Download the latest theme files from your HiddenTechies Account.
Step 3: Upload and override theme/extension files over existing theme files.
Step 4. Run below commands.
- php bin/magento setup:upgrade
- php bin/magento setup:static-content:deploy -f
Step 5. Clear/Flush the cache.
Theme configuration
Navigate to "Etrend Theme > Configuration > Theme".
Theme Layout

Boxed/Wide: You can choose boxed or fullwidth layout of entire store.
Maximum Page Width: You can choose your preferable max-width from two possible options. 1170px and 1280px.
You can also set background color or image for boxed layout.

Google Font Family

Etrend theme provide list of Google Fonts. You can set any fonts suits on your store.
Cookie Policy
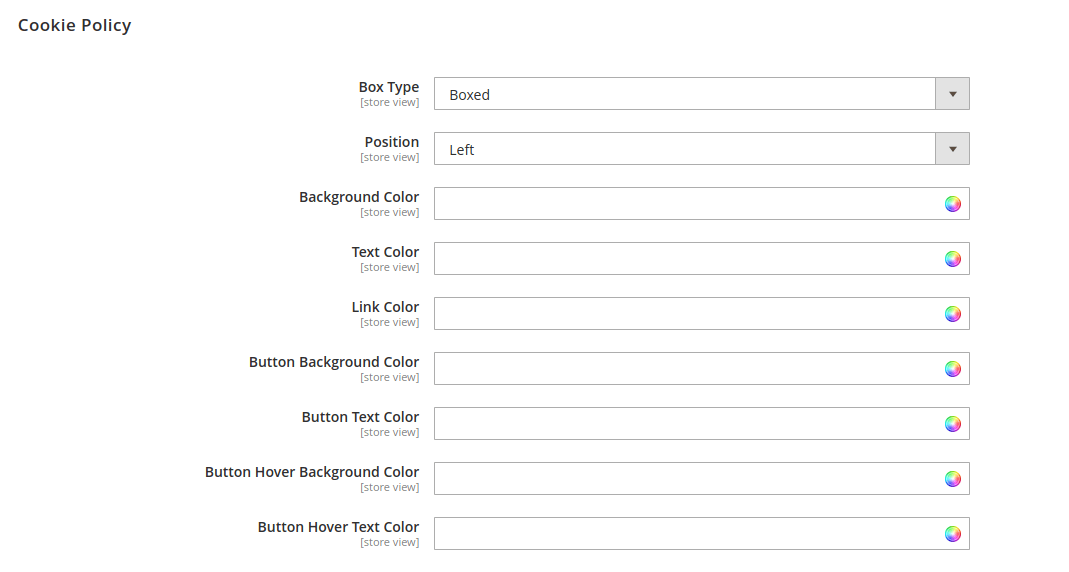
Box Type: Etrend theme provide options to set fullwidth and boxed layout for "Accept Cookie Policy" box.
Position: If you select "Boxed" type then you can set its position left or right side.
Etrend theme also provides options to set box background color, text color etc.
Page Messages

Etrend provides options to change the style of page messages. If you enable this option then, the page messages will display at top left corner and with fixed position.
Set option "All Pages" to apply this message style for all pages. If you want to change for Home page only then use option "Only on Home page". Or you can disable this feature to to display messages in Magento's default style.
Scroll To Top

Enable/Disable scroll to top button.
Add This (Socials)

Enable/Disable "Add This" socials.
You will get pub id from https://www.addthis.com
Customization
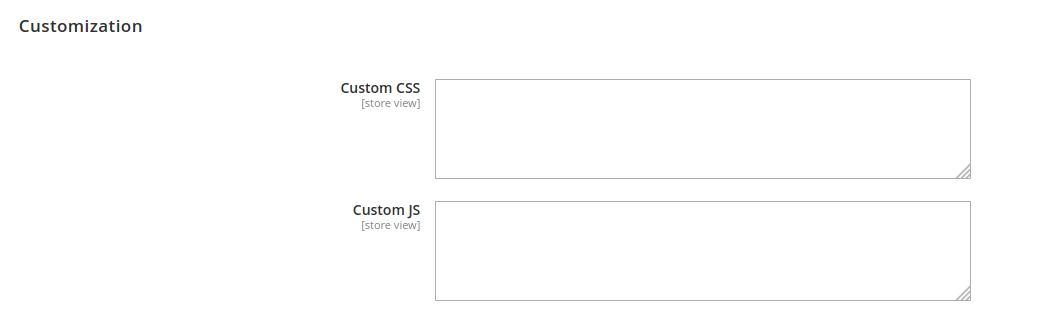
You can add your own CSS styles and scripts without touching theme files.
Homepage Configuration
How to set Home Page ?
Step 1: Navigate to "Admin > Store > Configuration > General > Web" and expand "Default Pages" tab.
Step 2: Choose the page in "CMS Home Page" field.
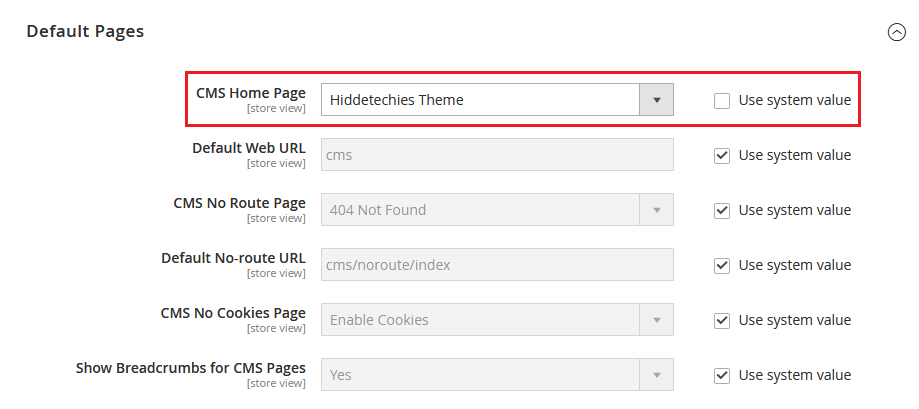
Step 3: Click on Save Config button.
Step 4: Clear/Flush the cache.
How to add Banner Slider on Home Page ?
Please Note:
Learn How to add new slide/banner ?Click here
Follow the steps.
Step 1: Navigate to "Content > Elements > Pages".
Step 2: Edit CMS page that is set as home page.
Step 3: Click on Insert Widget... button and select "Banner Slider" from "Widget Type" drop-down.
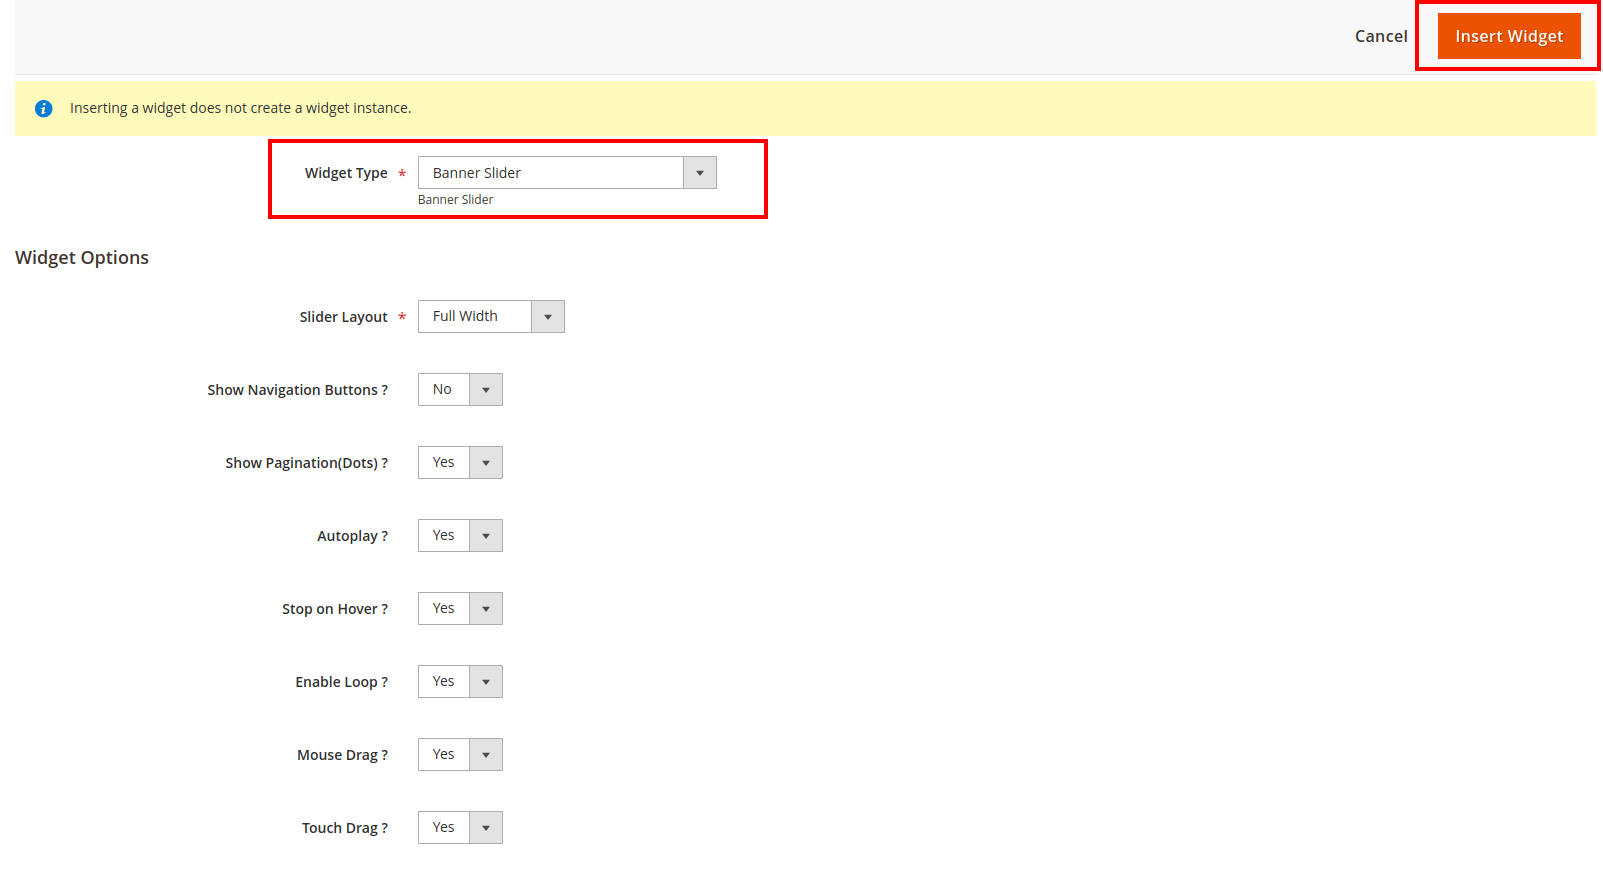
Here you can set layout (Full Width or Boxed Width) and other slider options.
Step 4: After done with options, click on Insert Widget button to add widget in page.
Step 5: Save the page and clear/flush the cache.
Frontend:

Home Page Services
To add "Home Services" block, use below code into the cms content field.
{{widget type="Magento\Cms\Block\Widget\Block" template="widget/static_block/default.phtml" block_id="et_home_services"}}
To edit this block, navigate to "Admin > Content > Elements > Blocks and edit "Home Services".
Frontend:

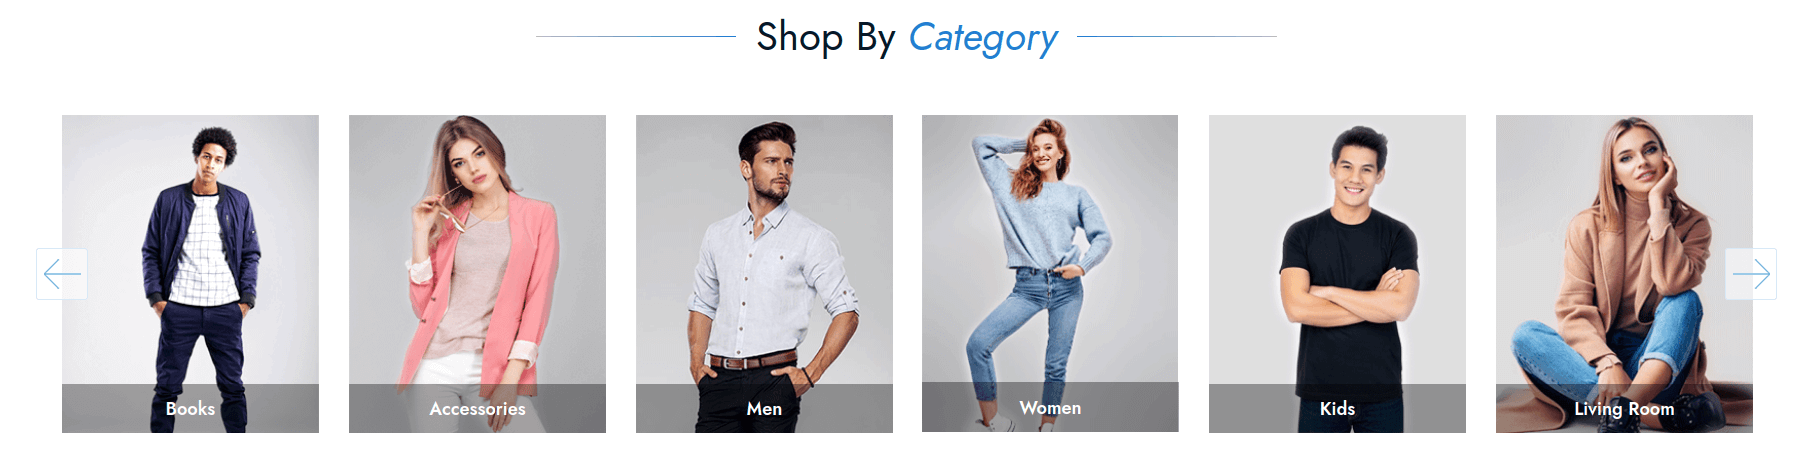
How to add "Shop By Category" block on Home Page?
Step 1: Go to edit CMS home page.
Step 2: Click on Insert Widget... button and select "Category Widget" from "Widget Type" drop-down.
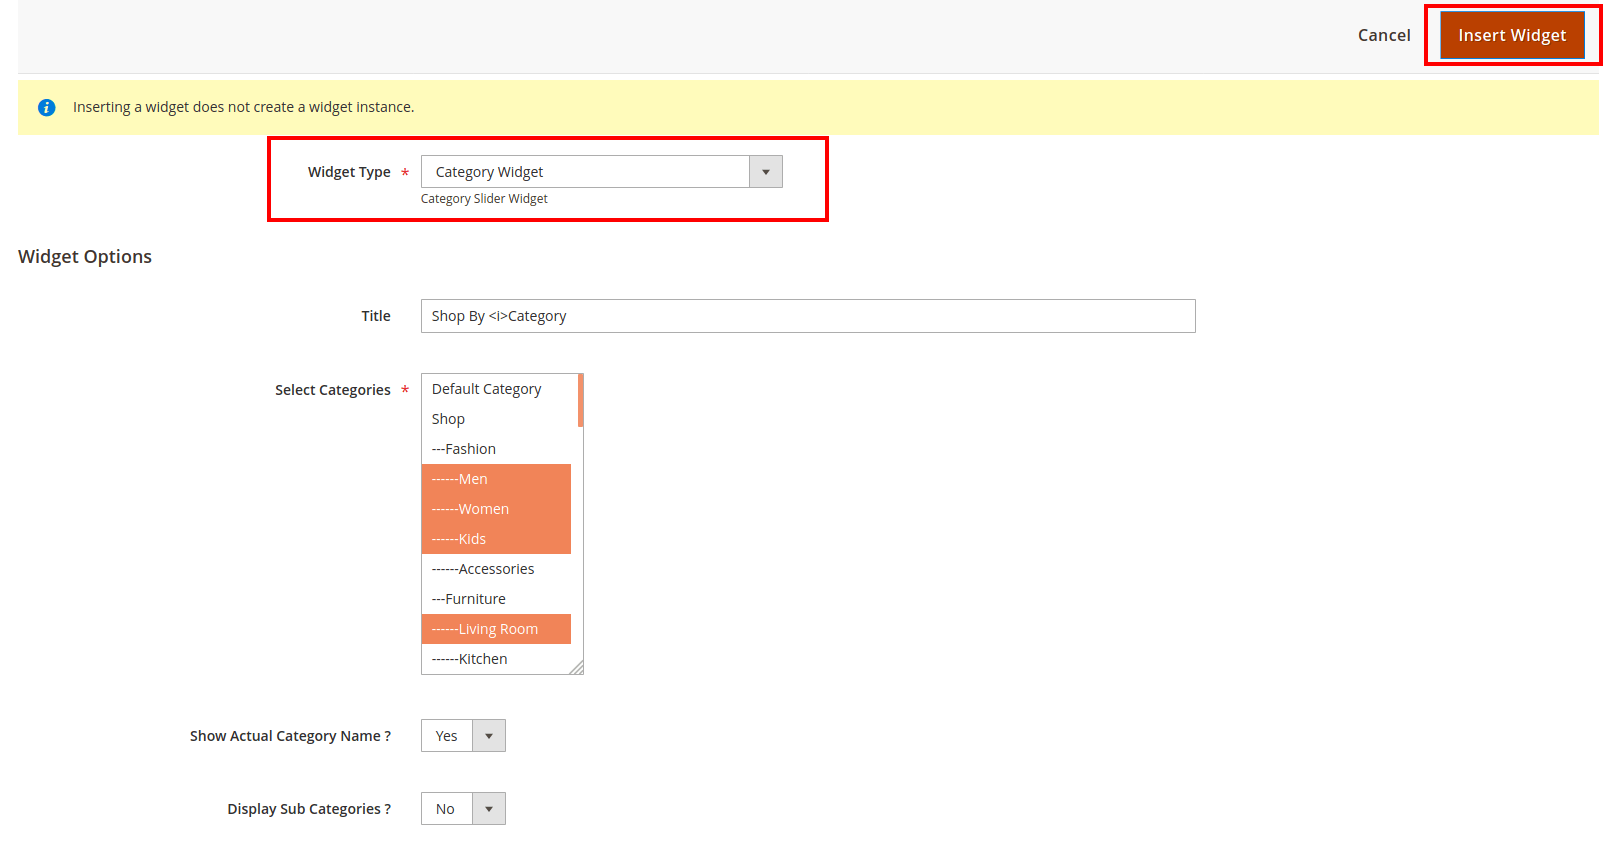
Select the categories and set all required options then, click on Insert Widget button to add widget in page.
Step 5: Save the page and clear/flush the cache.
Frontend:
Promotion Block
To add "Promotion Block One" block, use below code into the cms content field.
{{widget type="Magento\Cms\Block\Widget\Block" template="widget/static_block/default.phtml" block_id="et_promotion_one"}}
To edit this block, navigate to "Admin > Content > Elements > Blocks and edit "Promotion Block One".
Frontend:

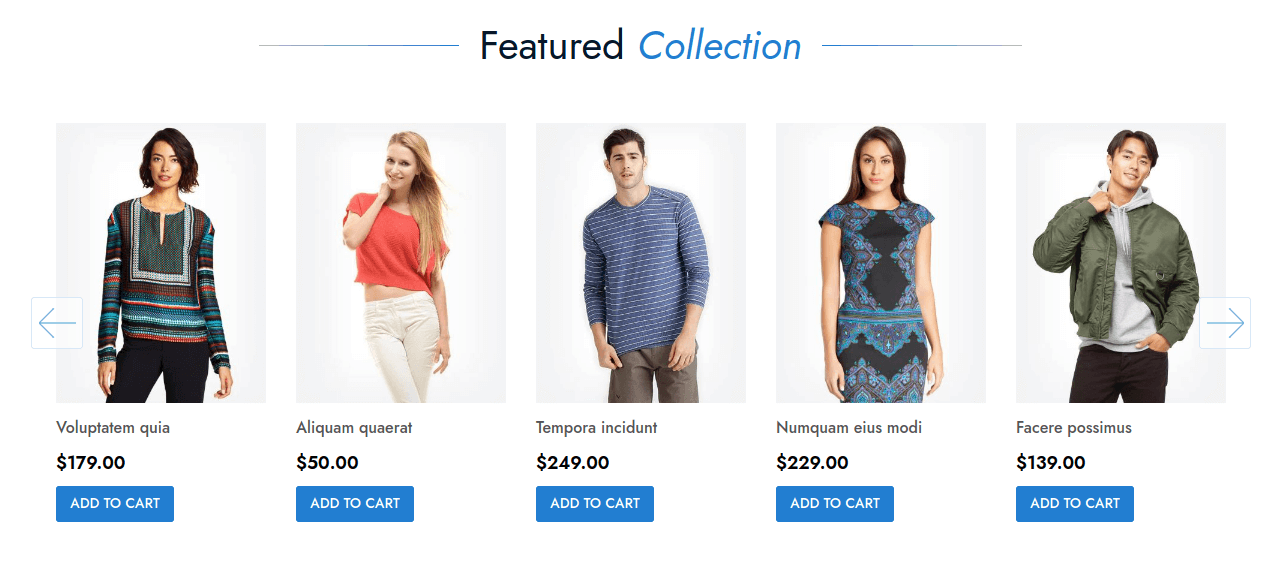
How to add "Featured Collection" Block on Home Page?
Step 1: Go to edit CMS home page.
Step 2: Click on Insert Widget... button and select "Catalog Products List" from "Widget Type" drop-down.
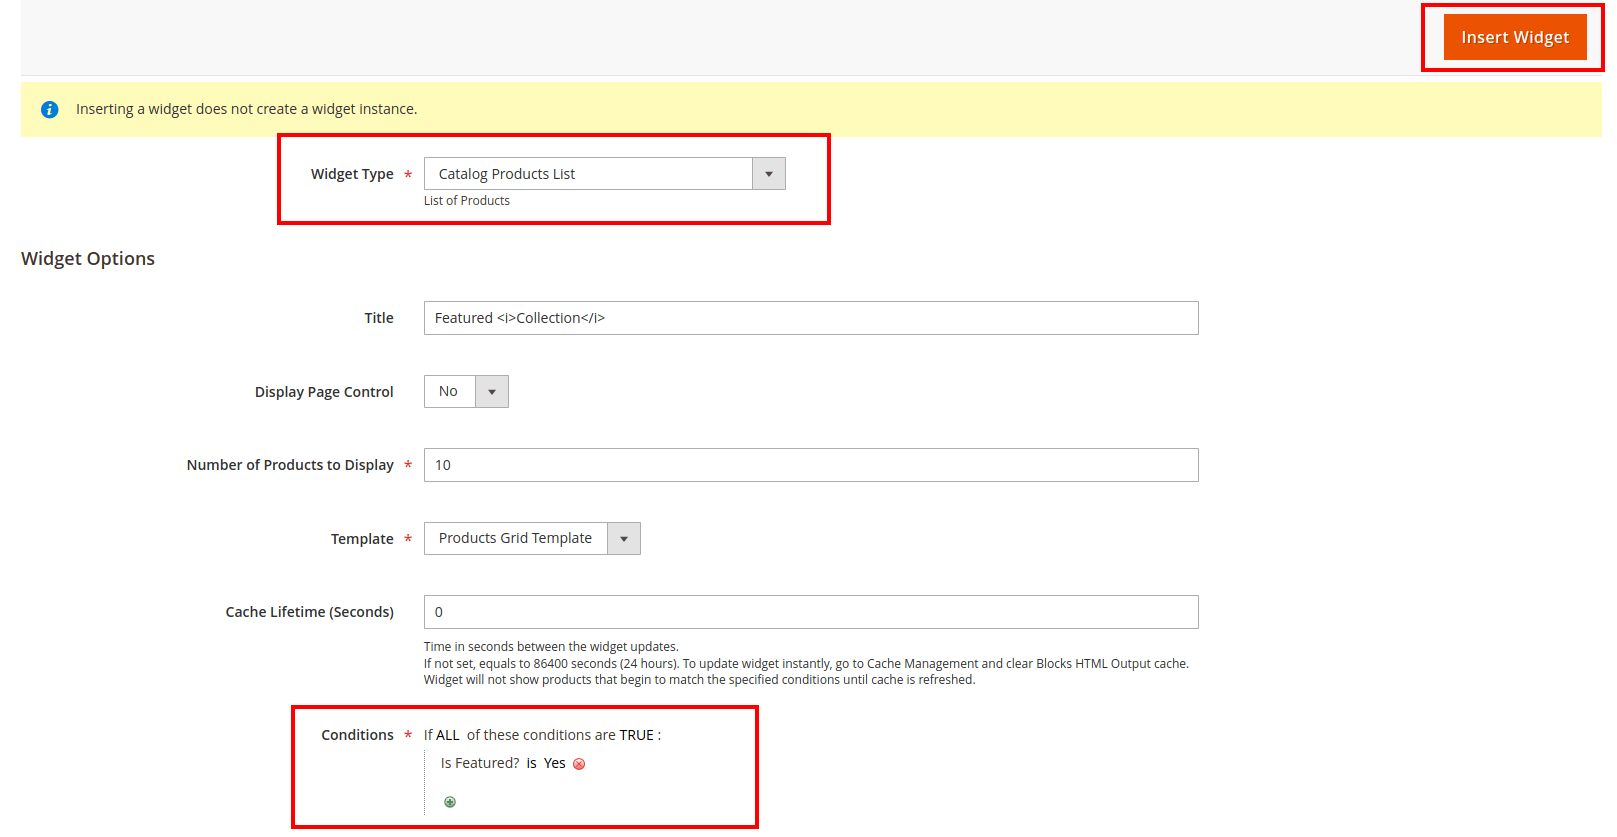
Step 3: Set widget options.
Title: Add title.
Number of Products to Display: Add how many products you want to display in widget.
Conditions: Select "Is Featured" to "Yes".
Please Note:
You need to select "Is Featured" attribute "Yes" in the products.
After done with options, click on Insert Widget button to add widget in page.
Step 5: Save the page and clear/flush the cache.
OR
You can use below code into the cms content field like below.
{{widget type="Magento\CatalogWidget\Block\Product\ProductsList" title="Featured <i>Collection</i>" show_pager="0" products_count="10" template="Magento_CatalogWidget::product/widget/content/grid.phtml" cache_lifetime="0" conditions_encoded="^[`1`:^[`type`:`Magento||CatalogWidget||Model||Rule||Condition||Combine`,`aggregator`:`all`,`value`:`1`,`new_child`:``^],`1--1`:^[`type`:`Magento||CatalogWidget||Model||Rule||Condition||Product`,`attribute`:`is_featured`,`operator`:`==`,`value`:`1`^]^]"}}
Frontend:
Fullwidth Promotion Block
To add "Promotion Block One" block, use below code into the cms content field.
{{widget type="Magento\Cms\Block\Widget\Block" template="widget/static_block/default.phtml" block_id="et_promotion_two"}}
To edit this block, navigate to "Admin > Content > Elements > Blocks and edit "Promotion Block Two".
Frontend:

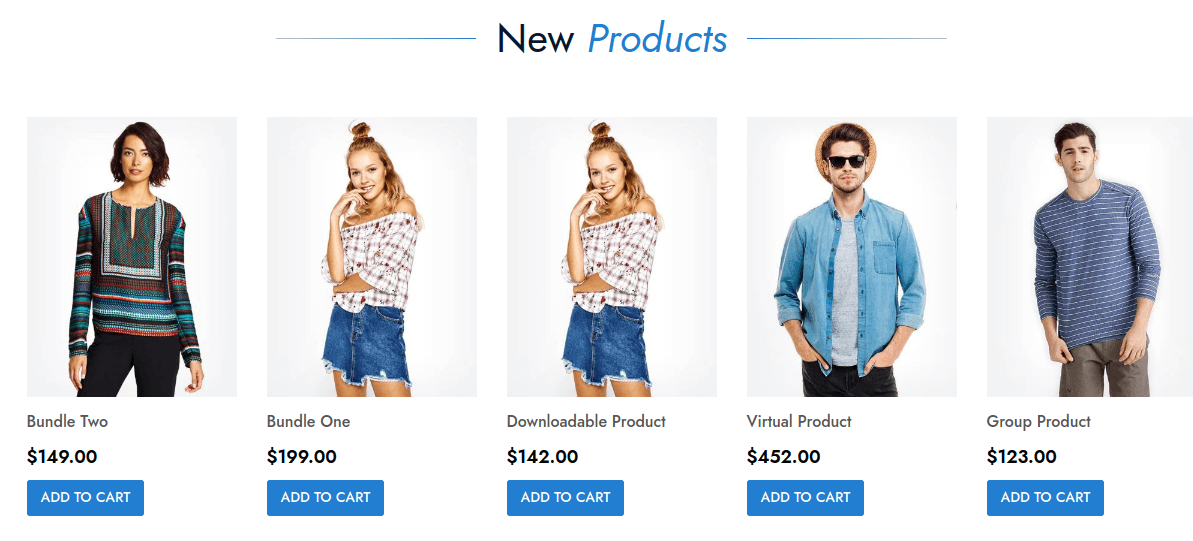
How to add "New Products" Block on Home Page?
Step 1: Go to edit CMS home page.
Step 2: Click on Insert Widget... button and select "Catalog New Products List" from "Widget Type" drop-down.
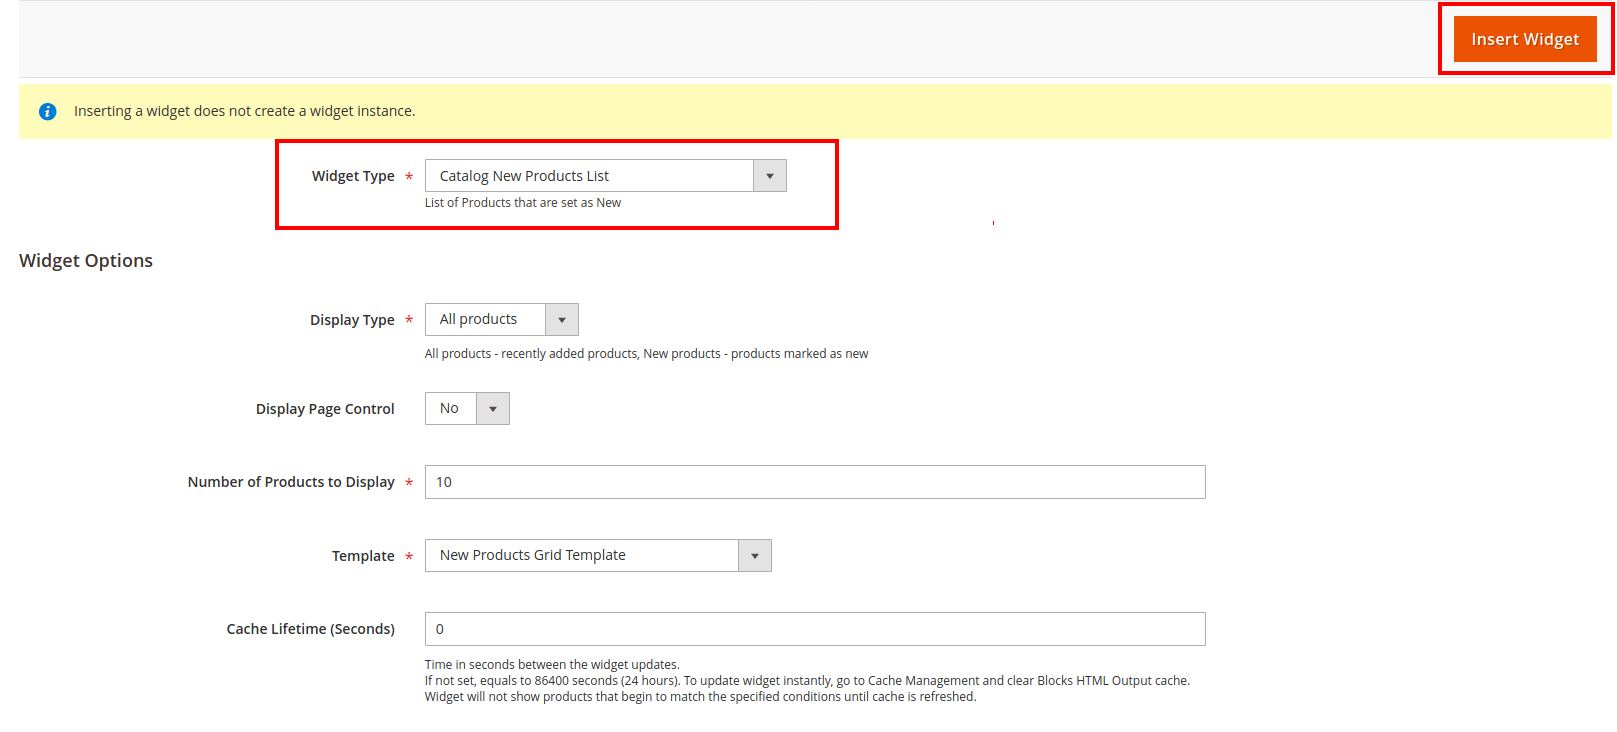
Step 3: Set options and click on Insert Widget button to add widget in page.
Step 4: Save the page and clear/flush the cache.
OR
You can use below code into the cms content field like below.
{{widget type="Magento\Catalog\Block\Product\Widget\NewWidget" display_type="all_products" show_pager="0" products_count="10" template="product/widget/new/content/new_grid.phtml" cache_lifetime="0"}}
Frontend:
How to add "Client Reviews (Testimonials)" Block on Home Page?
Please Note:
Learn How to add client reviews ? Click here
Step 1: Go to edit CMS home page.
Step 2: Click on Insert Widget... button and select "Client Reviews" from "Widget Type" drop-down.
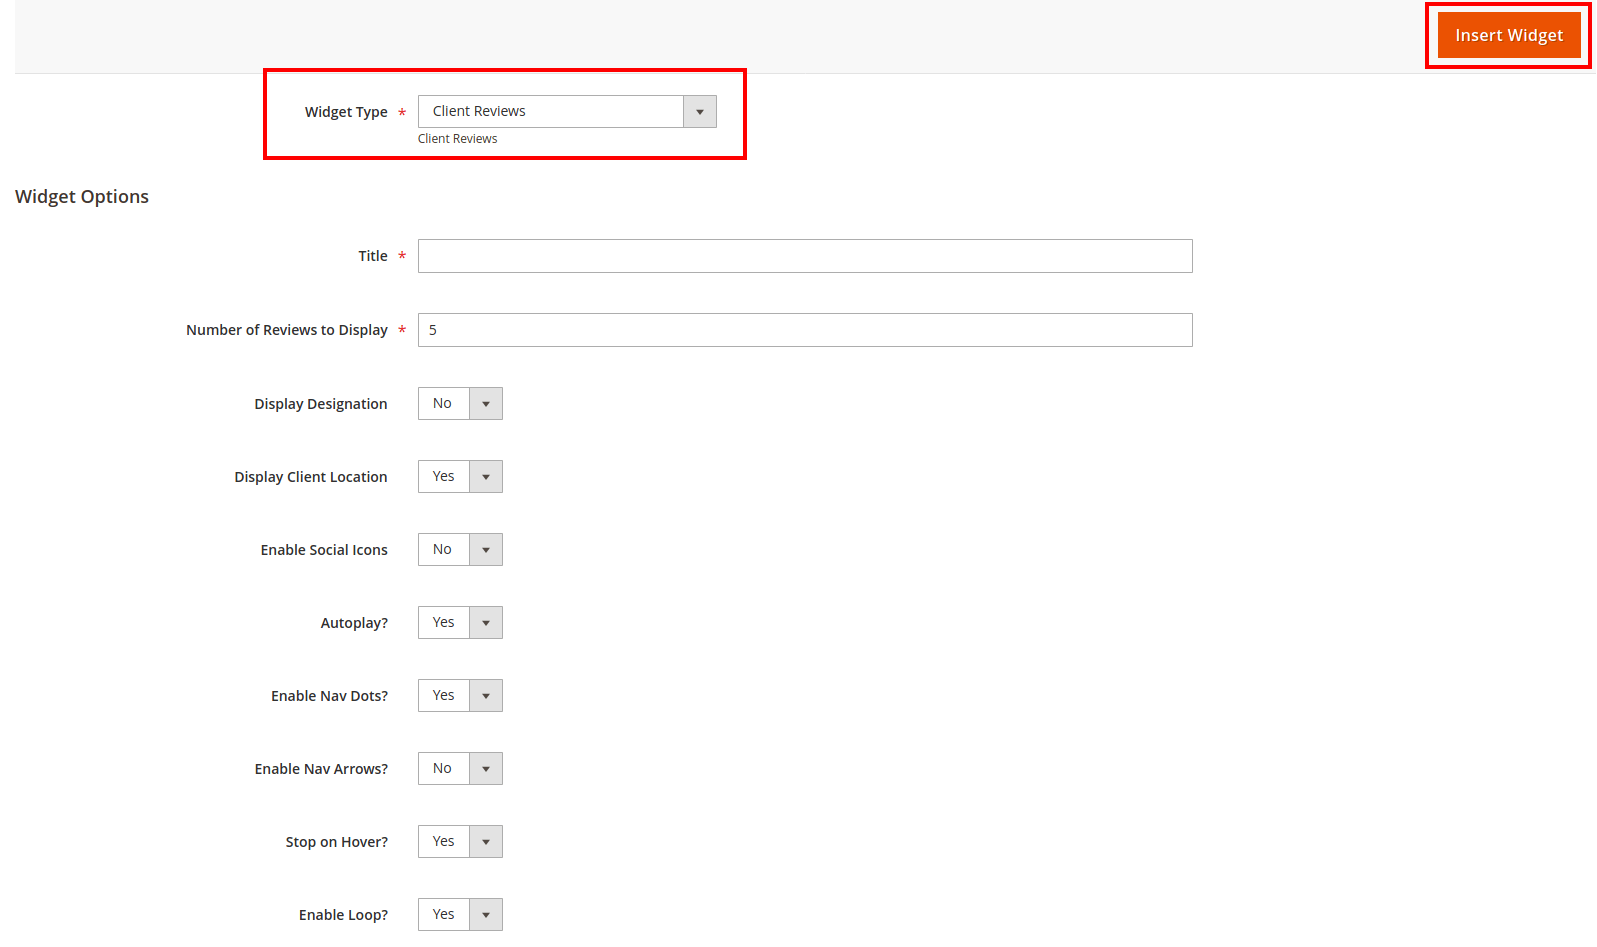
Set all required options then, click on Insert Widget button to add widget in page.
Step 5: Save the page and clear/flush the cache.
Frontend:

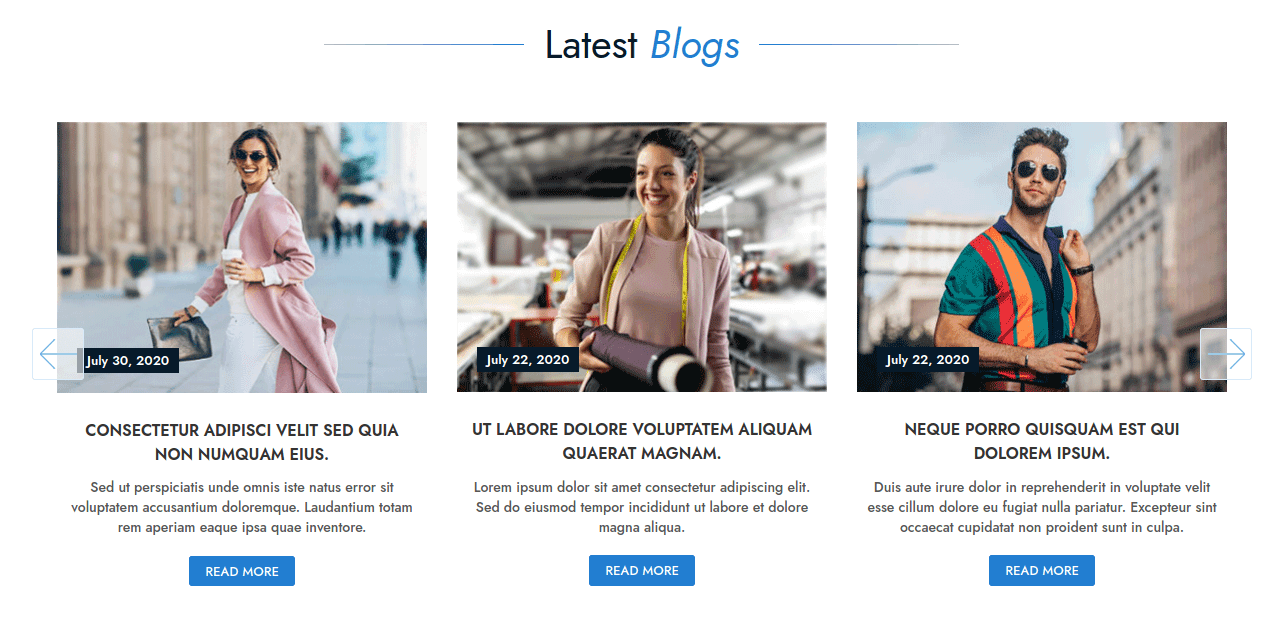
Latest Blogs
Etrend provides two types of blog section.
1. Static (static content in CMS Block)
To add "Home Blogs" block, use below code into the cms content field.
{{widget type="Magento\Cms\Block\Widget\Block" template="widget/static_block/default.phtml" block_id="et_home_blogs"}}
To edit this block, navigate to "Admin > Content > Elements > Blocks and edit "Home Blogs".
2. Using Magefan Blog Extension
Etrend theme provides support for magefan blog extension.
If you have installed this extension then use below code into the cms content field.
{{widget type="Magefan\Blog\Block\Widget\Recent" title="Latest <i>Blogs</i>" number_of_posts="5" category_id="0" tag_id="0" author_id="0"}}
Frontend:
Shop By Brand
To add "Home Brand Slider" block, use below code into the cms content field.
{{widget type="Magento\Cms\Block\Widget\Block" template="widget/static_block/default.phtml" block_id="et_brand_slider"}}
To edit this block, navigate to "Admin > Content > Elements > Blocks and edit "Home Brand Slider".
Frontend:

Header & Menu Configuration
Header General Settings
Navigate to "Etrend Theme > Configuration > Header" and expand "General" tab.
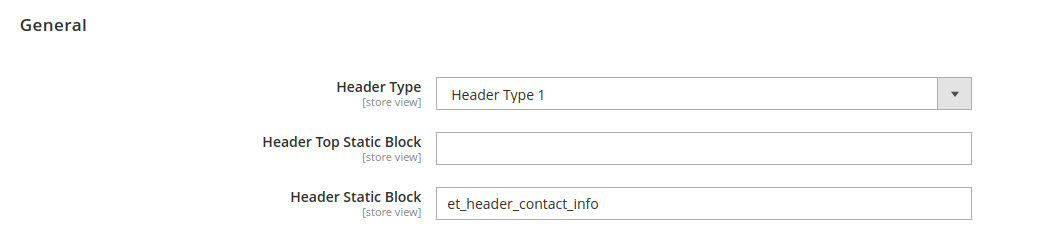
Header Type: Set/Change header type.
Header Top Static Block: Add static block identifier to display static content at header top.
Header Static Block: Add static block identifier to display static content in header. Ex. Right now its using to display contact information in header.
Please Note:
This config option is only for header type 1,4 and 5
How to add or change Logo?
Navigate to "Content > Design > Configuration". Go to edit your theme and expand "Header" tab.
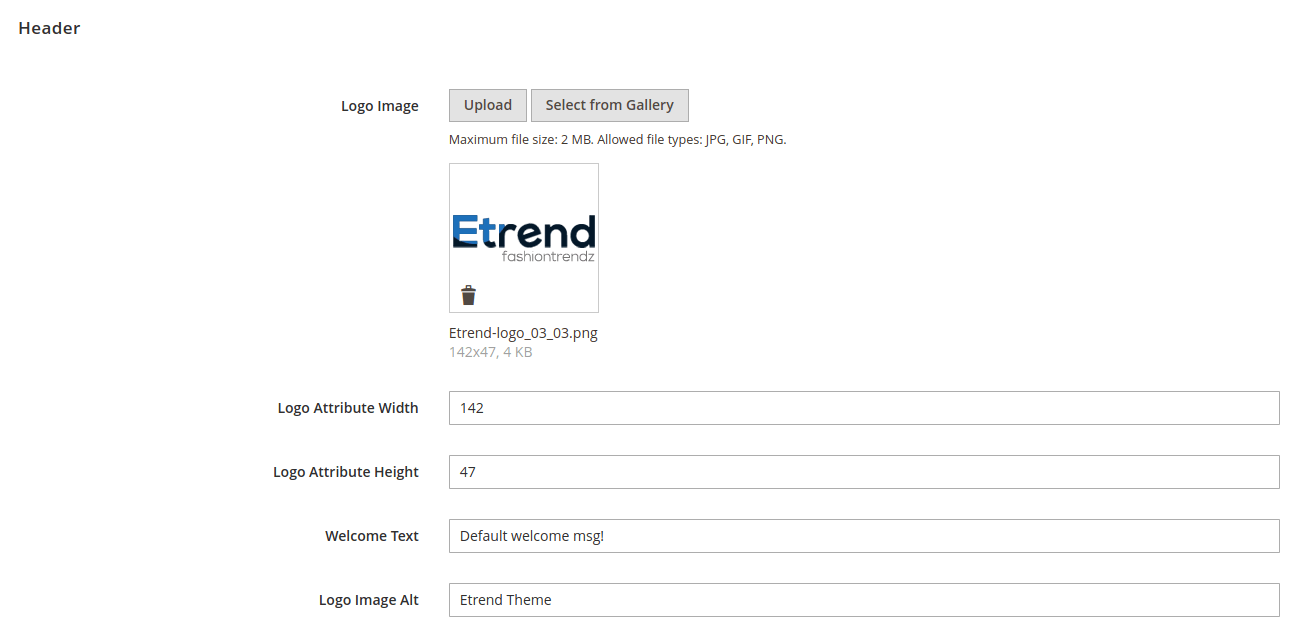
Logo Image: Upload your logo.
Logo Attribute Width: Add logo width.
Please Note:
Recommended width for logo for best view: Not more than 150px
Logo Attribute Height: Add logo height.
Please Note:
Recommended height for logo for best view: Not more than 50px
Welcome Text: Welcome texts in header.
Logo Image Alt: Logo Alt texts. It will display if in case logo image is not found.
After done with all settings, click on Save Configuration button.
How to add or change Favicon?
Navigate to "Content > Design > Configuration". Go to edit your theme and expand "HTML Head" tab.
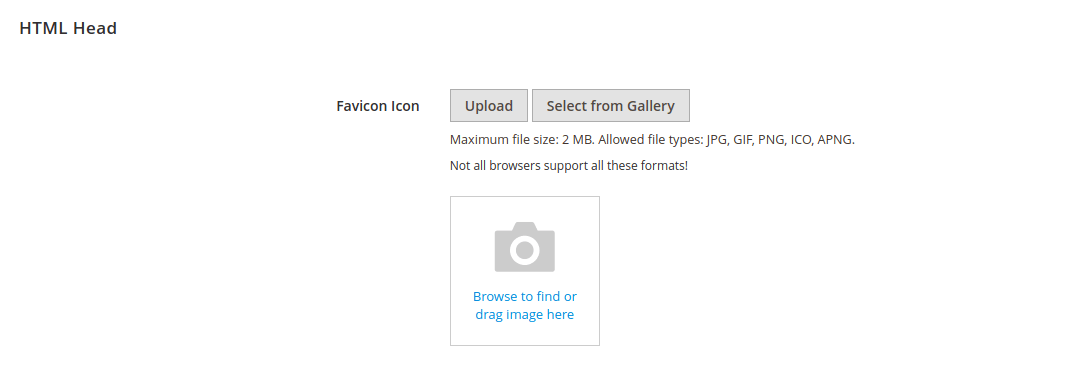
Favicon Icon: Upload your favicon icon with one of below file types.
Maximum file size: 2 MB. Allowed file types: JPG, GIF, PNG, ICO, APNG.
After uploading favicon, Click on Save Configuration button.
How to enable and display icons for store view drop-down labels ?
Navigate to "Etrend Theme > Configuration > Header" and expand "General" tab.
Set "Yes" in "Display Language Icons Before Label" field and save config.
Now upload language icon at below location.
"{magento-root}/pub/media/language/"
Image name format: {store-view-code}.png
Image Size: 20px x 12px.
Megamenu General Settings
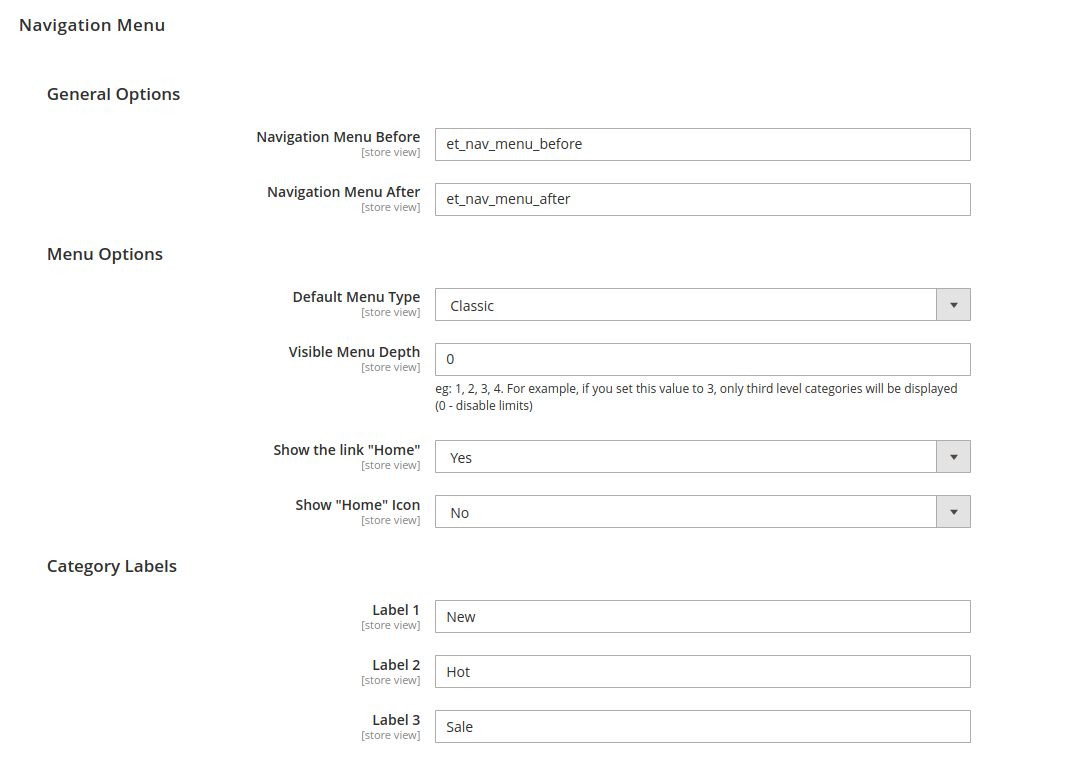
Etrend Megamenu provides options to add extra menu using CMS static block.
Navigation Menu Before: Adds menu before all categories. Check "Navigation Menu Before Links" CMS block.
Navigation Menu After: Adds menu after all categories. Check "Navigation Menu After Links" CMS block.
Default Menu Type: Set the default menu drop-down style. Ex. Classic, Full Width and Static Width
Visible Menu Depth: Set menu display depth. Ex. If you want to display only first level menu then add 1.
Show the link "Home": Set "Yes" to display Home link in menu.
Show "Home" Icon: Set "Yes" to upload icon for Home link.
Category Labels
Etrend Megamenu provides options to add three pre-defined labels for categories. You can use these labels from category edit page menu settings.
How to add a menu item that has full-width mega menu?
Follow the steps
Step 1: Navigate to "Catalog > Categories".
Step 1: Now select the 1st level category for which you want to display full-width mega-menu, and expand the "Mega Menu" tab.
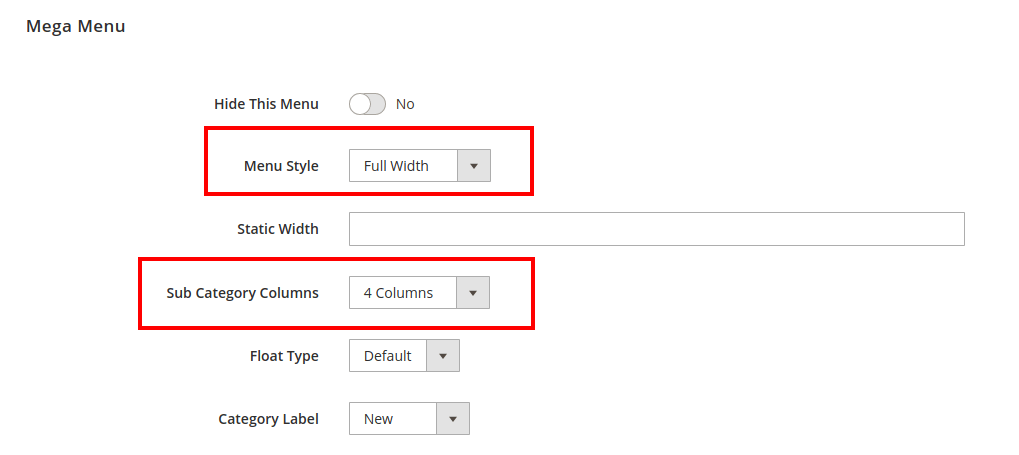
Step 3:
Set "Full Width" in "Menu Style" Field.
Set the "Sub Category Columns" to display number of sub category columns in downdown. For ex, 5 Columns.
Step 3: Save Category Settings. Click on Save button.
Step 4: Clear/Flush the cache.
How to add a menu item that has static-width mega menu?
Follow the steps
Step 1: Navigate to "Catalog > Categories".
Step 1: Now select the 1st level category for which you want to display static width mega-menu, and expand the "Mega Menu" tab.
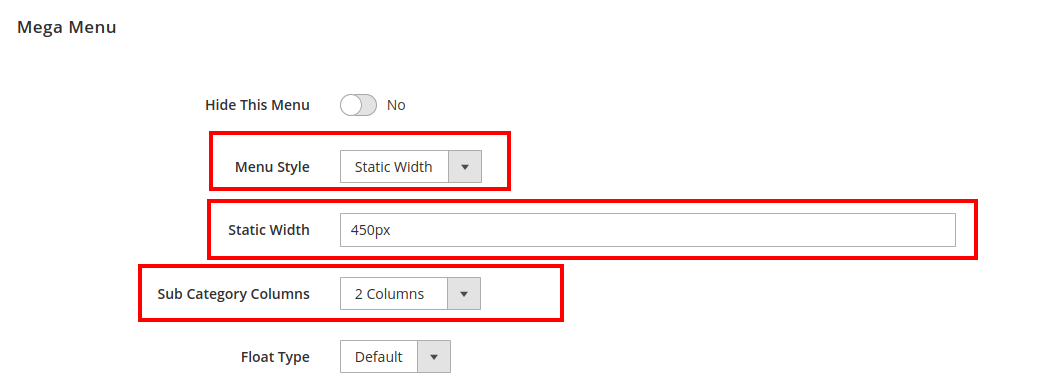
Step 3:
Set "Static Width" in "Menu Style" Field.
Set "Static Width" for the static width mega menu as your requirement. For ex, 450px.
Set the "Sub Category Columns" to display number of sub category columns in downdown. For ex, 2 Columns.
Step 3: Save Category Settings. Click on Save button.
Step 4: Clear/Flush the cache.
How to add a menu item that has classic dropdown menu?
Follow the steps
Step 1: Navigate to "Catalog > Categories".
Step 1: Now select the 1st level category for which you want to display classic mega-menu, and expand the "Mega Menu" tab.

Step 3:
Set "Classic" in "Menu Style" Field.
Step 3: Save Category Settings. Click on Save button.
Step 4: Clear/Flush the cache.
How to add static content or image in mega menu?
Etrend theme mega-menu provides an options to add the custom content like text or images in menu down-down menu. The possible options are Header Block, Left Block, Right Block and Footer Block of the link's columns.
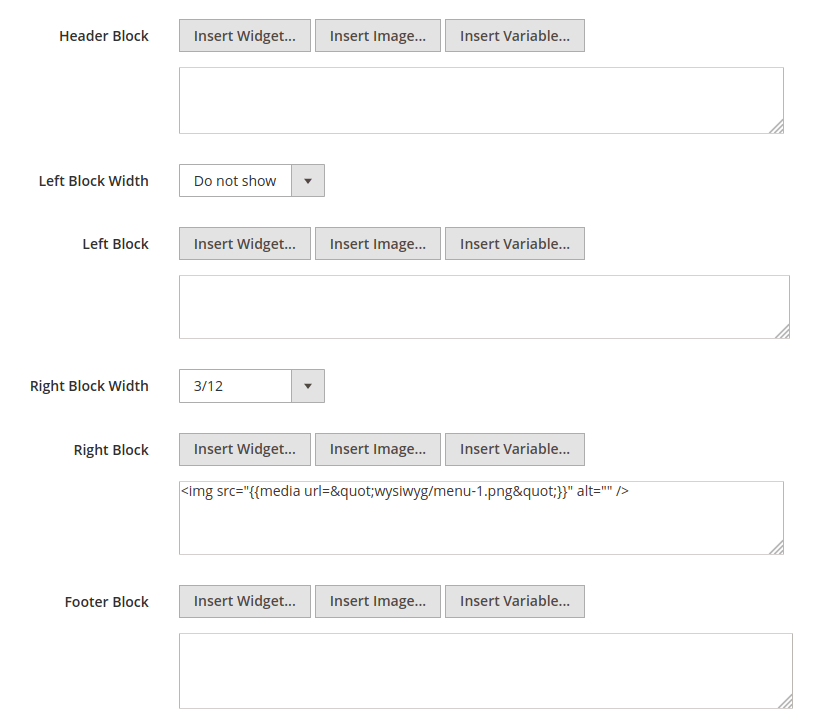
You can set with for Left and Right blocks. Set Block Width that you prefer to add image or custom content as right/left of the columns. For example, set 4/12 (means it will take 4 columns area from 12 columns).
How to set menu label as Hot, New, Sale ?
Step 1: Navigate to "Catalog > Categories".
Step 2: Edit the category in which you want to display/add label, and expand "Mega Menu" tab.
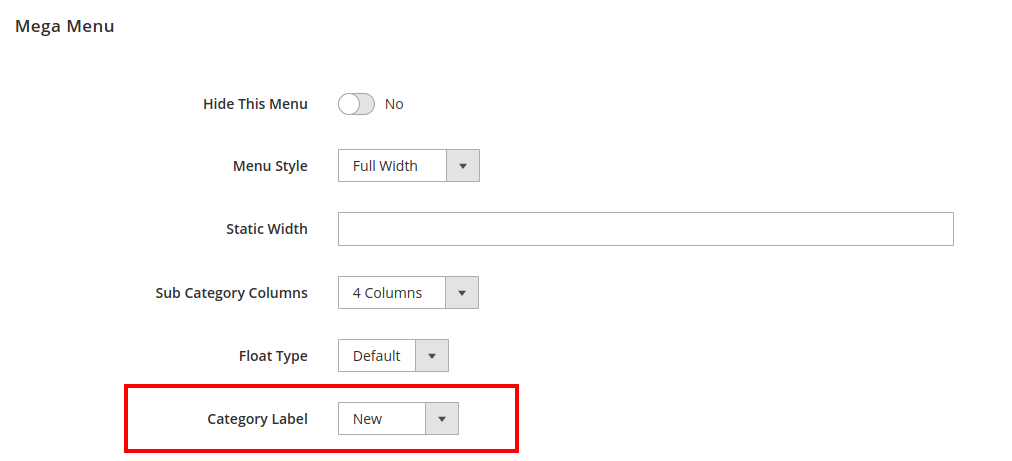
Step 3: Set label (Hot, New, Sale) in "Category Label" field.
Step 3: Save Category Settings. Click on Save button.
Step 4: Clear/Flush the cache.
Footer Configuration
Navigate to "Etrend Theme > Configuration > Footer" and expand "General" tab.

Etrend theme provides five different footer layouts. You can set any footer design you like.
Footer Top

Enable: Enable/Disable footer top section.
Footer Top Static Block: Set static block identifier to display content in footer top.
Etrend theme provides three pre-defined static blocks for footer top as below.
1. Footer Top Newsletter
Identifier: et_footer_top_newsletter

2. Footer Top Newsletter Two
Identifier: et_footer_top_newsletter_two

3. Footer Top Newsletter With Logo
Identifier: et_footer_top_newsletter_logo

Footer Middle
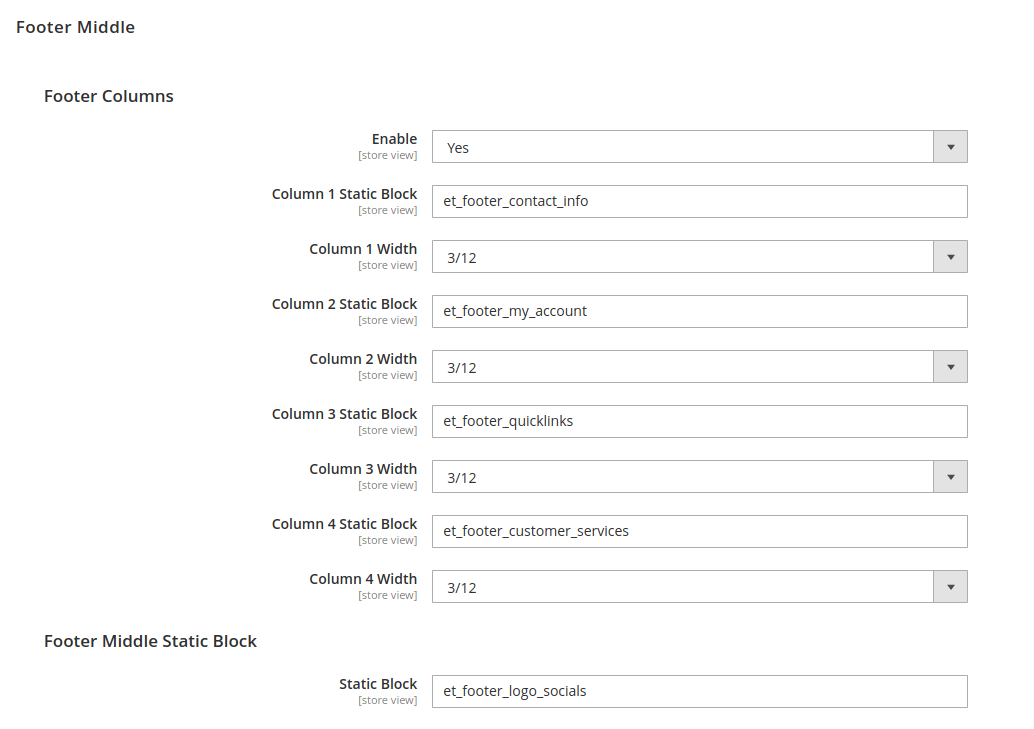
For each footer column, there are three settings as below.
Enable: Enable/Disable Column.
Column (x) Static Block: Set static block identifier to display content in footer column.
Column (x) Width: Set column width.
Etrend theme provides eight pre-defined static blocks for footer column as below.
1. Footer Get in Touch
Identifier: et_footer_contact_info
2. Footer My Account
Identifier: et_footer_my_account
3. Footer Quick Links
Identifier: et_footer_quicklinks
4. Footer Customer Services
Identifier: et_footer_customer_services
5. Footer Column Newsletter
Identifier: et_footer_column_newsletter
6. Footer Company
Identifier: et_footer_company
7. Footer Instagram Images
Identifier: et_footer_instagram_images
8. Footer Instagram Widget
Identifier: et_footer_instagram_widget
Footer Middle Static Block
"Footer Middle Static Block" is used to display static content above/below footer columns as per footer type.
Etrend theme provides three pre-defined static blocks for footer middle content as below.
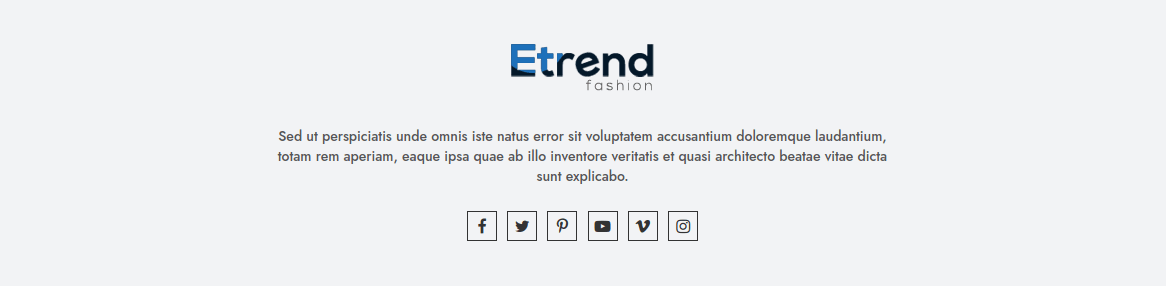
1. Footer Logo and Socials Content
Identifier: et_footer_logo_socials
2. Footer Links and Socials Content
Identifier: et_footer_links_socials

3. Footer Contact Info and Socials
Identifier: et_footer_contact_and_socials

Footer Bottom
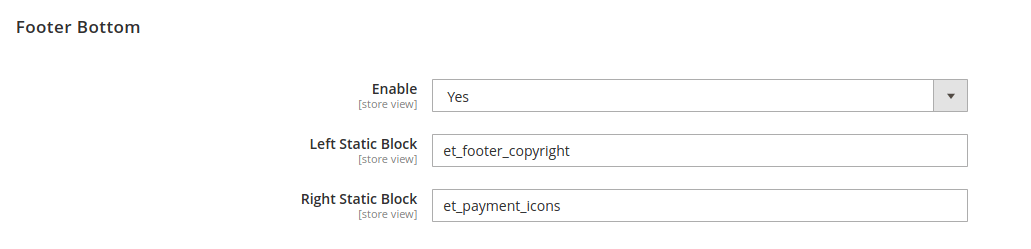
Enable: Enable/Disable footer bottom section.
Left Static Block: Set static block identifier to display content in footer bottom left.
Right Static Block: Set static block identifier to display content in footer bottom right.
Etrend theme provides five pre-defined static blocks for footer bottom as below.
1. Footer Copyright Text
Identifier: et_footer_copyright
2. Payment Icons
Identifier: et_payment_icons
3. Footer Logo and Copyright Text
Identifier: et_footer_logo_copyright
4. Footer Logo and Copyright Text Two
Identifier: et_footer_logo_copyright_two
5. Footer Socials, Payment Icons and Extra Links Block
Identifier: et_footer_socials_payment_links
Category Page
Navigate to "Etrend Theme > Configuration > Product List".
General Settings
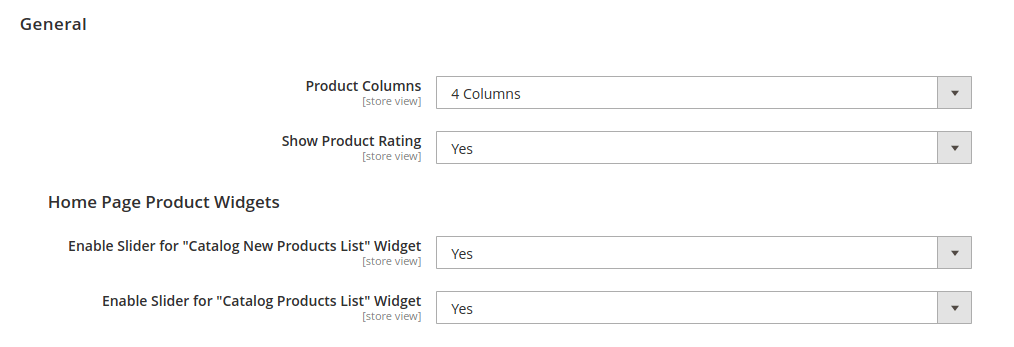
Product Columns: Set how many products you want to show in single row.
Show Product Rating: Enable/Disable product rating.
Enable Slider for "Catalog New Products List" Widget: Enable/Disable slider for home page "New Products" block.
Enable Slider for "Catalog Products List" Widget: Enable/Disable slider for home page "Featured Collection" block.
Product Image
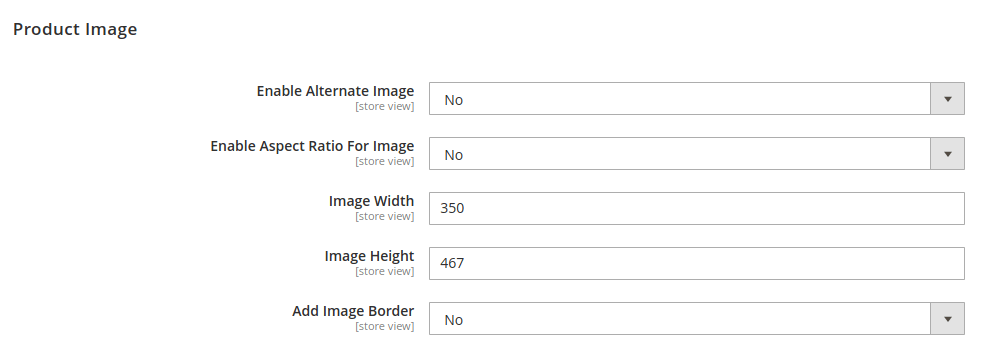
Enable Alternate Image: Enable/Disable second image display on hover.
Please Note:
You need to add/set "Thumbnail" image for each product.
Enable Aspect Ratio For Image: If "Yes", you don't need to add height of the images. Its automatically calculates height respected to width.
Image Width: Set image width.
Image Height: Set image height.
Add Image Border: Enable/Disable border around the image box.
Product Actions
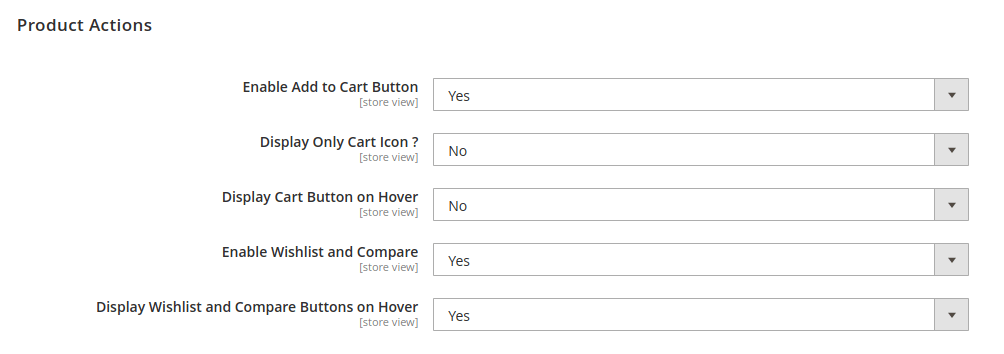
Enable Add to Cart Button: Enable/Disable cart button.
Display Only Cart Icon ?: If "Yes", display only cart icon instead of text "Add to Cart" for cart button.
Display Cart Button on Hover: If "Yes", cart button is displayed on hover instead of the outside box.
Enable Wishlist and Compare: Enable/Disable wishlist and compare buttons.
Display Wishlist and Compare Buttons on Hover: If "Yes", wishlist and compare buttons are displayed on hover instead of the outside box.
Product Labels

Show New Label: Enable/Disable new label.
Please Note:
In order to "New" label for any product, you must set product's "Set Product as New From" and "To" date.
Show Sale Label: Enable/Disable sale label.
Please Note:
In order to "Sale" label for any product, you must set product's "Special Price" and "Special Price From" and "To" date.
Category Page Sidebar

Sidebar Promotion Static Block: Set static block identifier to display content in category sidebar.
Etrend theme provides one pre-defined static blocks for category page sidebar as below.
1. Category Page Sidebar Block
Identifier: et_category_page_sidebar

Floating Recently Viewed Widget
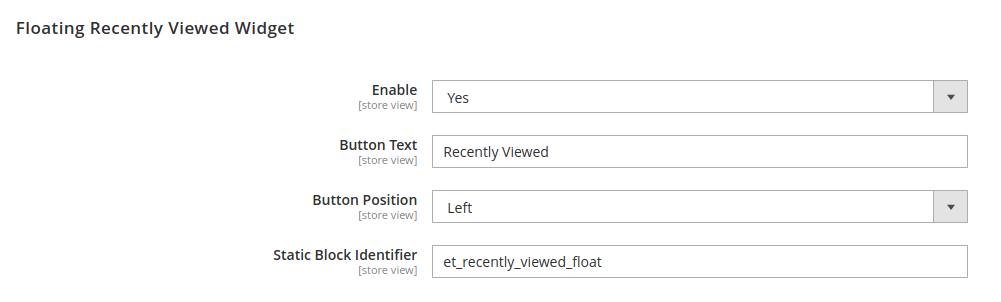
Enable: Enable/Disable recently viewed product block.
Button Text: Add button label.
Button Position: Set button position (Left or Right).
Static Block Identifier: We have already created and set static block identifier to display recently viewed products. This static block contains recently viewed product's widget. You can change if you have another one.
1. Recently Viewed Products Float Content
Identifier: et_recently_viewed_float
Product Page
Navigate to "Etrend Theme > Configuration > Product Detail".
General Settings
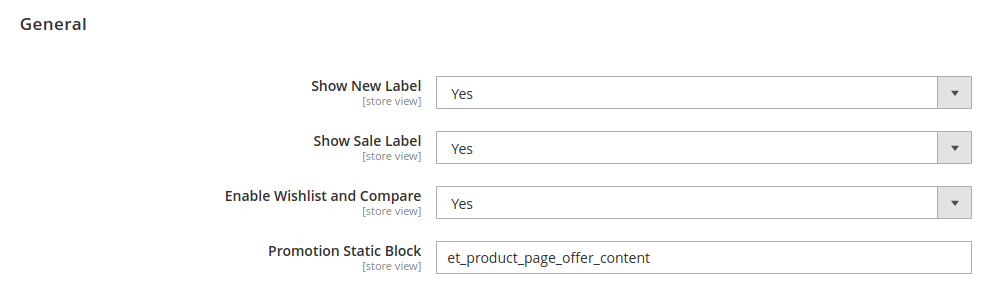
Show New Label: Enable/Disable new label.
Please Note:
In order to "New" label for any product, you must set product's "Set Product as New From" and "To" date.
Show Sale Label: Enable/Disable sale label.
Please Note:
In order to "Sale" label for any product, you must set product's "Special Price" and "Special Price From" and "To" date.
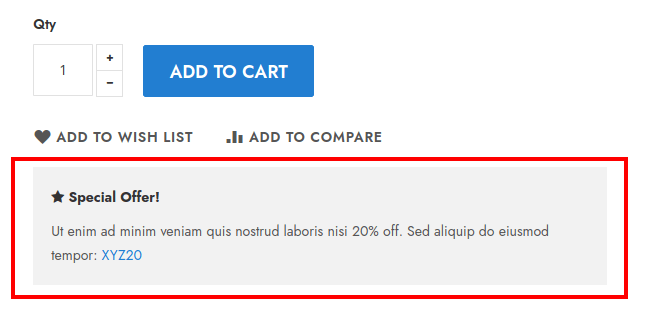
Enable Wishlist and Compare: Enable/Disable wishlist and compare links.
Promotion Static Block: Set static block identifier to display content on product page.
Etrend theme provides one pre-defined static blocks for product page as below.
1. Coupon - Product Page Offer Content
Identifier: et_product_page_offer_content
Countdown Timer
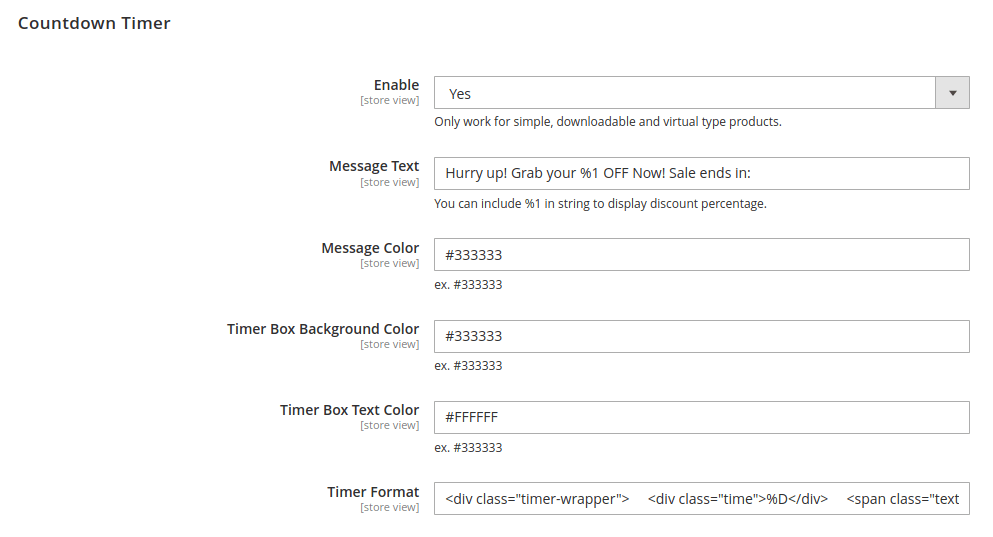
Enable: Enable/Disable countdown timer.
Please Note:
You must set product's "Special Price" and "Special Price From" and "To" date.
Message Text: Add message text. You can include %1 in string to display discount percentage.

Custom Tabs
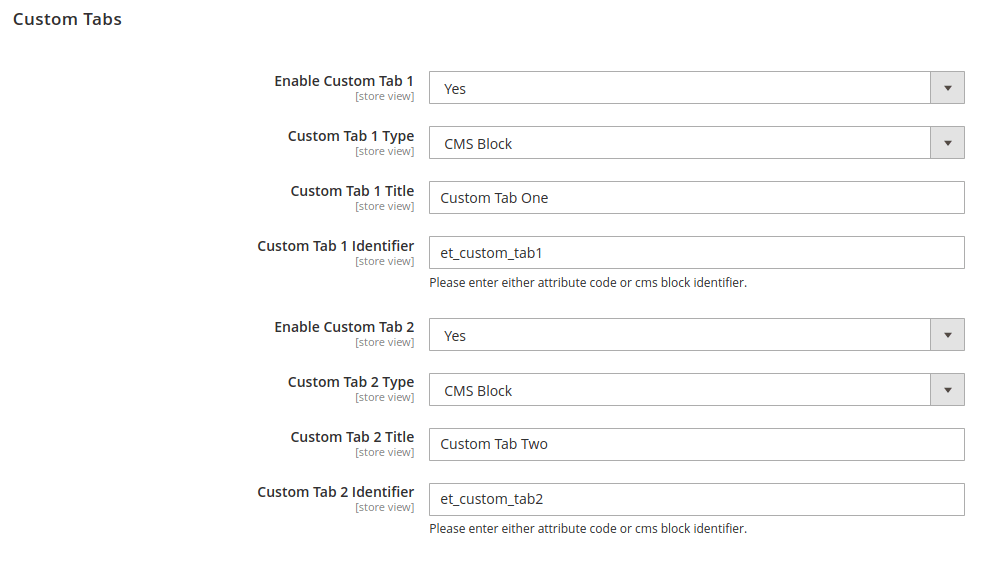
Etrend theme provide options for adding two custom tabs on product page.
You can add/display content in two ways in custom tans
1. CMS Block: Select "CMS Block" in drop-down and add block identifier code in tab identifier field.
2. Attribute: Select "Attribute" in drop-down and add product attribute code in tab identifier field.
Contact Us Page
Navigate to "Etrend Theme > Configuration > Contact".
General Settings

Top Static Block: Set static block identifier to display content at top of the page.
Bottom Static Block: Set static block identifier to display content at bottom of the page.
Contact Info
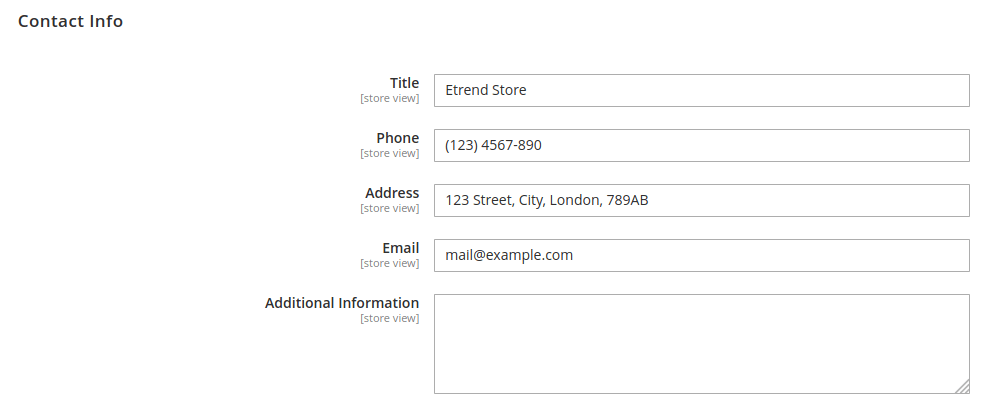
You can add store title, phone, address, email and additional info on contact page.
Google Map
Enabled: Enable/Disable google map.
Google Map Iframe Code: Add google map iframe code here.
Checkout Page
Navigate to "Etrend Theme > Configuration > Checkout" and expand "General" tab.

Etrend theme provides new enhanced checkout page design.
Enable Special Checkout Page Design: Enable/Disable new checkout page design.
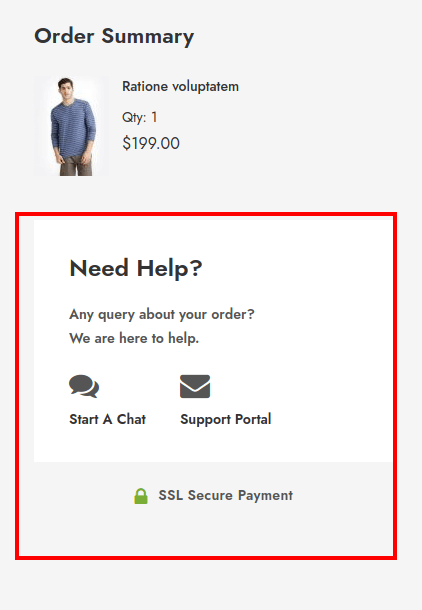
Checkout Sidebar Static Block: Set static block identifier to display content at checkout page sidebar.
Etrend theme provides one pre-defined static blocks for checkout page sidebar.
1. Checkout Sidebar Content
Identifier: et_checkout_sidebar_content
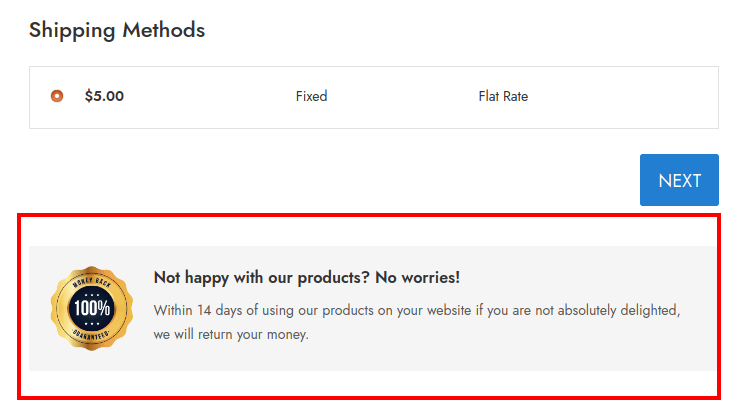
Checkout Bottom Static Block: Set static block identifier to display content at checkout page bottom.
Etrend theme provides one pre-defined static blocks for checkout page bottom.
1. Checkout Bottom Content
Identifier: et_checkout_bottom_content
Theme Design
Navigate to "Etrend Theme > Configuration > Design".
Primary Color

This config color will replace primary color of the theme. Default its #227ed1
Title Color

Using this config you can change the title colors. Check the below image for more detail.

Primary Button
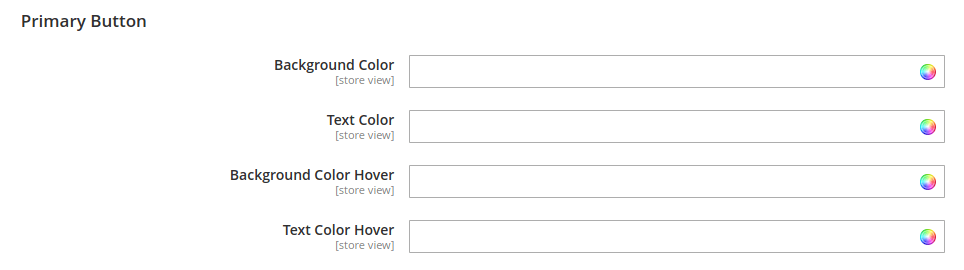
Using this config you can change the primary button background, text color and same on hover. Primary button is blue one as below.
Shop NowSecondary Button
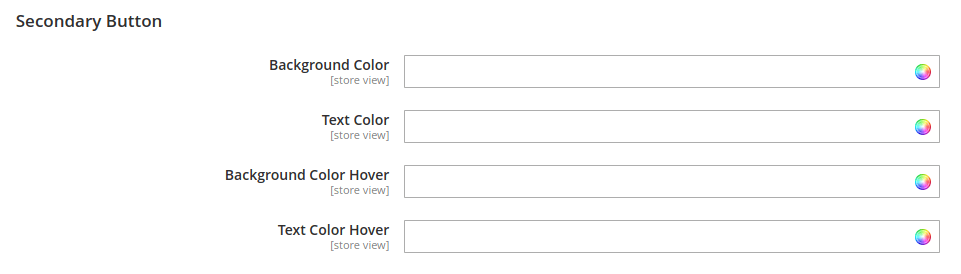
Using this config you can change the secondary button background, text color and same on hover. Secondary button is grey one as below.
Shop NowProduct Labels
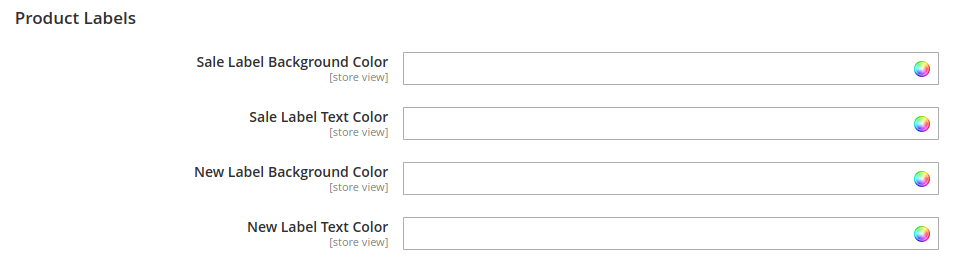
Using this config you can change the background and text colors of "New" and "Sale" labels.
Header General Colors
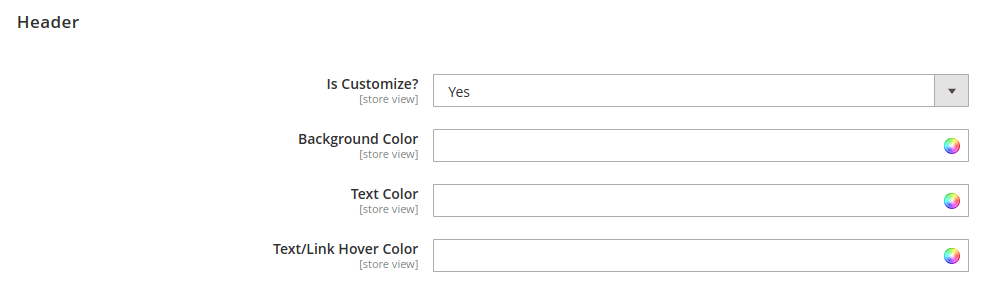
Is Customize?: If "Yes", then only entire header color config is applied.
Using this config you can set header background color, text color and its hover color.
Header Top
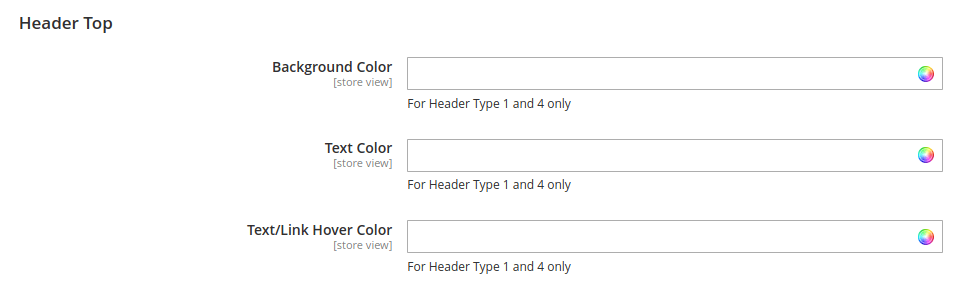
Using this config you can set header top section background color, text color and its hover color.
Header Top is available in only Header Type 1 and 4.
Header Icons (Phone, Cart, Search)
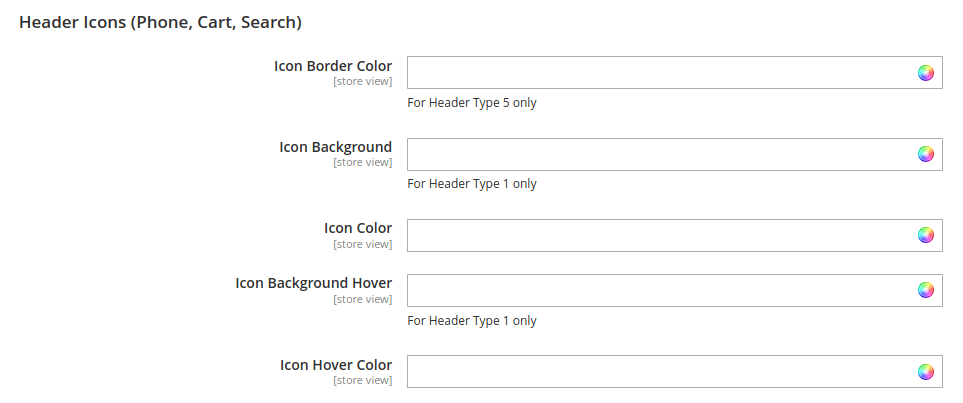
Using this config you can change Phone, Cart, Search icon's color.
These color Settings are applied as per your header type.
Header Search
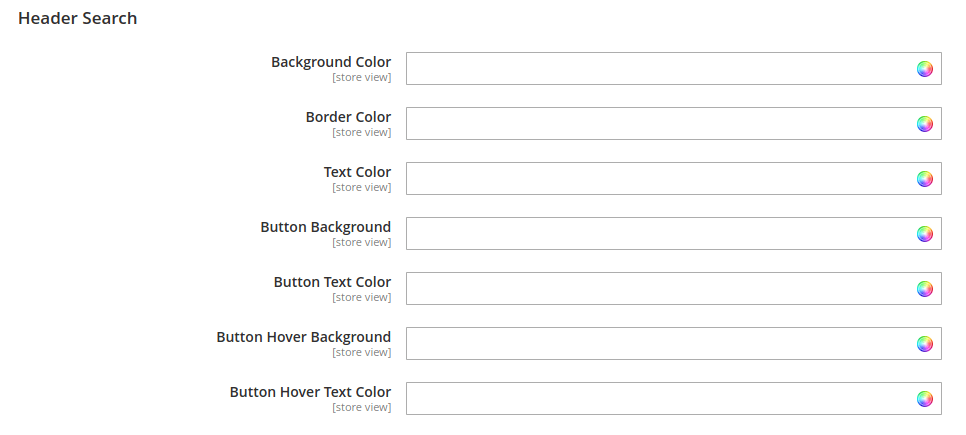
Using this config you can change colors of search box.
Top Navigation
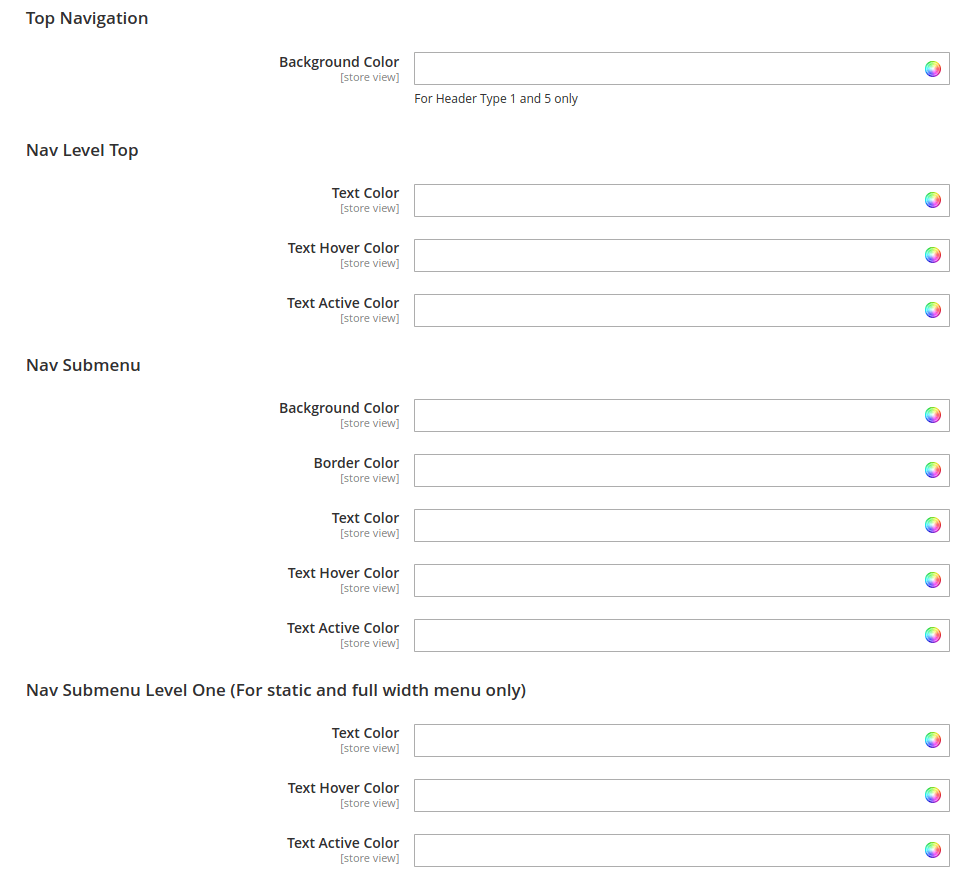
This section contains all the color options for megamenu.
Footer

Is Customize?: If "Yes", then only entire footer color config is applied.
Footer Top
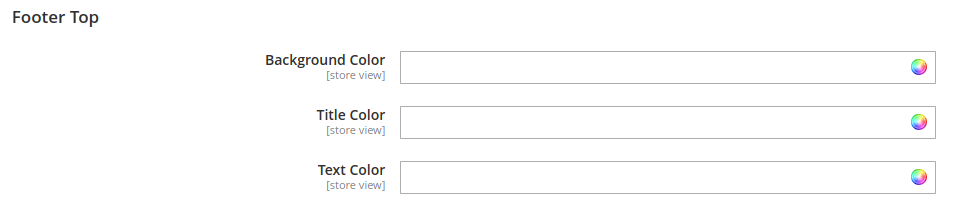
Using this config you can set footer top background color, title color and text color.
Footer Top Newsletter
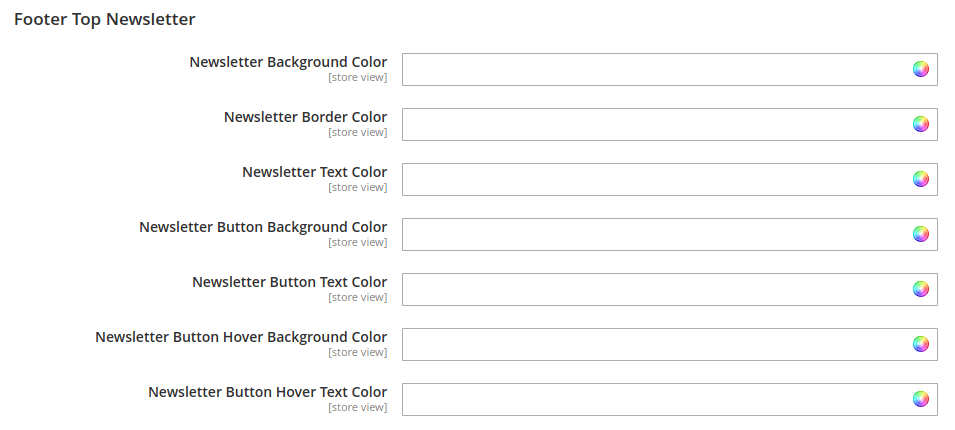
This config is only for newsletter box in footer top.
Using this you can customize the colors of newsletter box.
Footer Middle
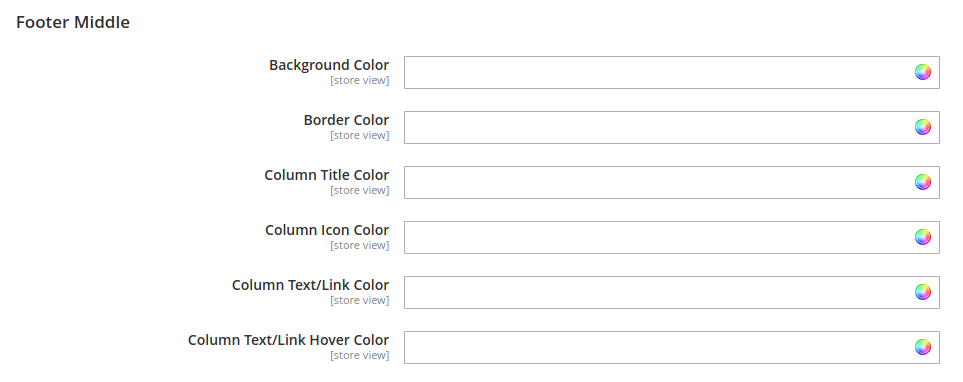
This color config option are use to customize the footer column and footer middle static block content.
Using this config you can change the background color, border color, column title, icon, text/link's color and its hover color.
Footer Middle Socials
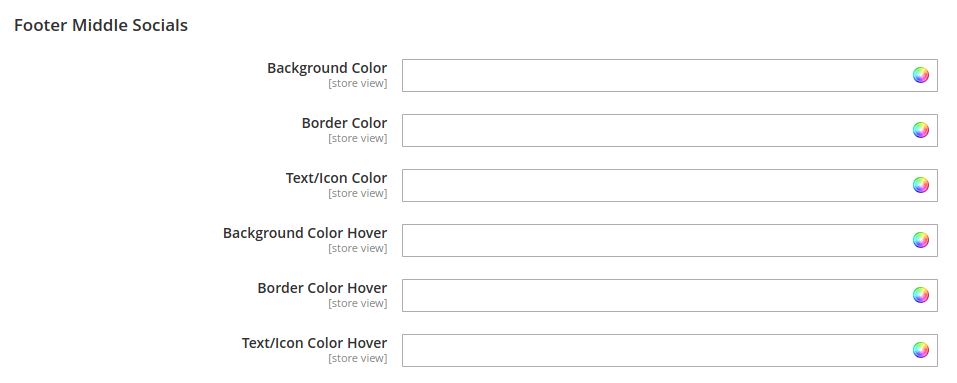
This config is only for social icons in footer middle.
Using this you can customize the colors of social icons.
Footer Column Newsletter
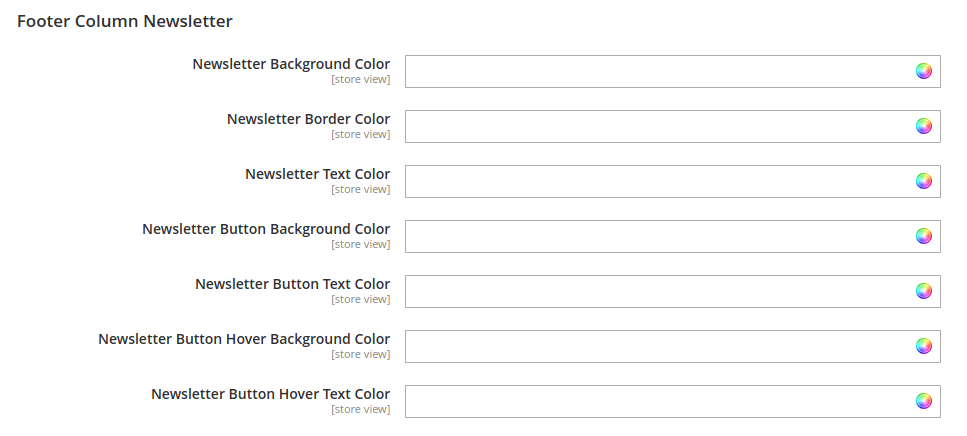
This config is only for newsletter box in footer column.
Using this you can customize the colors of newsletter box.
Footer Bottom
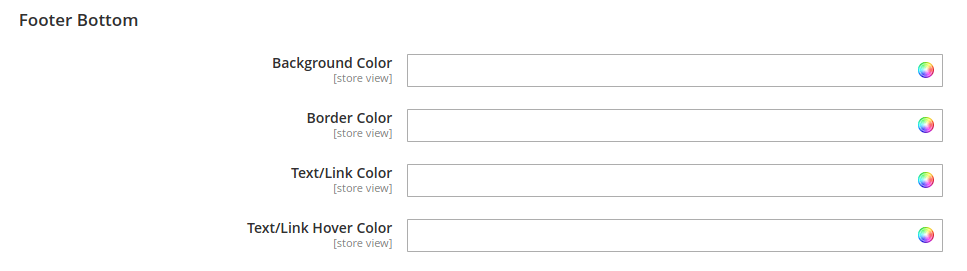
This color config option are use to customize the footer bottom section.
Using this config you can change the background color, border color, text/link's color and its hover color.
Footer Bottom Socials
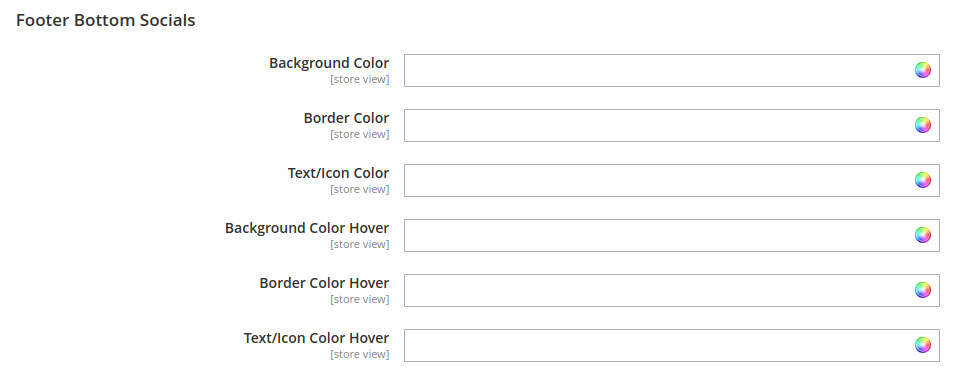
This config is only for social icons in footer bottom.
Using this you can customize the colors of social icons.
Theme Extension:
Let's see How to Configure Theme Extension in This Theme.
Booster Addons:
Let's see How to Configure Booster Add-ons in This Theme.
Sticky Cart
This Sticky Add to Cart bar gives the customer easy access to add the product to their shopping cart at any time.
How does it work?
It adds the sticky bar that becomes visible when the customer scrolls the page. The sticky bar contains the add to cart button so users can quickly add your product to the cart without scrolling back to up.
Sticky Cart Configuration
To set the configuration options navigate to "Etrend Theme > Sticky Cart > Configuration".
General Configuration
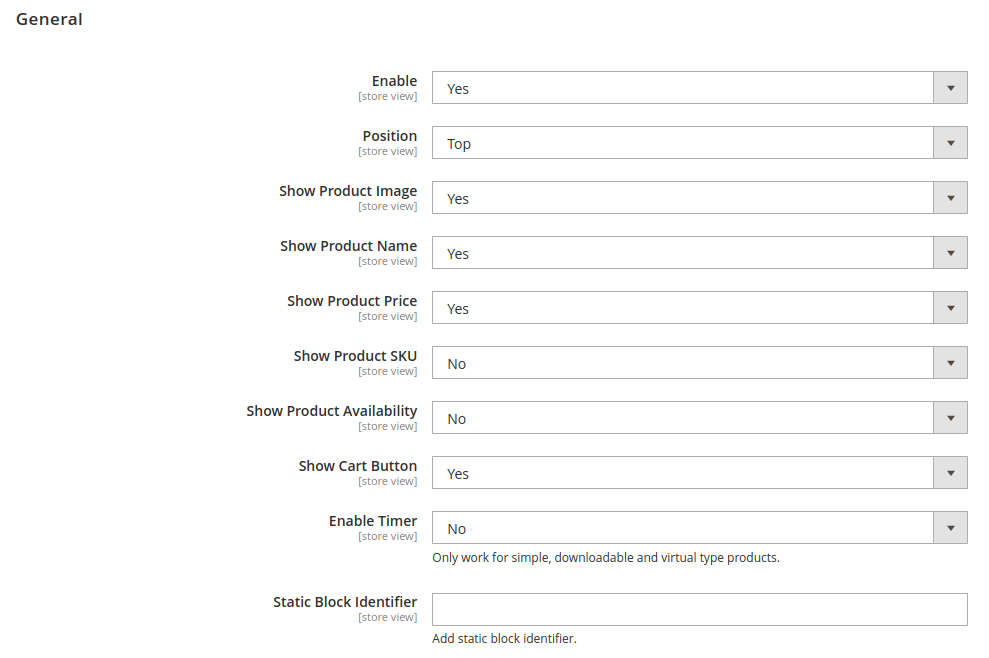
Enable: Enable/Disable sticky cart.
Position: Set its position. Possible options are Top and Bottom.
Show Product Image: Select Yes or No.
Show Product Name: Select Yes or No.
Show Product Price: Select Yes or No.
Show Product SKU: Select Yes or No.
Show Product Availability: Select Yes or No.
Show Cart Button: Select Yes or No.
Enable Timer: Enable/Disable countdown timer.
Please Note:
To show countdown timer, you must set product's "Special Price" and "Special Price From" and "To" date.
Only work for simple, downloadable and virtual type products.
Static Block Identifier: Set static block identifier to display extra content from CMS block in sticky cart bar.
Design Configuration
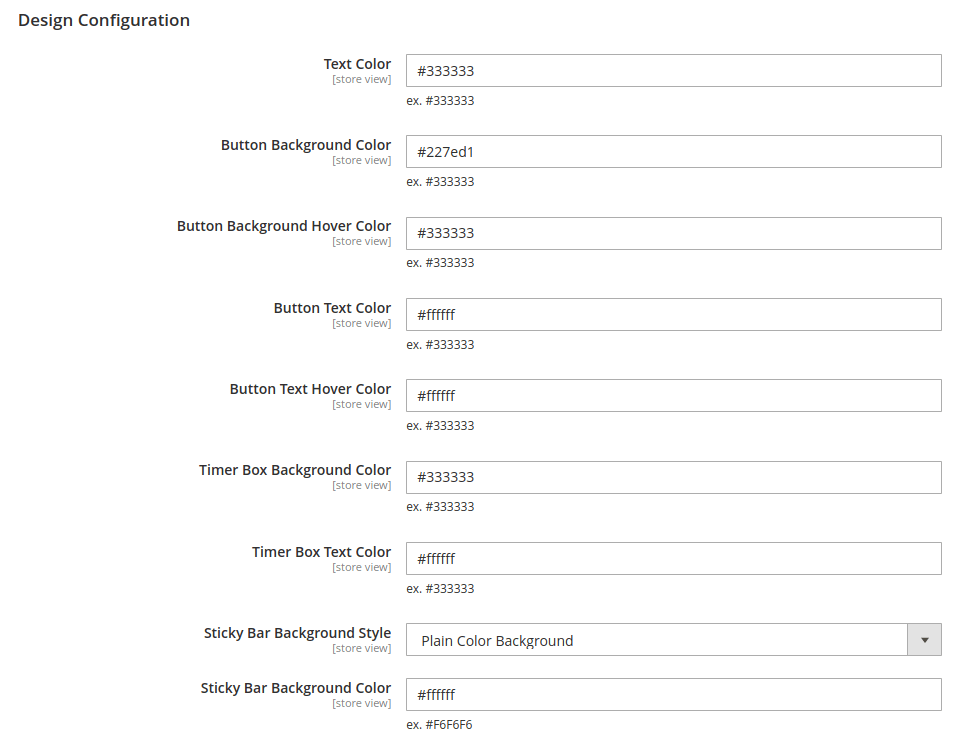
Using design config, you can customize all element's color available in sticky bar.
Frontend:
1. Sticky Cart

2. Sticky Cart with Countdown Timer

3. Sticky Cart with Static Content

Product Remaining Stock
Product Remaining Stock will help you to grow your conversion and sales. It absolutely create a sense of urgency in your customers. The biggest eCommerce retailers are all using this concept of scarcity to boost conversions and sell more product.
Product Remaining Stock Configuration
To set the configuration options navigate to "Etrend Theme > Product Remaining Stock > Configuration".
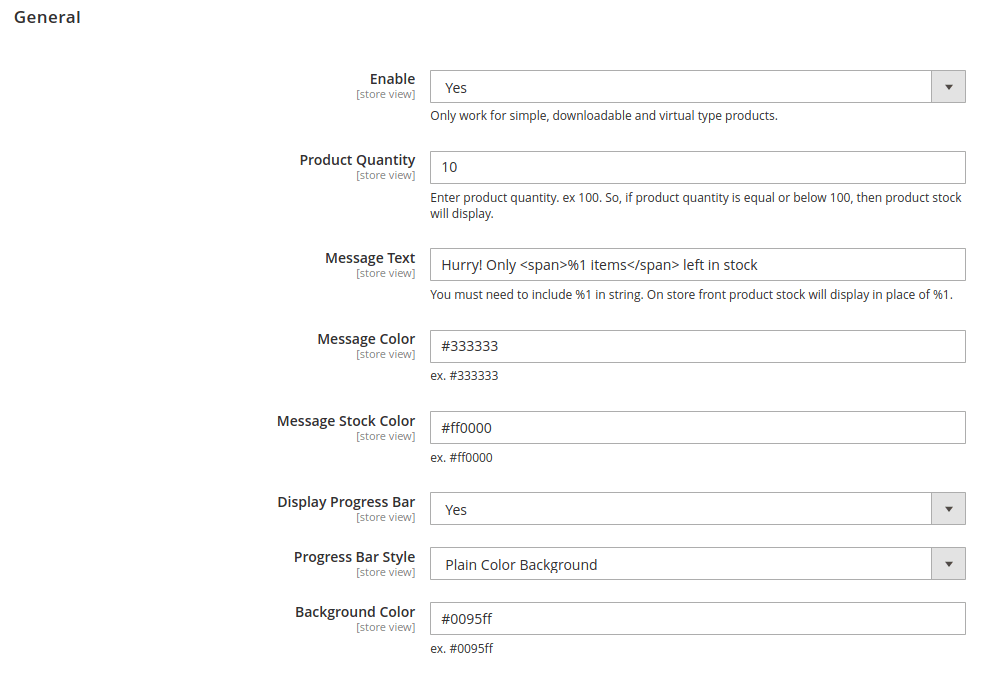
Enable: Enable/Disable the extension.
Please Note:
Only work for simple, downloadable and virtual type products.
Product Quantity: Enter product quantity. ex 10. So, if product quantity is equal or below 10, then product stock notification will display.
Message Text: Add message text here.
Please Note:
You must need to include %1 in string. On store front product stock will display in place of %1.
Message Color: Set message color.
Message Stock Color: Set stock amount color message.
Display Progress Bar: Enable/Disable progress bar for remaining stock.
Progress Bar Style: Set progress bar background color stylebook.
Background Color: Set background color (Ex. add hex code: #0095ff). If you have selected "Gradient Background" in "Progress Bar Style" then add hex color comma separated. Ex. #11998e,#38ef7d
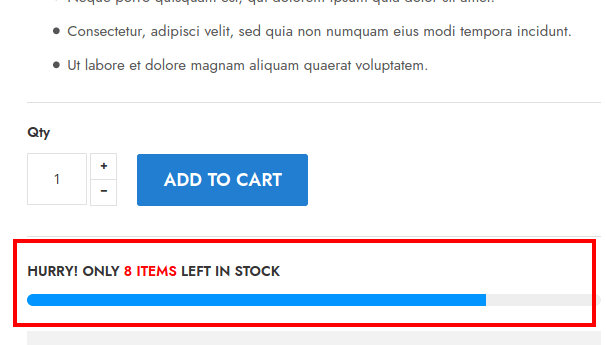
Frontend:
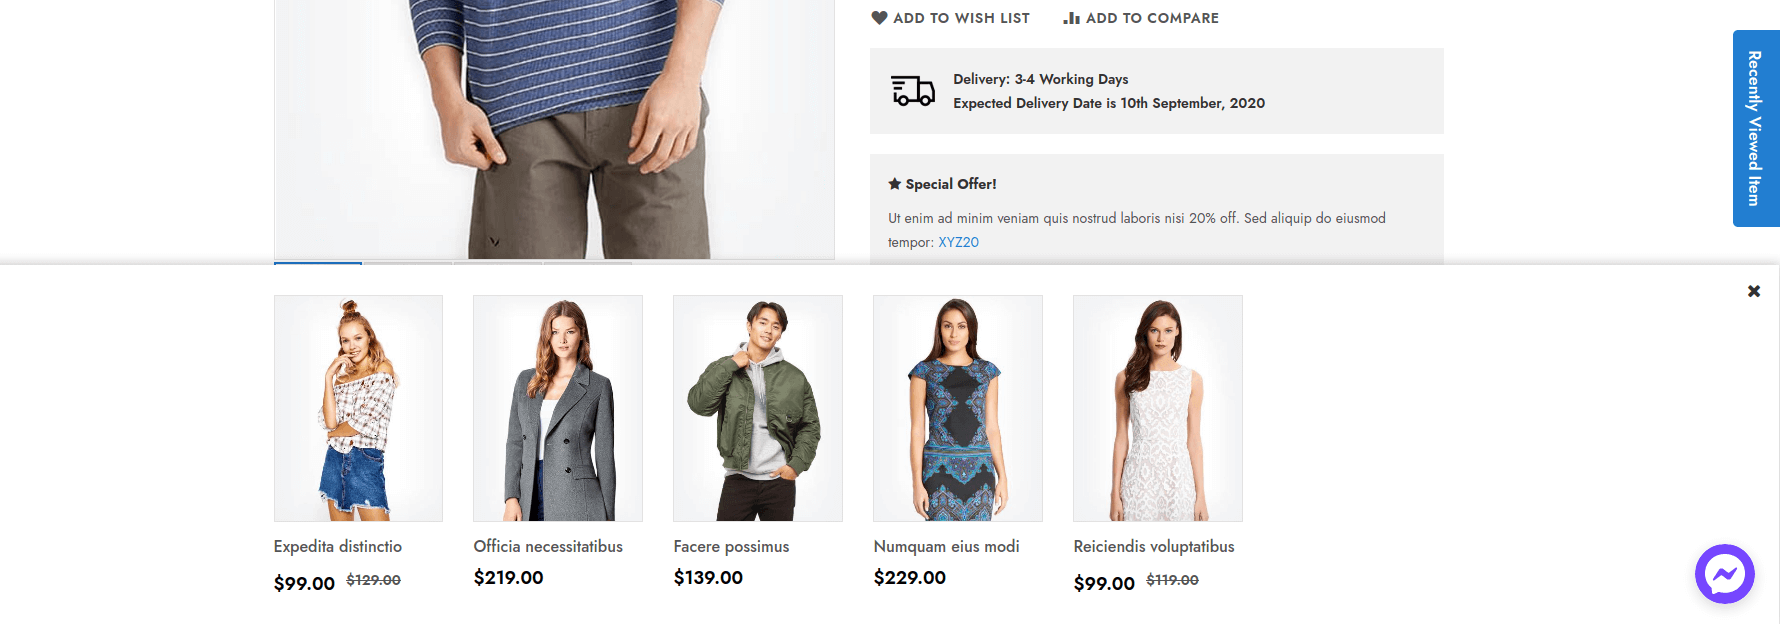
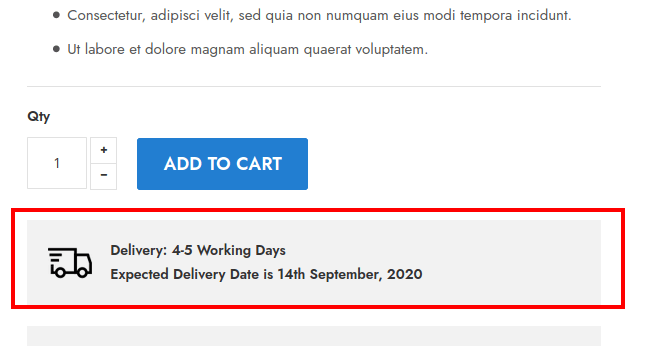
Shipping Time Estimation
The Shipping Time Estimator extension helps you to show order delivery information on the product detail page. It is a powerful extension to instantly build trust with your customers.
Shipping Time Estimation Configuration
To set the configuration options navigate to "Etrend Theme > Shipping Time Estimation > Configuration".
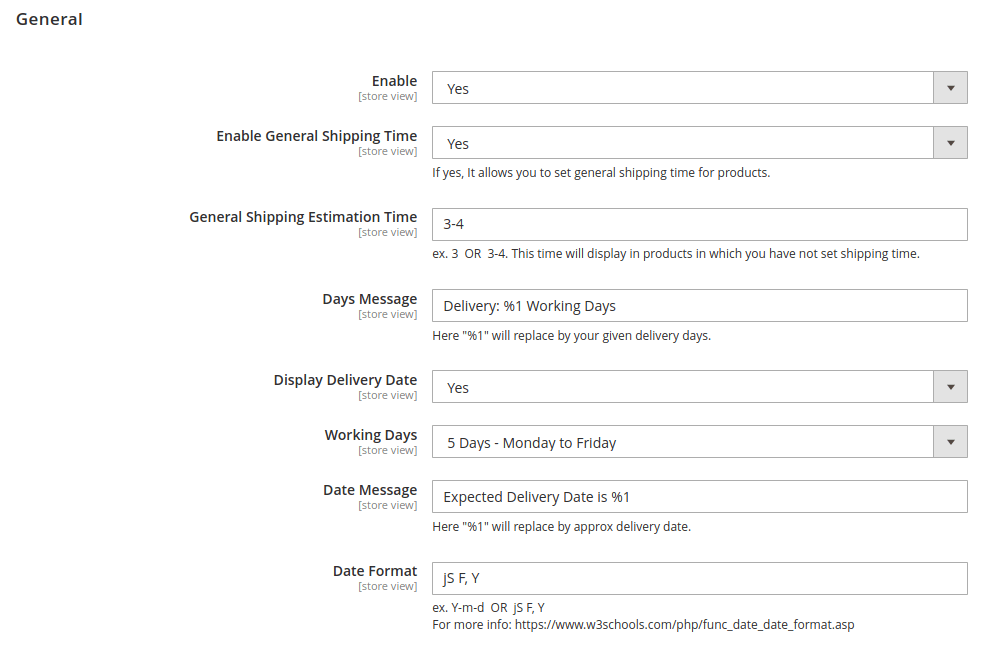
Enable: Enable/Disable the extension.
Enable General Shipping Time: If "Yes", It allows you to set general shipping time for products.
General Shipping Estimation Time: Set general shipping time for all products. Ex. 3 OR 3-4.
Please Note:
This time will use in products in which you have not set shipping time.
Days Message: Set notification message. Here you can use "%1" in message and it will replace by your given delivery days.
Display Delivery Date: If "Yes", Expected Delivery Date is displayed width message.
Working Days: Set working days of week. If you have set "5 Days - Monday to Friday", then based on that extension is calculated estimated shipping date.
Date Message: Set message to display date. Ex. "Expected Delivery Date is %1". Here "%1" will replace by approx delivery date.
Date Format: Set date format. Ex. Y-m-d OR jS F, Y
For more info check this link: https://www.w3schools.com/php/func_date_date_format.asp
How to set Shipping Time for specific product?
Follow the steps.
Step 1: Navigate to "Catalog > Products".
Step 2: Go to edit any product in which you want to add Shipping Time.
Step 3: Set shipping time in "Shipping Estimation Time" filed. Ex. 3 or 3-4.
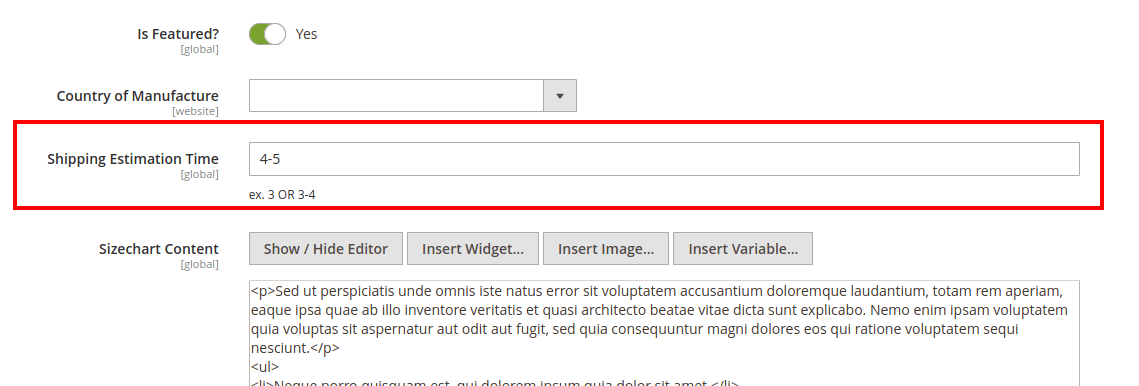
Step 4: Save the product and Clear/Flush the cache.
Frontend:
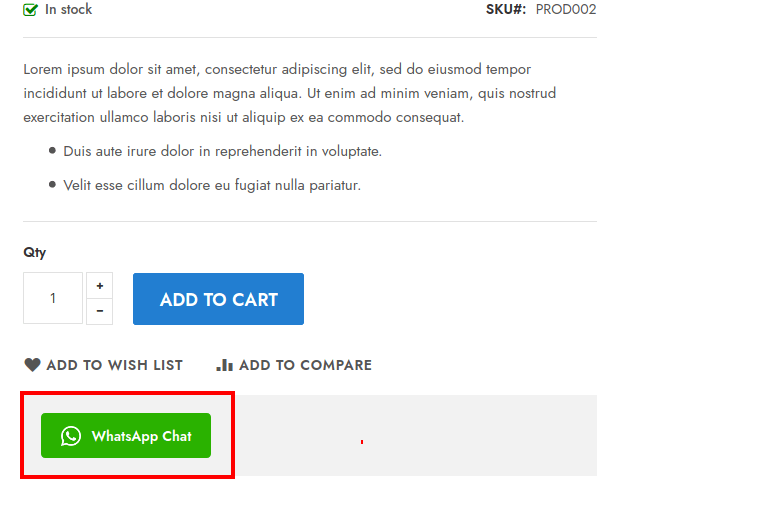
Whatsapp Chat
WhatsApp Chat extension allows you to provide live chat, instant and personalized customer support. WhatsApp Chat helps to increase conversions and boost up customer satisfaction.
WhatsApp Chat Configuration
To set the configuration options navigate to "Etrend Theme > WhatsApp Chat > Configuration".
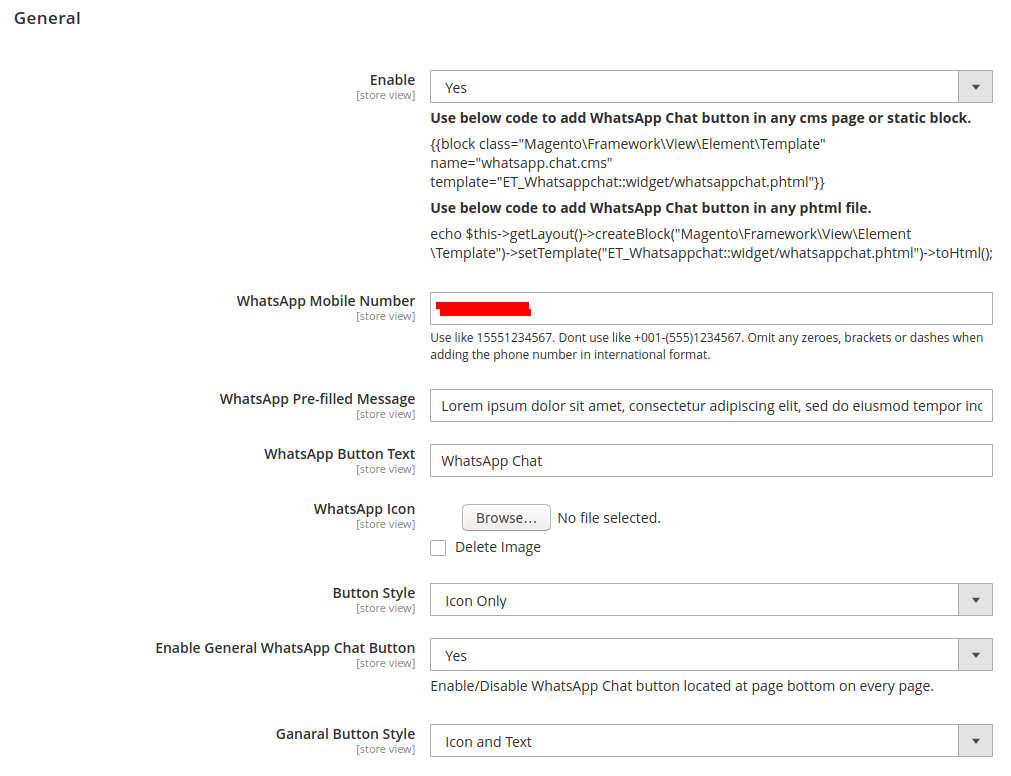
Enable: Enable/Disable the extension.
WhatsApp Mobile Number: Add mobile number.
Please Note:
Add mobile number like 15551234567. Don't add like +001-(555)1234567. Omit any zeroes, brackets or dashes when adding the phone number in international format.
WhatsApp Pre-filled Message: Pre-filled Message that display when customer start chat.
WhatsApp Button Text: Add/Change WhatsApp button text.
WhatsApp Icon: Upload AhatsApp chat button icon image.
Button Style: Set button style. Possible options are "Icon and Text" and "Icon Only"
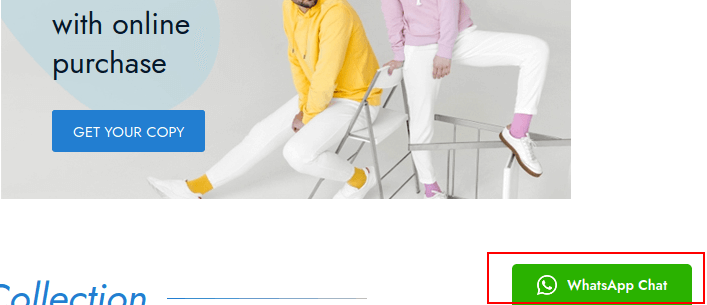
Enable General WhatsApp Chat Button: Enable/Disable WhatsApp Chat button located at page bottom on every page.
Ganaral Button Style: Set general WhatsApp chat button style. Possible options are "Icon and Text" and "Icon Only"
Use below code to add WhatsApp Chat button in any cms page or static block.
{{block class="Magento\Framework\View\Element\Template" name="whatsapp.chat.cms" template="ET_Whatsappchat::widget/whatsappchat.phtml"}}Use below code to add WhatsApp Chat button in any phtml file.
echo $this->getLayout()->createBlock("Magento\Framework\View\Element\Template")->setTemplate("ET_Whatsappchat::widget/whatsappchat.phtml")->toHtml();Frontend:
You can also create static block with WhatsApp Widget in it. And then use that static block to display it on product page.
You just need to set static block identifier in "Promotion Static Block" field. (Navigate to "Etrend Theme > Configuration > Product Detail".)
Facebook Chat
Facebook Chat extension provides live, instant and personalized customer support with Facebook messenger live chat.
Facebook Chat Configuration
To set the configuration options navigate to "Etrend Theme > Facebook Chat > Configuration".
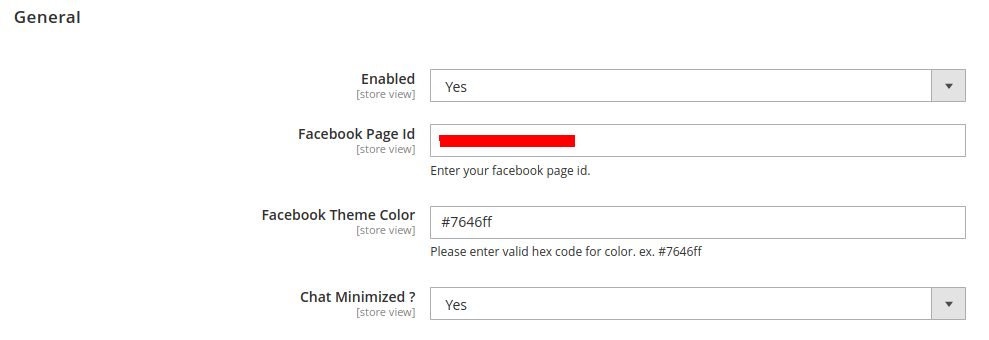
Enable: Enable/Disable the extension.
Facebook Page Id: Enter the Facebook Page ID.
Facebook Theme Color: Set the theme color for the Facebook chat window.
Chat Minimized ?: Set Yes/No for Minimized/Maximized chat window.
Please Note:
Please don't forget to add the domain in white list on Facebook messenger. In your Facebook Page go to Settings > Messenger Platform > White-listed domains and add your Domains.
Frontend:

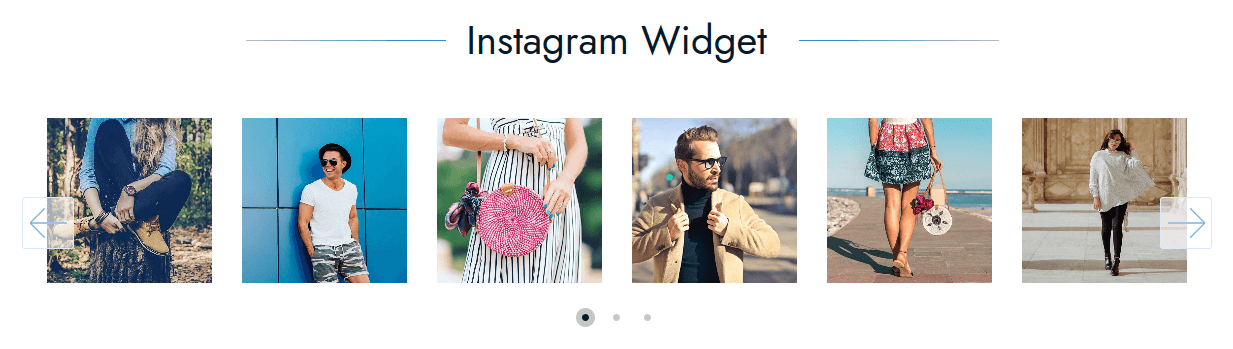
Instagram Widget
Instagram Widget is professionally designed extension that allows you to easily add your Instagram feed in your Store. Show your Instagram pictures as a gallery in your Store. It Syncs automatically with your Instagram account!
Instagram Widget Configuration
To set the configuration options navigate to "Etrend Theme > Instagram Widget > Configuration".

Enabled: Enable/Disable the extension.
User Token: Add User Token.
Please Note:
Access developers.facebook.com to create applications. Please refer this link
How to add Instagram Widget in any CMS Page or Static Block?
Step 1: Go to edit any CMS page or block.
Step 2: Click on Insert Widget... button and select "ET Instagram Widget" from "Widget Type" drop-down.

Title: Add Instagram block title.
Image Count: Add how many images you want to display in widget.
Image Width (auto/px): Set image width. Ex auto or 200px.
Image Height (auto/px): Set image height. Ex auto or 200px.
Show Caption: If "Yes", caption is displayed on hover.
Enable Slider ?: Enable/Disable slider. If "Yes" then you can set the other slider settings like Autoplay, Show Navigation Buttons etc.
Step 3: After done with options, click on Insert Widget button to add widget in page or block.
Step 4: Save the page/block and clear/flush the cache.
Frontend:
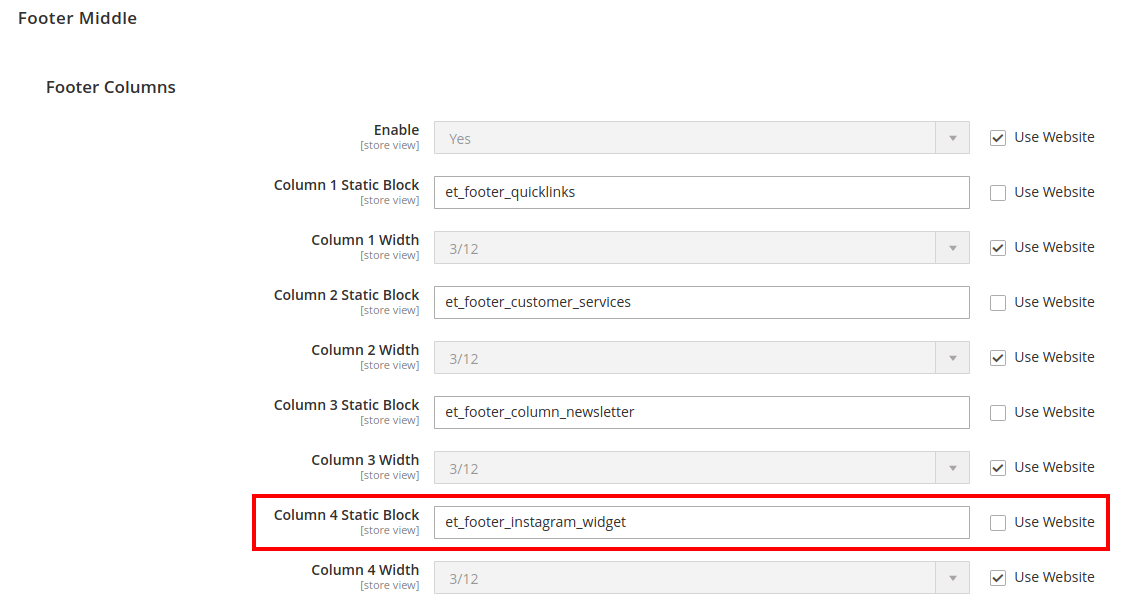
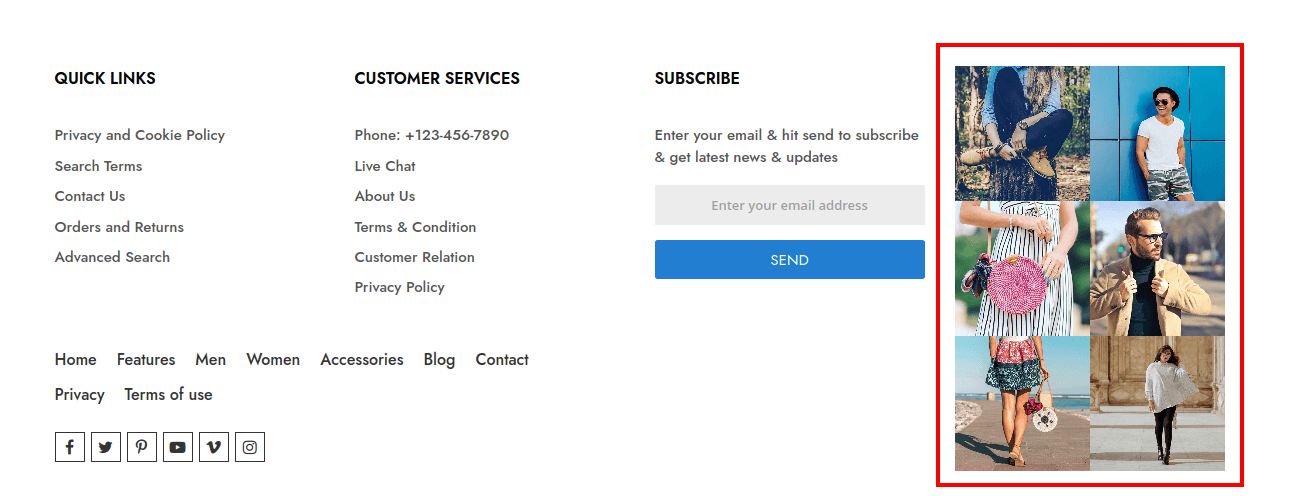
How to add Instagram Widget in Footer Column ?
In order to use Instagram Widget in footer column, first you need to add in CMS Static Block and then add this block identifier in footer column config.
Step 1: Add new CMS Static block.
Step 2: Click on Insert Widget... button and select "ET Footer Column Instagram Widget" from "Widget Type" drop-down.
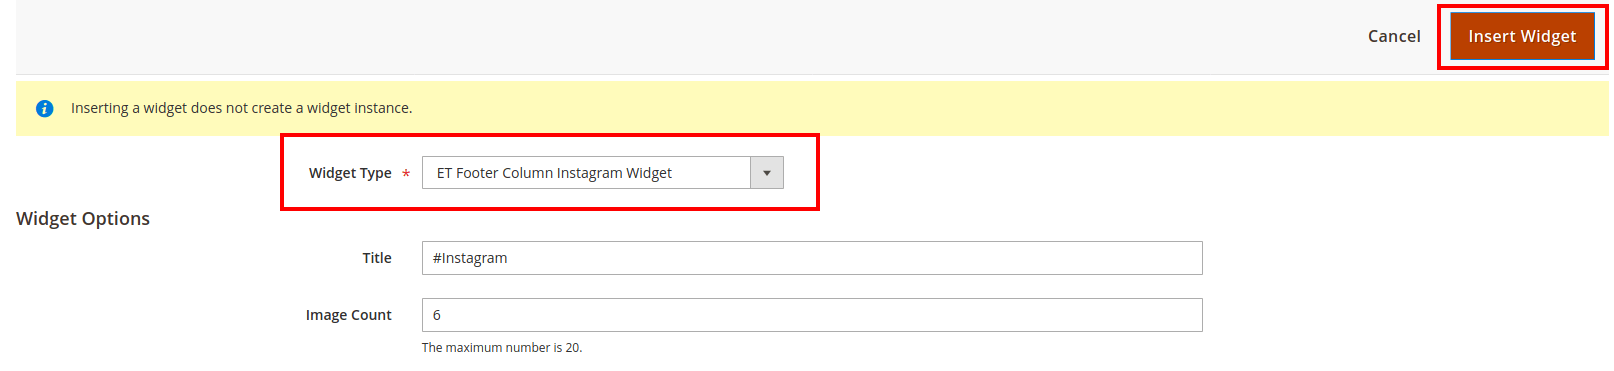
Title: Add Instagram block title.
Image Count: Add how many images you want to display in widget.
Step 3: After done with options, click on Insert Widget button to add widget in block.
Step 4: Save the block and clear/flush the cache.
Now add this static block identifier in footer column config as below
Please Note:
We have already given the CMS Static Block "Footer Instagram Widget" that contain the Instagram Widget.
Frontend:
Basic Addons:
Let's see How to Configure Basic Add-ons in This Theme.
Banner Slider
Etrend theme provides the Banner Slider extnsion to manage the banners/slides of the slider.
How to add new Banner/Slide in slider ?
Follow the steps.
Step 1: Navigate to "Etrend Theme > Banner Slider > Manage Banner".
Step 2: Click on Add New button on top right.
Step 3: Add all the required information as below.
General Information
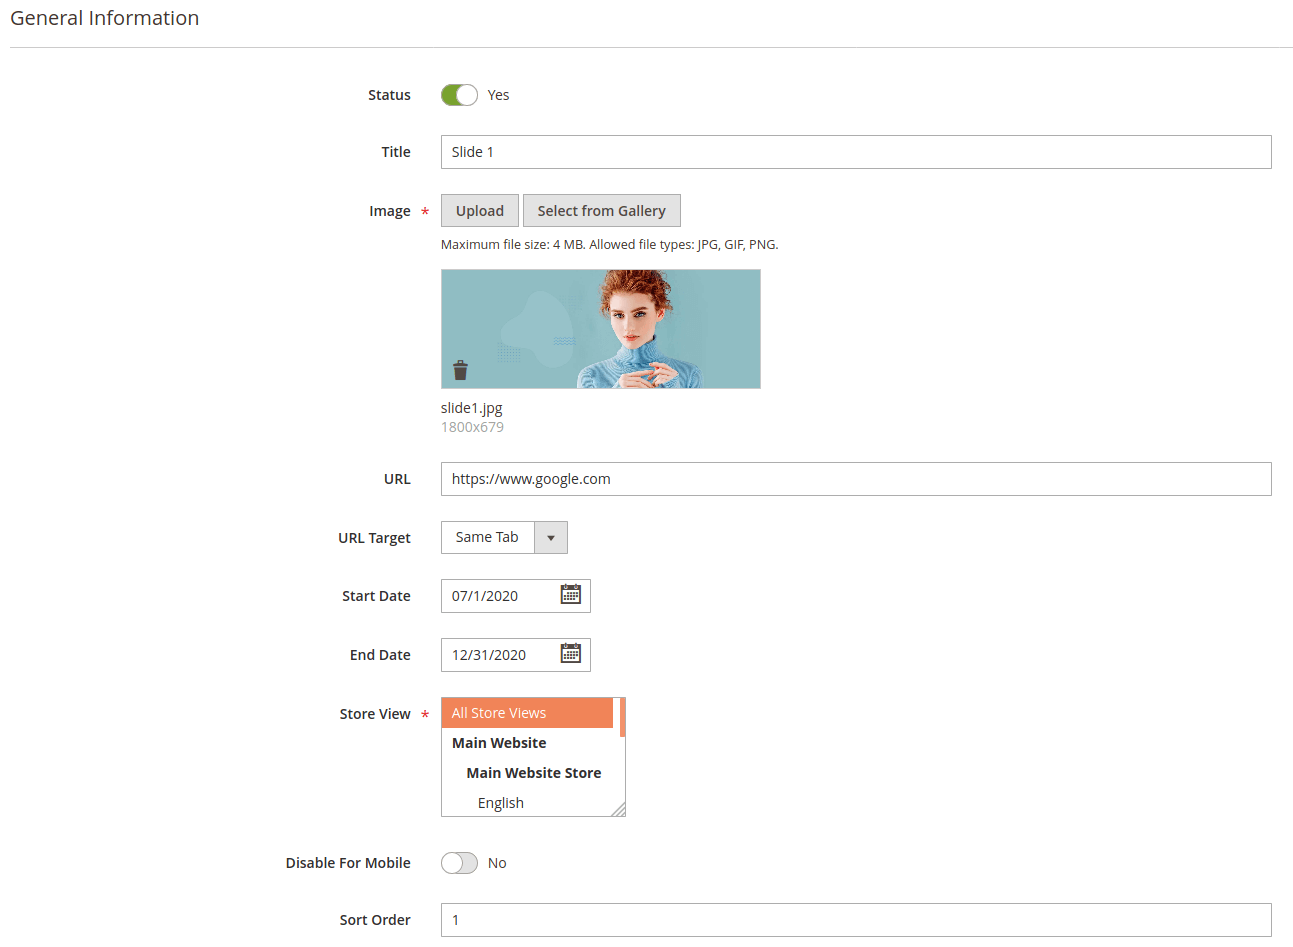
Status: Enable/Disable banner.
Title: Set title of the banner.
Image: Upload Image. As per theme Design best display image size is 1800x680
URL: Add hyperlink on banner click.
URL Target: Set the target for the link like you want to open url in same tab or new tab.
Start Date: Add the date from you want to enbale/show the banner.
End Date: Add the date till you want to enable/show banner. After that date banner will not display at frontend.
Store View: Set the store view.
Disable For Mobile: If "Yes", then banner is disabled in mobile view.
Sort Order: Set the display order of the banner.
Content Information
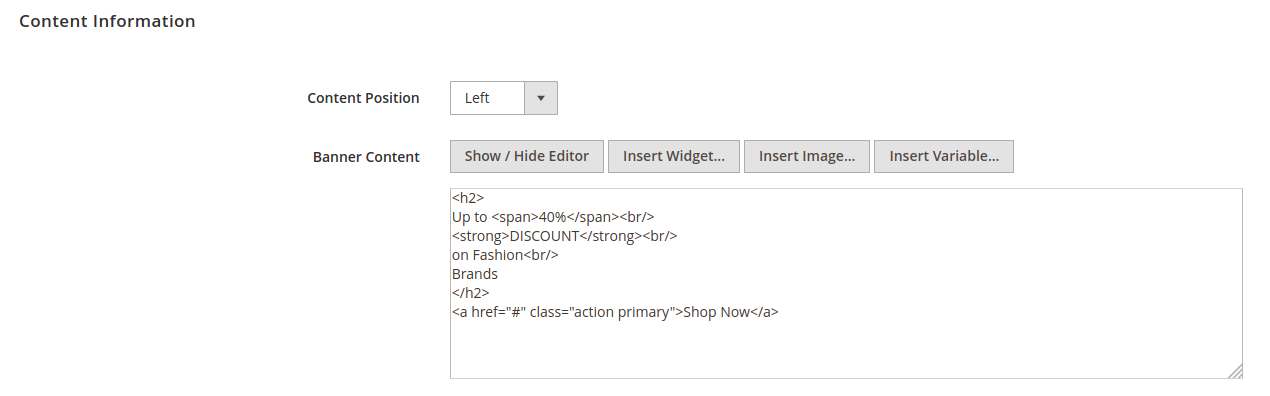
Content Position: Set the content position on the banner. Possible options are Left, Right and Center.
Banner Content: Add the banner content.
Step 4: After adding all the information, Click on Save button at top right.
Step 5: Clear/Flush the cache.
How to import demo slides/banners ?
Step 1: Navigate to "Etrend Theme > Configuration > Theme" and expand "Installation" tab.
Step 2: Here check the "Import Slider Demo" section.
Step 3: Click on Import Slider Demo to import demo slides/banners.
Step 4: Clear/Flush the cache.
How to add Banner Slider on Home Page ?
Step 1: Navigate to "Content > Elements > Pages".
Step 2: Edit CMS page that is set as home page.
Step 3: Click on Insert Widget... button and select "Banner Slider" from "Widget Type" drop-down.
Here you can set layout (Full Width or Boxed Width) and other slider options.
Step 4: After done with options, click on Insert Widget button to add widget in page.
Step 5: Save the page and clear/flush the cache.
Frontend:
Category Widget
Etrend theme provides the Category Widget extension to showcase your categories in unique & elegant way.
How to add/upload image in category ?
Follow the steps.
Step 1: Navigate to "Catalog > Categories".
Step 2: Edit the category in which you want to add/upload image.
Step 3: Add "Widget Display Name" and upload "Widget Display Image".
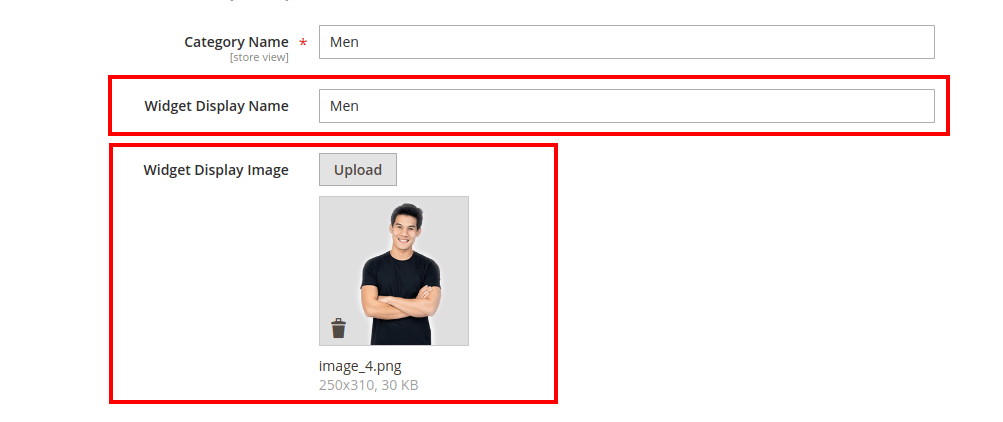
Step 4: Save the category and clear/flush the cache.
How to add Category Widget in any CMS Page or Static block?
Step 1: Go to edit CMS page or Static block.
Step 2: Click on Insert Widget... button and select "Category Widget" from "Widget Type" drop-down.
Title: Add the title.
Select Categories: Select the categories which you want to display in showcase.
Show Actual Category Name ?: If "Yes", its show the actual category name instead of names added in "Widget Display Name" filed.
Display Sub Categories ?: If "Yes" then sub-categories will display below each parent category.
Sub Category Count: Set the limit that how many sub-categories you want to display.
Image Width: Set image width. (Optional. Leave blank for auto)
Image Height: Set image height. (Optional. Leave blank for auto)
Custom Class: If you want to customize anything using styles then you can add custom class here.
Enable Slider ?: Enable/Disable slider. If "Yes" then you can set the other slider settings like Autoplay, Show Navigation Buttons etc..
Items: If you do not want to enable the slider then you can set the number of items in single row as per the screen size.
After setting all options, click on Insert Widget button to add widget in page.
Step 5: Save the page and clear/flush the cache.
Frontend:
Promotion Bar
Etrend theme provides Promotion Bar extension and using Promotion Bar its easy to share a custom message with your audience.
Promotion Bar Configuration
To set the configuration options navigate to "Etrend Theme > Promotion Bar > Configuration".
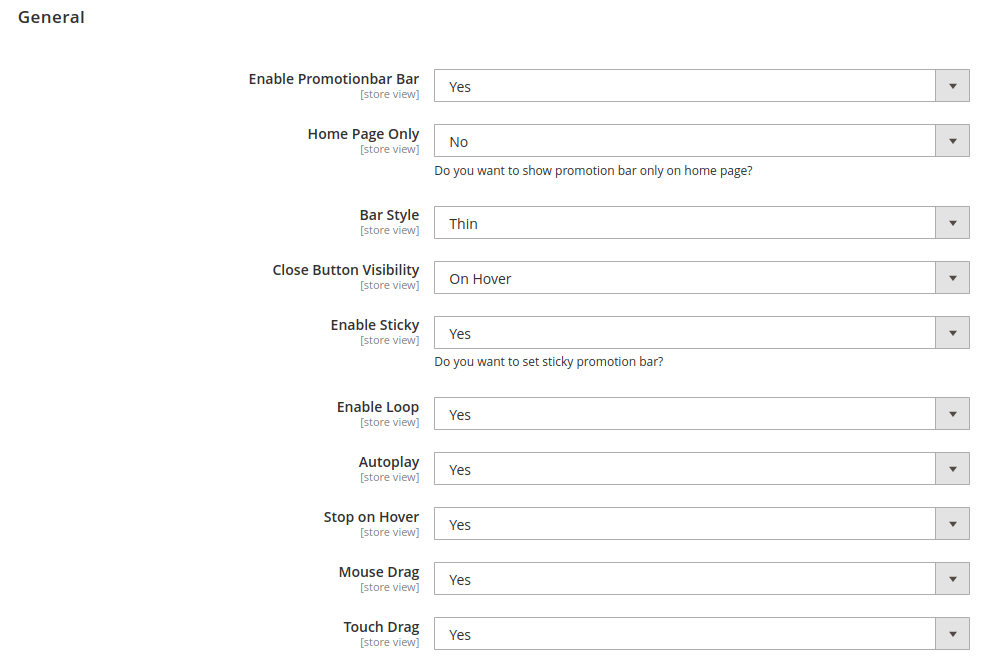
Enable Promotionbar Bar: Enable/Disable promotion bar.
Home Page Only: If "Yes", then promotion bar is enabled only on home page.
Bar Style: Set the bar style. Possible options are Skinny, Thin, Regular and Tall.
Close Button Visibility: Set close button visibility. Possible options are On Hover, Always Show and Always Hide.
Enable Sticky: Enable/Disable promotion bar sticky.
Slider Options
Enable Loop: Select Yes or No.
Autoplay: Select Yes or No.
Stop on Hover: Select Yes or No.
Mouse Drag: Select Yes or No.
Touch Drag: Select Yes or No.
How to add new Promotion Bar ?
Follow the steps
Step 1: Navigate to Etrend Theme > Promotion Bar > Manage Promotion
Step 2: Click on Add New button on top right.
Step 3: Add all the required information as below.
General Information
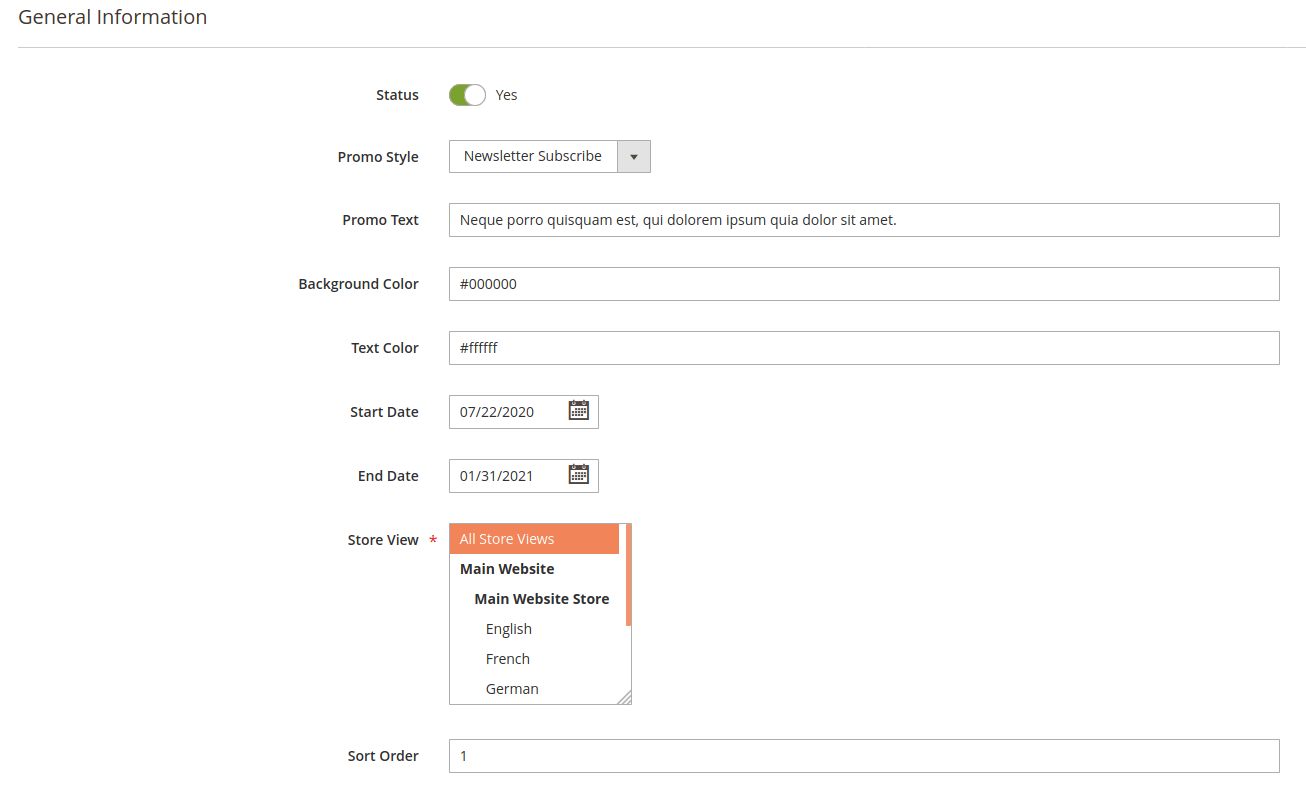
Status: Enable/Disable promotion bar.
Promo Style: You can create 3 types of promotion bars.
1. General - Simple promo bar with text and button.
2. Newsletter Subscribe - Promo bar with text and newsletter subscribe form.
3. Countdown Timer - Promo bar with text and countdown timer.
Promo Text: Add promo bar text here.
Background Color: Set bar background color.
Text Color: Set bar text color.
Start Date: Add the date from you want to enbale/show the promo bar.
End Date: Add the date till you want to enable/show promo bar. After that date promo bar will not display at frontend.
Store View: Set the store view.
Sort Order: Set the display order of the banner.
Button Settings
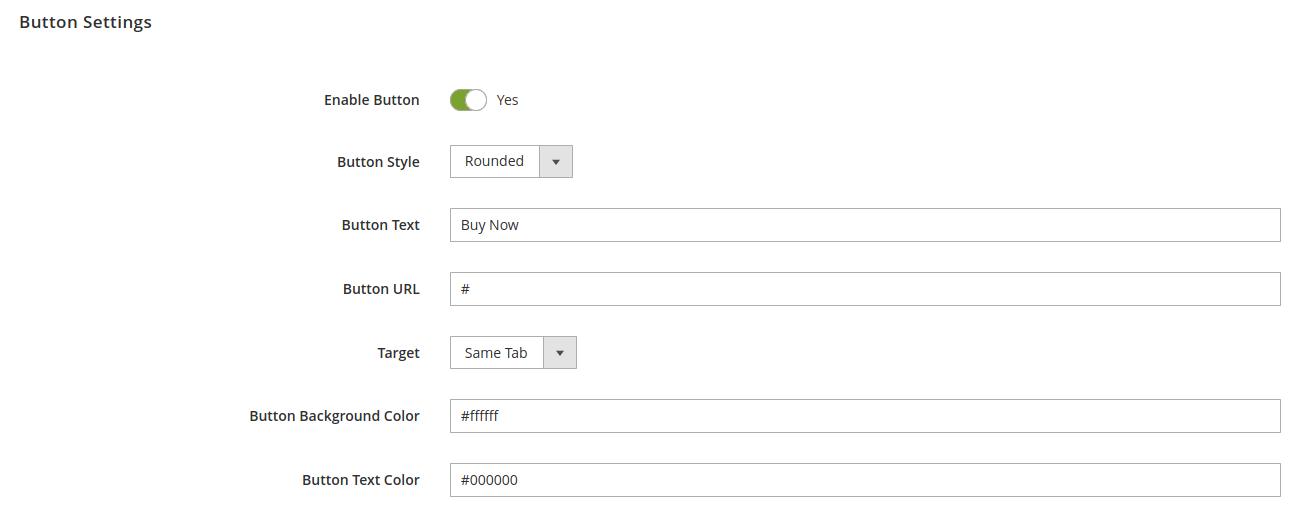
Enable Button: Enable/Disable button in promotion bar.
Button Style: Set button style. Possible options are Rounded, Pill, Square and Outline.
Button Text: Add button text.
Button URL: Add button link.
Target: Set the target for the link like you want to open url in same tab or new tab.
Button Background Color: Set button background color.
Button Text Color: Set button text color.
Newsletter Settings
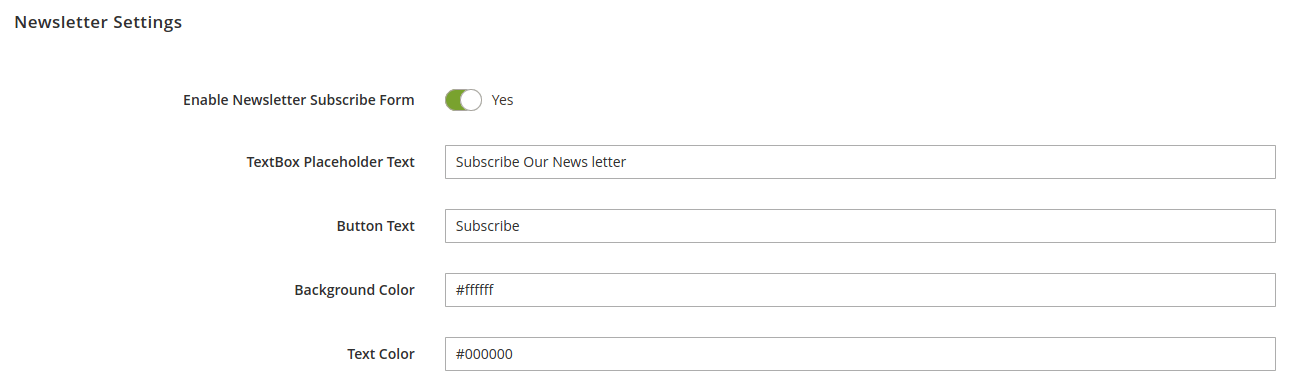
Enable Newsletter Subscribe Form: Enable/Disable newsletter subscribe form in promo bar.
Please Note:
Make sure that you have selected "Newsletter Subscribe" in "Promo Style" drop-down.
TextBox Placeholder Text: Placeholder text for newsletter box.
Button Text: Add button text.
Background Color: Set button background color.
Text Color: Set button text color.
Timer Settings
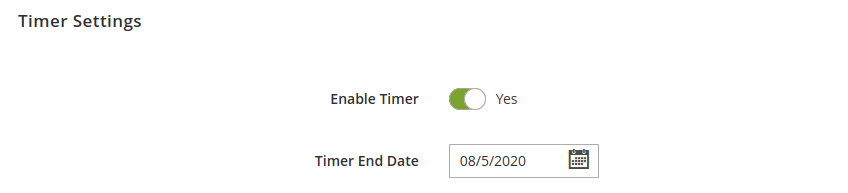
Enable Timer: Enable/Disable countdown timer.
Please Note:
Make sure that you have selected "Countdown Timer" in "Promo Style" drop-down.
Timer End Date: Set timer end date.
1. General Promo Bar

2. Promo Bar with Newsletter

3. Promo Bar with Countdown Timer

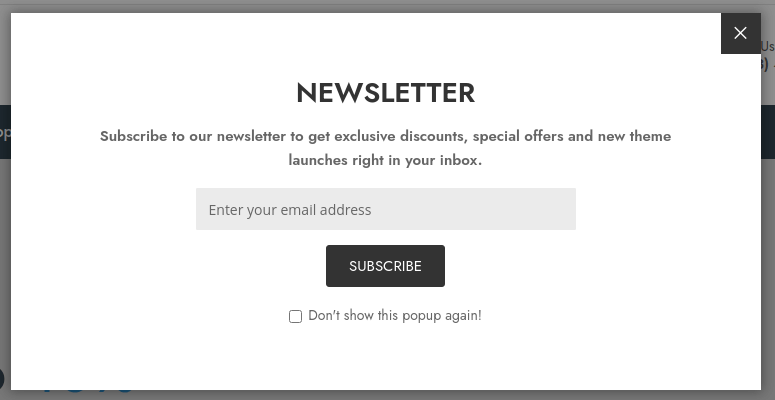
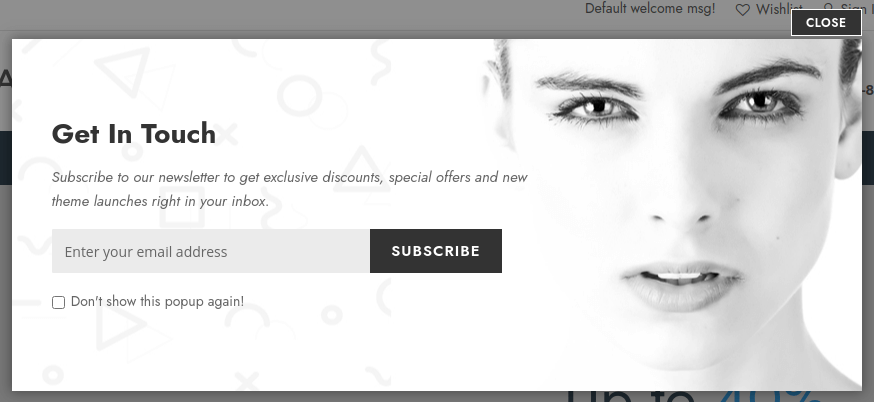
Newsletter Popup
Etrend theme provides Newsletter Popup extension helps to boost your sales by increasing email subscriptions, and engage new customers through promotions.
Newsletter Popup Configuration
To set the configuration options navigate to "Etrend Theme > Newsletter Popup > Configuration".
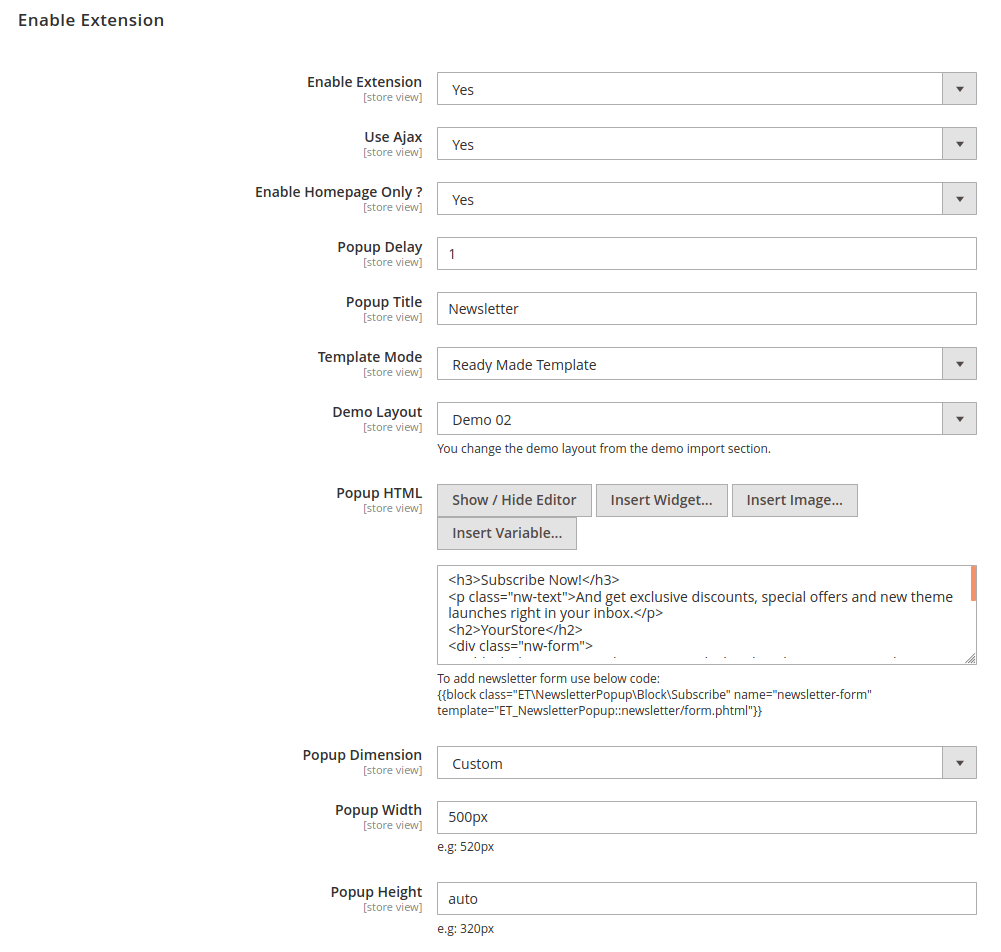
Enable: Enable/Disable newsletter popup.
Use Ajax: If yes, the email subscription form will submit without refreshing the page.
Enable Homepage Only ?: If yes, the popup is enabled on home page only.
Popup Delay: Set the delay time that after how much seconds popup will display.
Popup Title: Add popup title.
Template Mode: Select the content mode of the popup. If you want to use ready-made templates then select "Ready Made Template" option or if you have your own content, then select "Custom" option in the dropdown.
Popup HTML: Add popup content.
Popup Dimension: If custom, you can set the height and width of the popup.
Popup Width: Popup width. ex. 700px
Popup Height: Popup Height. ex. 700px or auto
How to import newsletter popup demo?
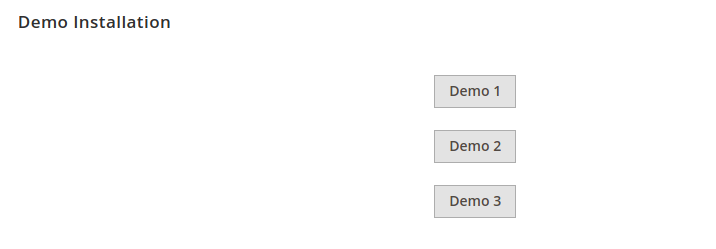
Click Demo X button to install popup demo version that you prefer to install.
Clear/Flush cache.
Newsletter Popup - Demo 1
Newsletter Popup - Demo 2

Newsletter Popup - Demo 3
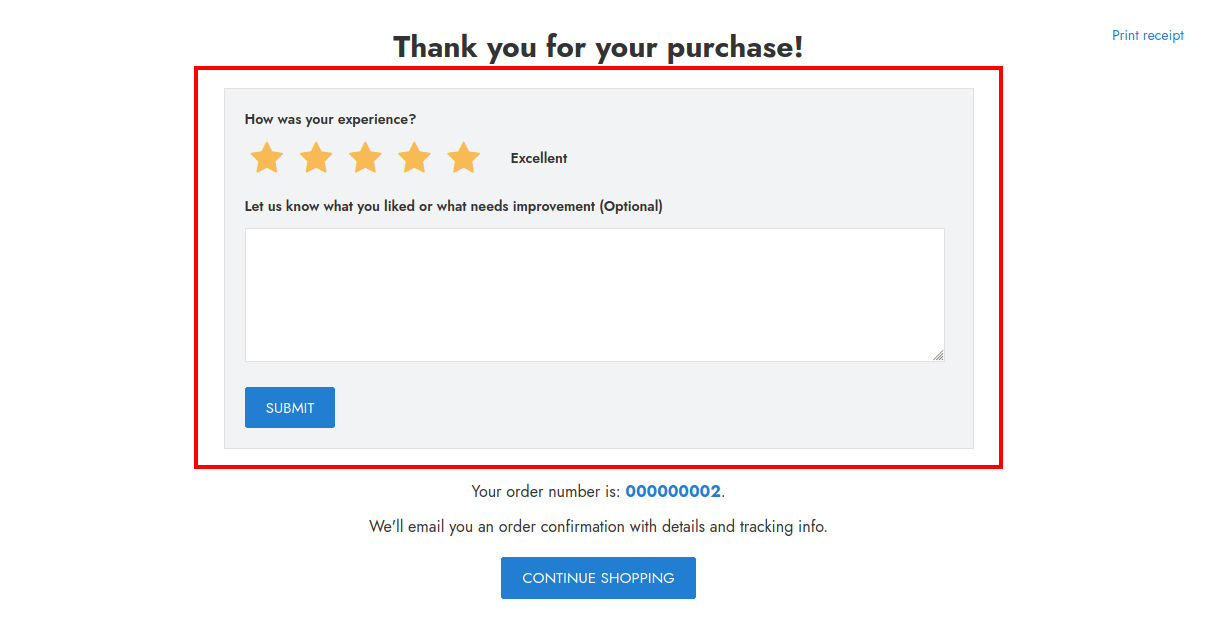
Order Feedback
Order Feedback helps to collect a precious feedback from customers after their purchase complete. Its adds the fully functional feedback form on checkout success page.
Order Feedback Configuration
To set the configuration options navigate to "Etrend Theme > Order Feedback > Configuration".
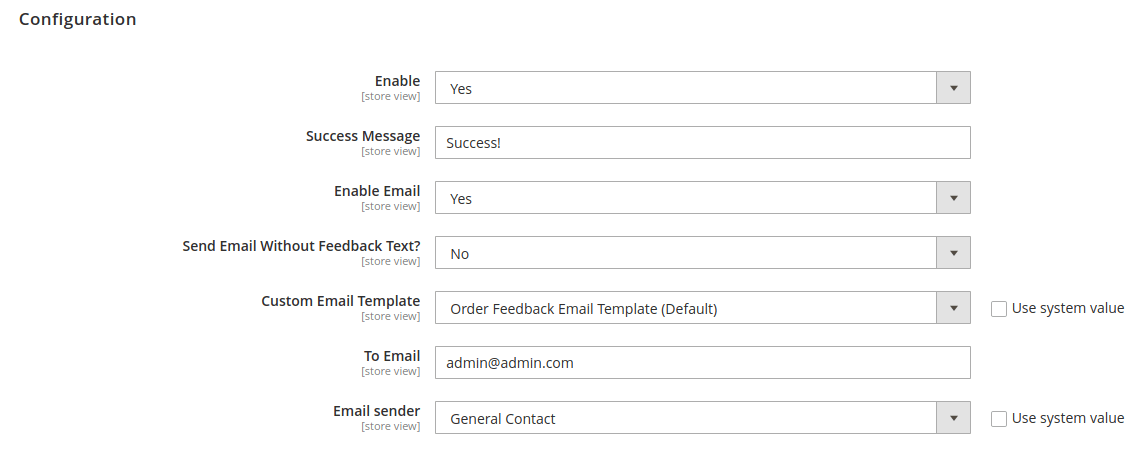
Enable: Enable/Disable order feedback form.
Success Message: Set message on successful submission of feedback.
Enable Email: Enable/Disable email function.
Send Email Without Feedback Text?: If "Yes", then it allows to send email without feedback text.
To Email: Set email id on which you want to receive feedback emails.
Feedback form on checkout success page is as below.
Size Chart
The size chart allows creating product charts with pictures, presentation in the way of popups, in tabs or directly on page.
Size Chart Configuration
To set the configuration options navigate to "Etrend Theme > Size Chart > Configuration".
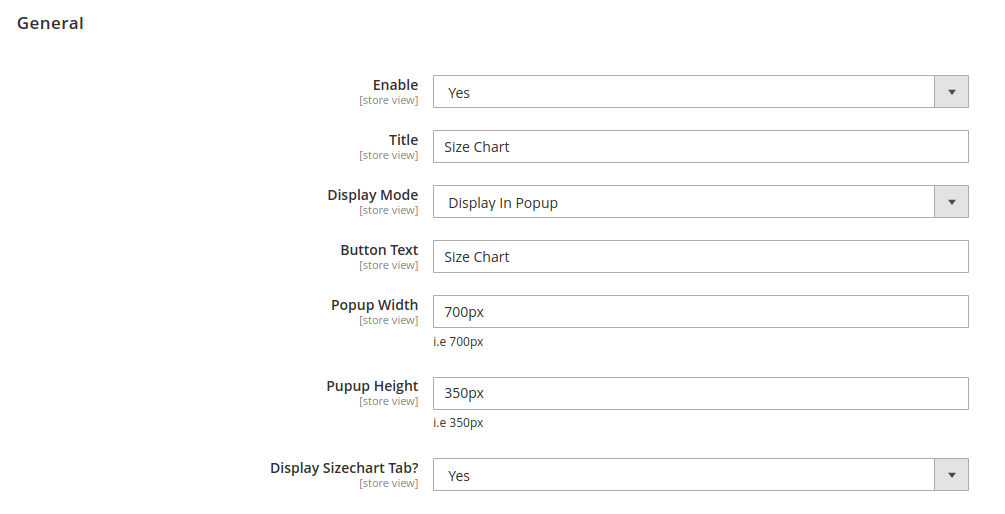
Enable: Enable/Disable size chart.
Title: Set size chart content title.
Display Mode: Set the posotion how you want to display the size chart content. If "Display in Popup" option is selected then size chart content will display in popup on click of button. And if "Display with Product Content" option is selected then size chart content will display directly on product page alogn with other product content.
Button Text: Set size chart button text.
Popup Width and Popup Height: Set popup dimensions (Its height and width in px).
Display Sizechart Tab?: If "Yes", then size chart is displayed in tab.
How to add Size Chart content for product?
Follow the steps
Step 1: Navigate to "Catalog > Products"
Step 2: Go to edit product in whcih you want to add size chart.
Step 3: Here you will find field "Sizechart Content" with text editor. Add product's size chart content here.
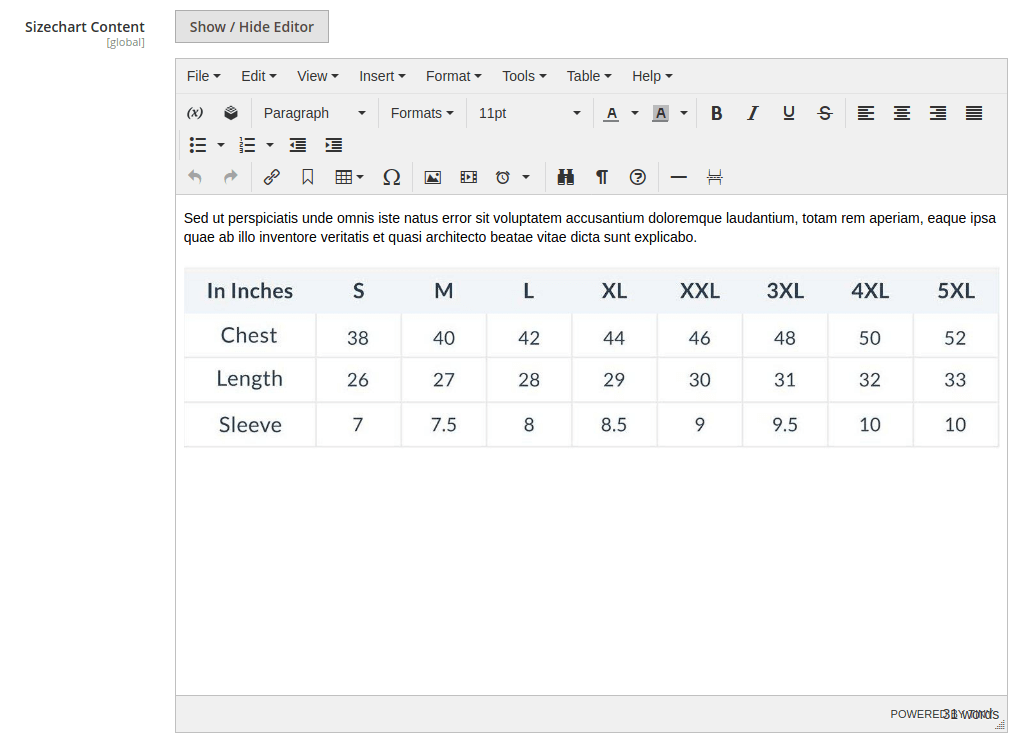
Step 5: Save the page and clear/flush the cache.
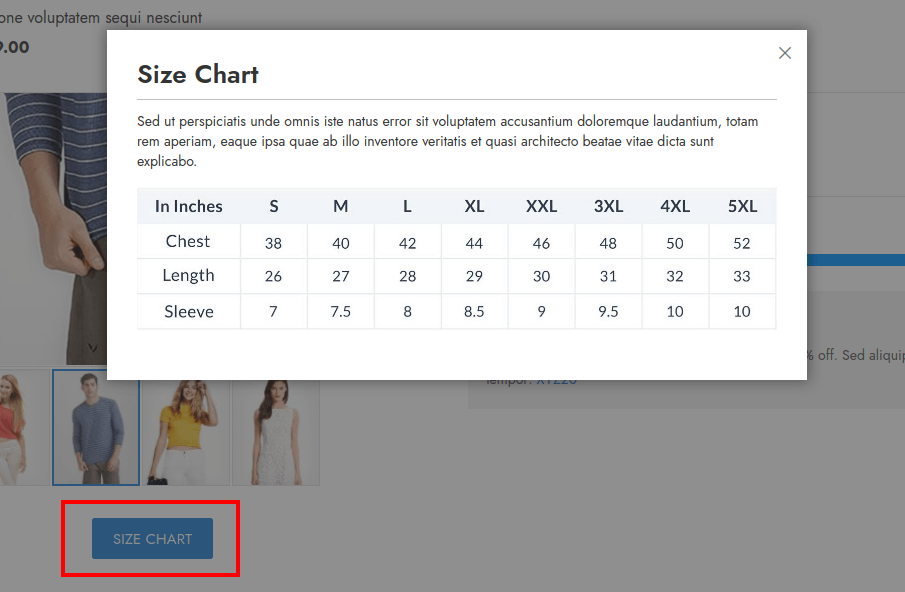
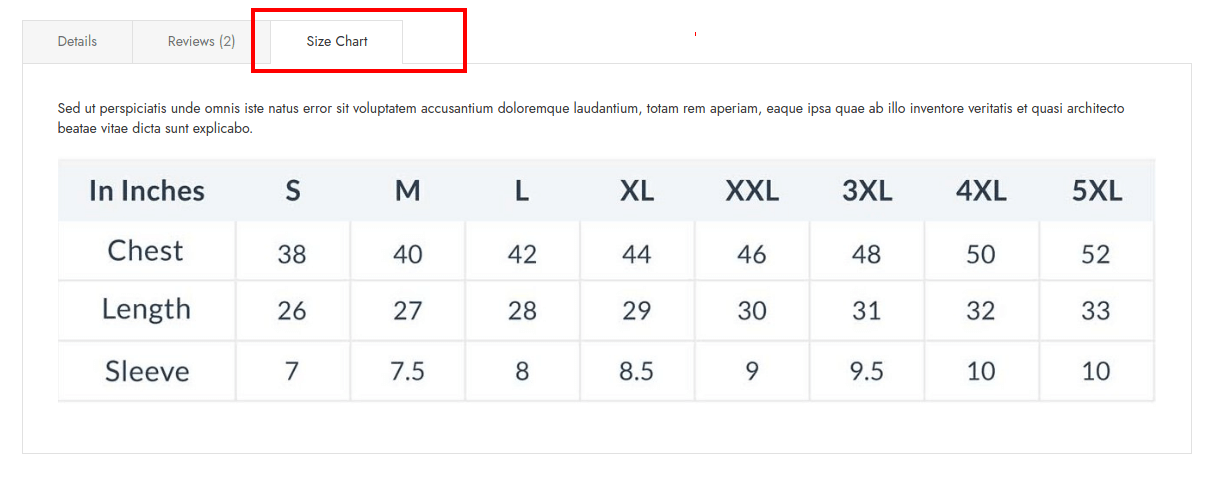
Frontend Product Page:
1. Size chart in Popup
2. Size chart in Tab
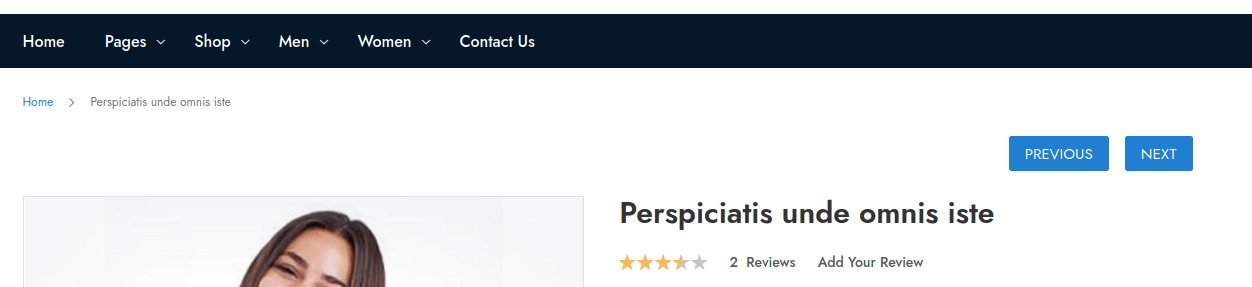
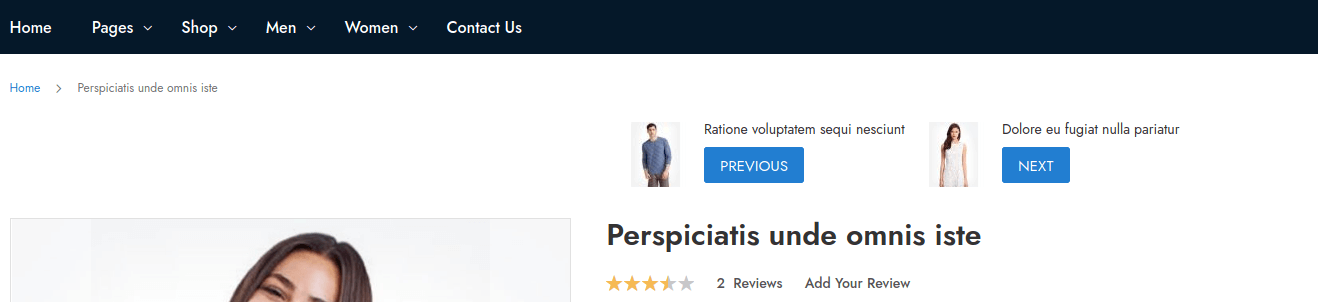
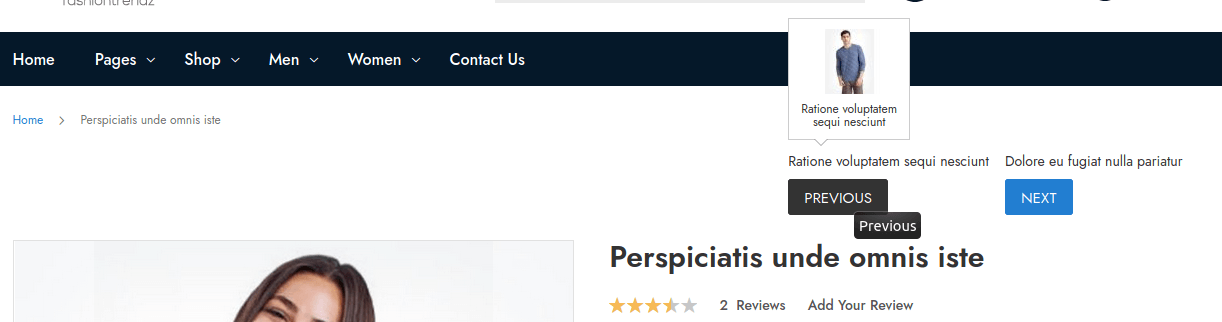
Product Navigation
Product Navigation extension allows visitors to navigate between Product pages with a single click, by adding Previous and Next product links on the product detail page.
Product Navigation Configuration
To set the configuration options navigate to "Etrend Theme > Product Navigation > Configuration".
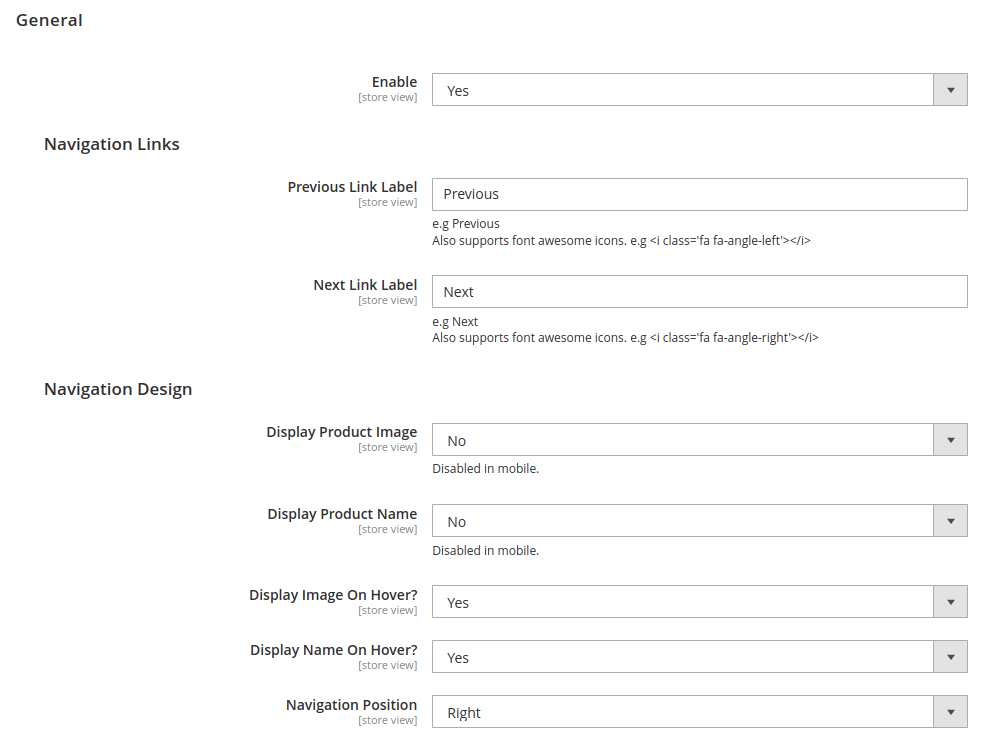
Enable: Enable/Disable product navigation buttons on product page.
Previous Link Label: Set previous nav button label.
Next Link Label: Set next nav button label.
Display Product Image: If "Yes", product image is displayed with nav buttons.
Display Product Name: If "Yes", product name is displayed with nav buttons.
Display Image On Hover?: If "Yes", product image is displayed on nav button's hover.
Display Name On Hover?: If "Yes", product name is displayed on nav button's hover.
Navigation Position: Set nav button's position. Possible options are Left and Right.
Frontend:
1. Product Navigation Only Buttons
2. Product Navigation With Product Name and Image
2. Product Navigation With Product Image On Hover
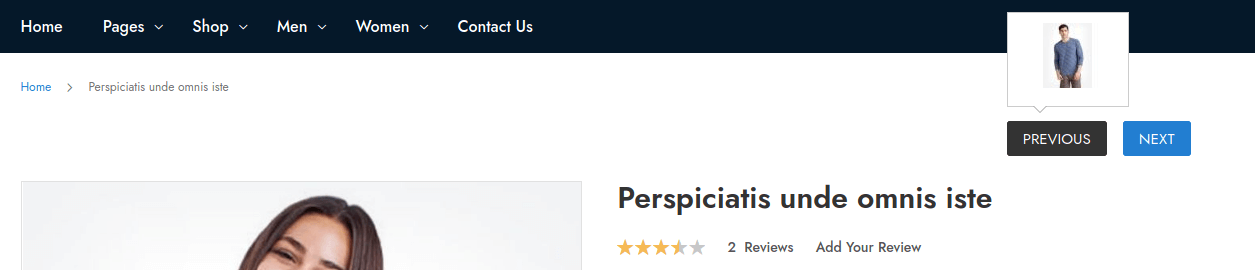
2. Product Navigation With Product Name and Image On Hover
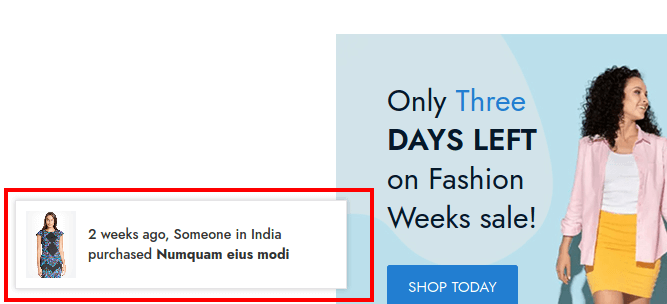
Recent Order Notification
Recent Order Notification extension allows you to show recent sales popups on your website. You can use the recent sales popups to notify visitors of recently bought items or promote the products.
Recent Order Notification Configuration
To set the configuration options navigate to "Etrend Theme > Recent Order Notification > Configuration".
General Configuration
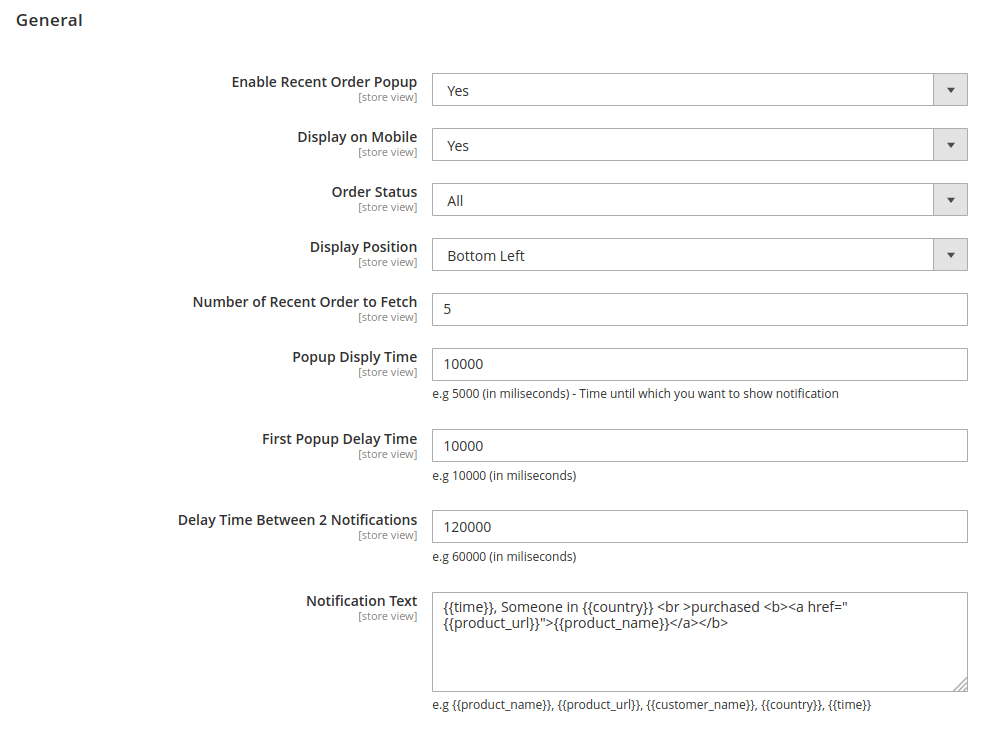
Enable Recent Order Popup: Enable/Disable the extension.
Display on Mobile: Enable/Disable order notification in mobile.
Order Status: Select order status of which you want to show recent orders in the notification popup. Only order with the status "Complete" or all orders.
Display Position: Select the popup position in the frontend.
Number of Recent Order to Fetch: Set limit for the number of recent orders to show in the notification popup.
Popup Disply Time: Set time until which you want to show notification. e.g 5000 (in miliseconds)
First Popup Delay Time: Set delay time, means first appearance of popup after page load. e.g 10000 (in miliseconds)
Delay Time Between 2 Notifications: Set time between two popup notifications. e.g 120000 (in miliseconds)
Notification Text: Set notification message. You can use some pre-defined variables to set the message. e.g {{product_name}}, {{product_url}}, {{customer_name}}, {{country}}, {{time}}.
Message Example:
{{time}}, Someone in {{country}} purchased <b><a href="{{product_url}}">{{product_name}}</a></b>Fake Orders
Using this extension you can also setup the fake orders notifications based on product ID.
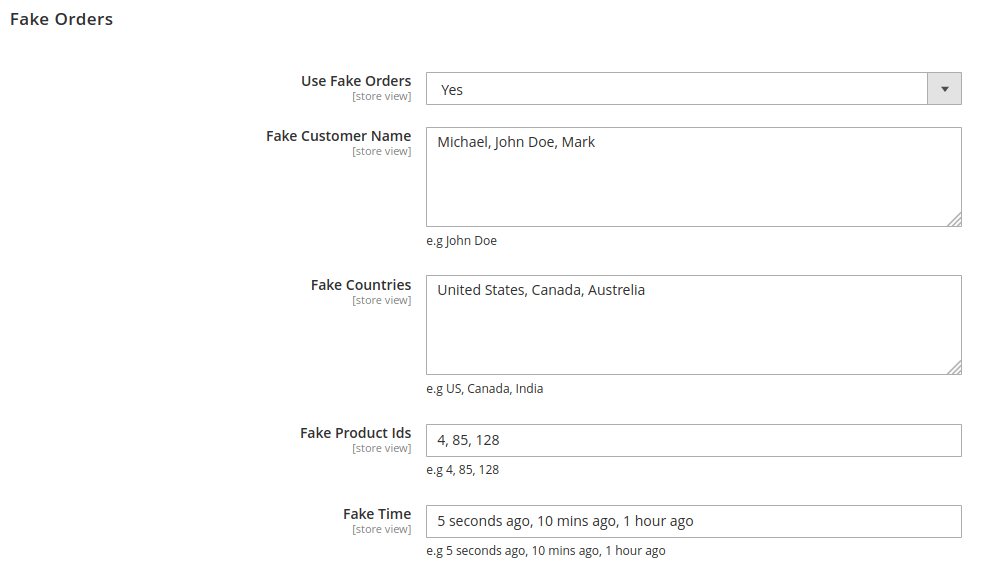
Use Fake Orders: Enable/Disable fake order notification.
Fake Customer Name: Add comma separated fake customer names. e.g Michael, John Doe, Mark
Fake Countries: Add fake countries list comma separated. e.g US, Canada, India
Fake Product Ids: Add product ids comma separated. e.g 4, 85, 128
Fake Time: Add fake time comma separated. e.g 5 seconds ago, 10 mins ago, 1 hour ago
Using this data extension will build the fake order notification.
Design Settings
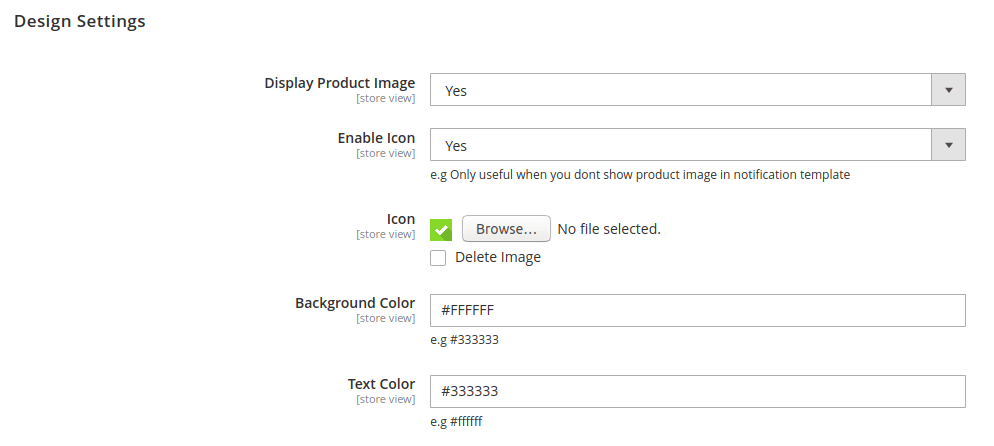
Display Product Image: If "Yes", product image is displayed in notification.
Enable Icon: Enable/Disable icon with in notification popup.
Please Note:
Only useful when you don't show product image in notification template.
Background Color: Set background color of notification popup.
Text Color: Set text color of notification popup.
Frontend:
Client Reviews
Client Reviews Extension provides the functionality to add and manage customer reviews and show them on the website.
How to add Client Review ?
Follow the steps.
Step 1: Navigate to "Etrend Theme > Client Reviews > Manage Reviews".
Step 2: Click on Add New button on top right.
Step 3: Add all the required information as below.
General Information
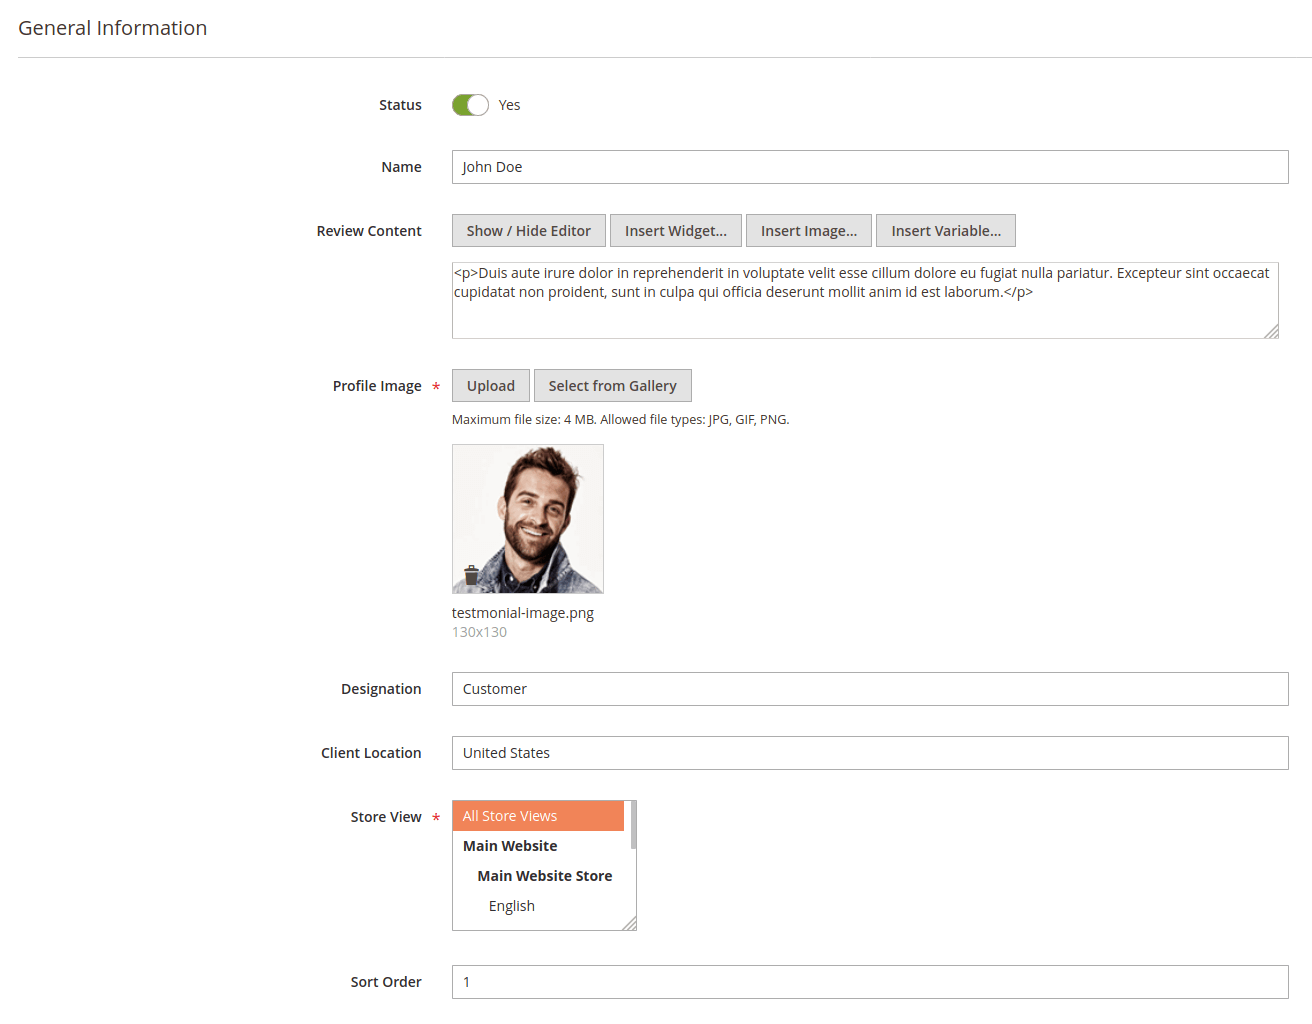
Status: Enable/Disable review.
Name: Add customer name.
Review Content: Add review text.
Profile Image: Upload customer photo.
Designation: Add designation if any.
Client Location: Add from where the customer is? e.g country, state or city.
Store View: Select store view.
Sort Order: Set display order. e.g 1, 2, 3...
Social Information
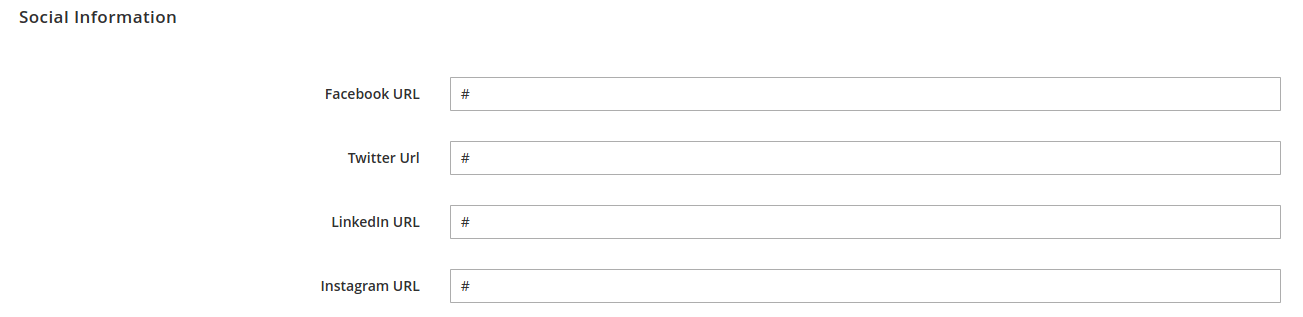
If client has any social profiles then here you can add its links.
Step 4: After adding all the information, Click on Save button at top right.
Step 5: Clear/Flush the cache.
How to add "Client Reviews (Testimonials)" Block on Home Page?
Step 1: Go to edit CMS home page.
Step 2: Click on Insert Widget... button and select "Client Reviews" from "Widget Type" drop-down.
Set all required options then, click on Insert Widget button to add widget in page.
Step 5: Save the page and clear/flush the cache.
Frontend:
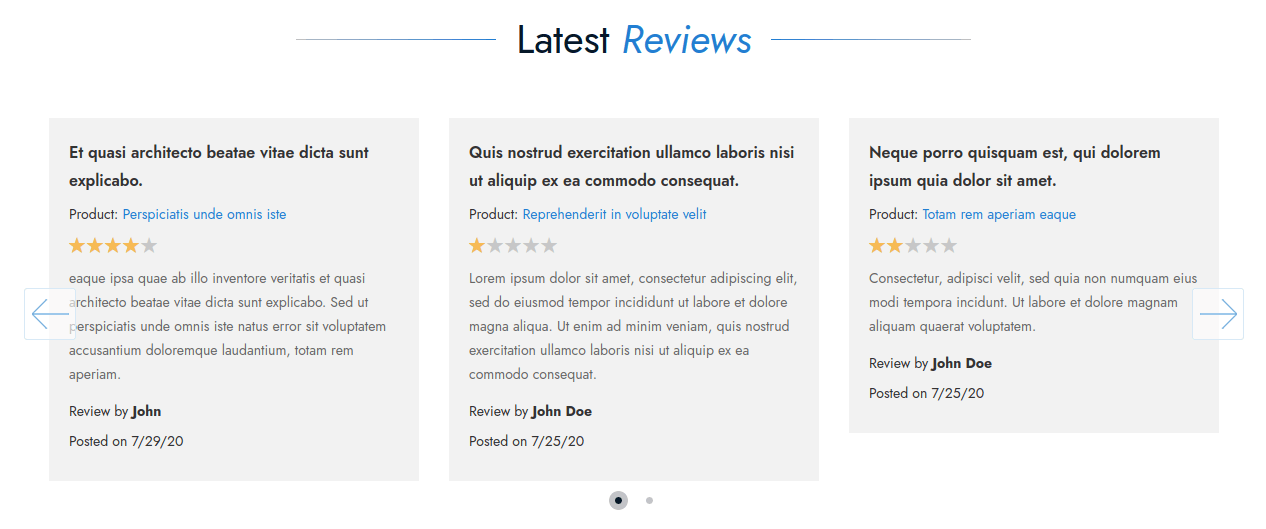
Latest Reviews Widget
Latest Reviews Widget is professionally designed and powerful extension which allows you to display latest product reviews anywhere in your store.
How to add Latest Reviews Widget in any CMS Page or Static Block?
Step 1: Go to edit CMS page or block.
Step 2: Click on Insert Widget... button and select "Latest Reviews Widget" from "Widget Type" drop-down.
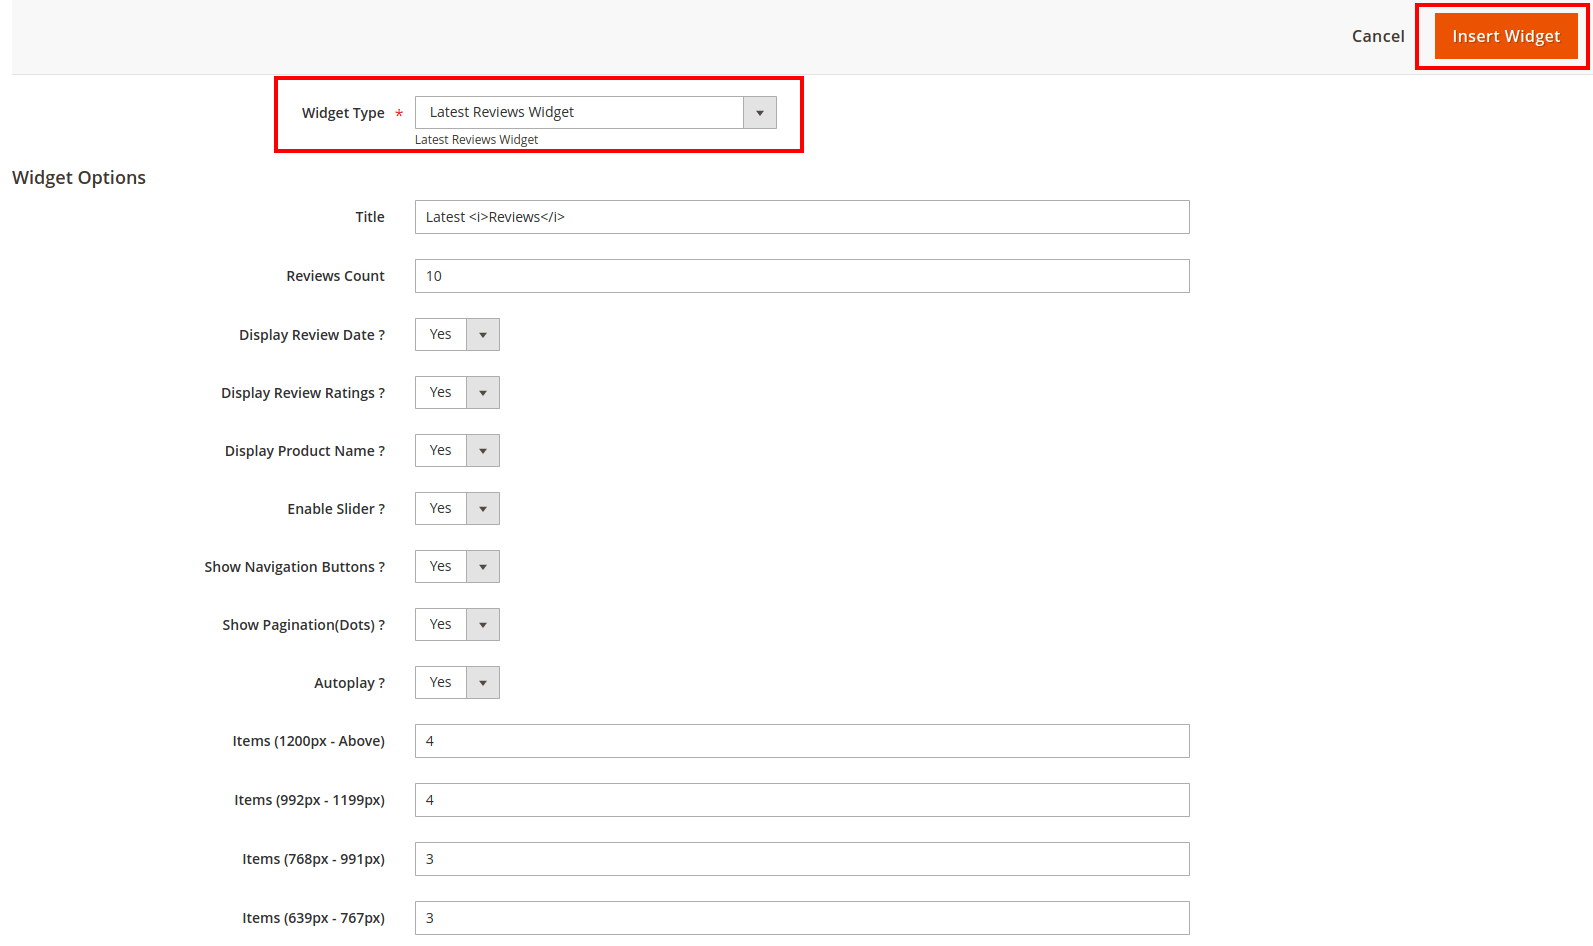
Title: Add title.
Reviews Count: Set the limit that how many reviews you want to display.
Display Review Date ?: If "Yes", it displayed review date.
Display Review Ratings ?: If "Yes", it displayed review's star rating.
Display Product Name ?: If "Yes", it displayed product name.
Enable Slider ?: Enable/Disable slider. If "Yes" then you can set the other slider settings like Autoplay, Show Navigation Buttons etc..
Items: If you do not want to enable the slider then you can set the number of items in single row as per the screen size.
Step 3: After setting all options, click on Insert Widget button to add widget in page or block.
Step 4: Save the page and clear/flush the cache.
Frontend:
Useful Technical Blogs
- How to Get All Regions of Country by Country Code in Magento 2
- How to get CMS Block Collection in Magento 2
- How to Remove Block From Layout on Specific Condition in Magento 2
- Magento 2 - How To Get System Configuration Value in phtml File
- Magento 2 - How to Hide Admin Menu Based on System Configuration
- How to Remove Block From Layout on Specific Condition in Magento 2
- Magento 2 - How to Get Customer Data By Customer ID
- Magento 2 - How to Add Date Picker in Custom Form
- Magento 2 - How to Resize Product Image
FAQs
Best Selling Magento 2 Themes


Help & Support
Please, if you have any questions, run into any issues or just need some help, do not hesitate to contact us via our Support Center. We believe in providing the best support possible, and we monitor our Support center just about daily.
Your feedback is absolutely welcome!